
The Heart of the Bread
Your sourdough starter is the heart of this bread. It is a living thing. I call mine “Bubbles.” You must feed it before you bake.
An active starter is bubbly and happy. It smells a little sour and sweet. That smell means it is ready to work. It makes the bread rise and gives it flavor.
A Good, Strong Hug
Mixing the dough is simple. You just stir it all together. Then the real fun begins. You have to give the dough a good, strong hug.
This is the stretch and fold. You pull the dough up and tuck it in. You do this many times over a few hours. It builds strength, like exercise for your bread.
This matters because it builds the bread’s structure. It helps trap air for a light, airy loaf. What name would you give your sourdough starter?
The Long, Slow Nap
After all that stretching, the dough is tired. It needs a long nap. Let it sit until it doubles in size. This is called bulk fermenting.
I once forgot about my dough. It napped for ten whole hours. I was so worried. But it turned into the fluffiest bread I ever made. I still laugh at that.
This slow rise matters. It lets the flavor get deep and tasty. Rushing it makes for a sad, flat loaf.
Shaping Your Loaf
Now you shape the dough into a ball. Be gentle with it. You are tucking it into a tight, cozy bundle.
Then it goes into the fridge for the night. This cold proof makes the flavor even better. It is the secret to great sourdough. Doesn’t that smell amazing?
Fun fact: The basket you proof it in is called a banneton. It gives the bread its pretty lines. Do you like a round loaf or a long one?
The Big Bake
The next day, your oven must be very hot. I heat my dutch oven for a full hour. This gives the bread a burst of heat.
You score the top with a razor. This is like letting the bread take its first deep breath in the oven. It can puff up and grow. Then you bake it until it is golden brown.
The Hardest Part
The hardest part is waiting for it to cool. The bread is still cooking inside. If you cut it too soon, it gets gummy.
But when you wait, you are rewarded. You get that perfect crunch when you slice it. The inside is soft and full of holes.
What is your favorite thing to put on a warm slice of bread? I love a little butter and honey. Tell me yours.
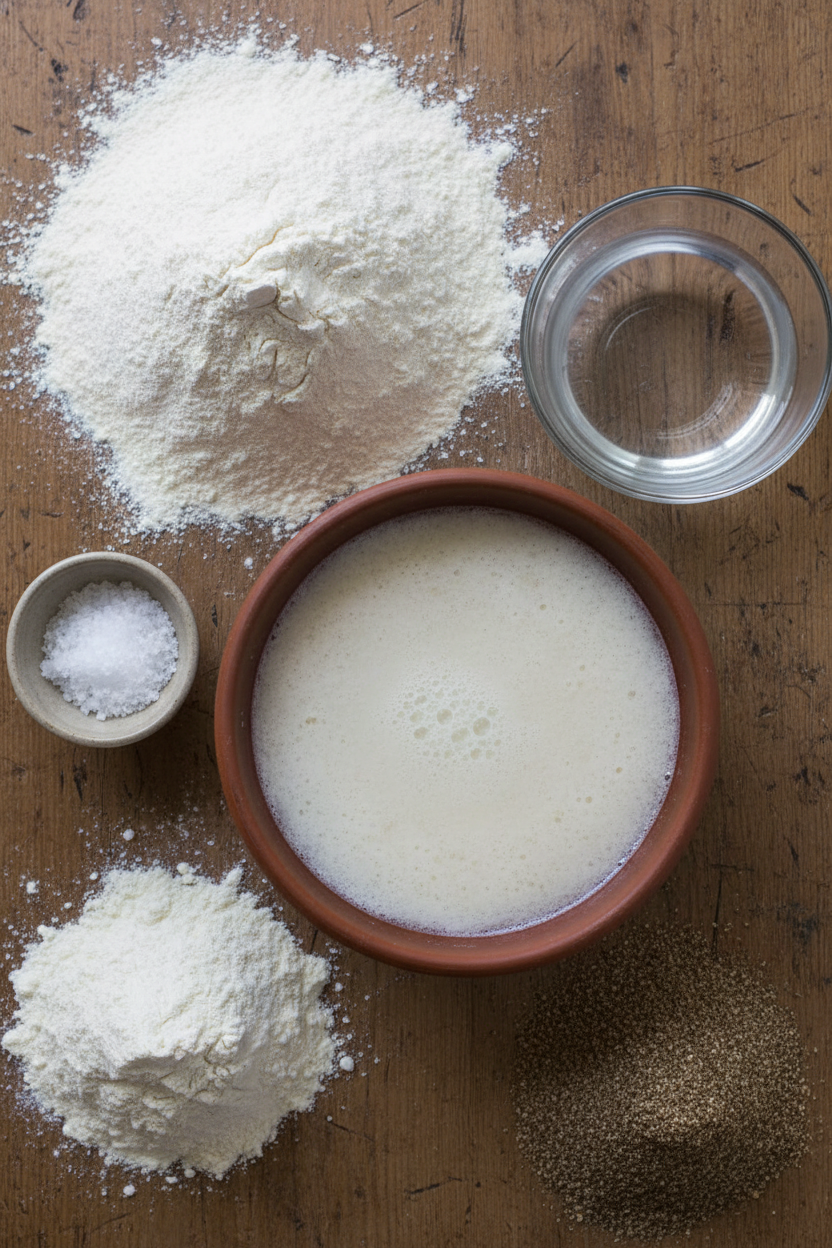
Ingredients:
| Ingredient | Amount | Notes |
|---|---|---|
| Bread Flour | 250 grams | |
| White Spelt Flour | 175 grams | |
| Whole Spelt Flour | 100 grams | |
| Sourdough Starter | 100 grams | Active and bubbly |
| Water | 325 grams | Warm |
| Salt | 10 grams |
My Cozy Kitchen Bread
There is nothing quite like the smell of baking bread. It makes a house feel like a home. My grandson says it’s the best smell in the world. I have to agree with him.
This spelt sourdough is my latest favorite. It has a gentle, nutty taste. It’s not too heavy, but still so satisfying. Let’s bake a loaf together, you and I.
Step 1: First, wake up your sourdough starter. It should be bubbly and happy. Mix it with the warm water and all the flours. Add the salt last. Stir until it becomes a shaggy dough. It will look messy, and that’s just fine.
Step 2: Now, let the dough rest for half an hour. This lets the flour drink up the water. Cover the bowl with a damp towel. I use my favorite red-checked one. It feels like putting the dough to bed for a little nap.
Step 3: Time for some gentle stretching. Pull a corner up and fold it over. Turn the bowl and do it again. We will do this six times. (My hard-learned tip: wet your hands first! The dough won’t stick as much). This makes the bread strong and airy.
Step 4: Let the dough sit until it doubles in size. This can take many hours. I put it in a warm spot. I sometimes read a book nearby. It’s a slow, patient process. Good bread can’t be rushed.
Step 5: Shape the dough into a smooth ball. Let it rest on the counter for a bit. Then, we shape it again, folding the sides in. It’s like tucking a child into bed. Gently pull it towards you to tighten the surface.
Step 6: Place the dough in a floured bowl, seam-side up. Cover it and put it in the fridge overnight. The next day, heat your oven and a Dutch oven very hot. This gives the bread a great rise and crust. What’s your favorite thing to put on warm bread? Share below!
Step 7: Take the dough from the fridge. Turn it onto parchment paper. Dust it with flour and make a quick slash on top with a razor. This is called scoring. It lets the bread expand beautifully in the oven.
Step 8: Bake it with the lid on for 20 minutes. Then, take the lid off. Bake for another 20 minutes until it’s golden and sounds hollow when tapped. Let it cool completely. I know, the wait is the hardest part!
Cook Time: 40 minutes
Total Time: 18-24 hours (mostly resting)
Yield: 1 beautiful loaf
Category: Baking, Bread
Three Tasty Twists
Once you master the basic loaf, you can have some fun. I love adding little extras to my dough. It makes each loaf a new surprise. Here are a few ideas I play with.
Sunflower & Pumpkin Seed Crunch. Mix a handful of seeds right into the dough. It adds a wonderful crunch. It tastes like a sunny garden.
Sweet Cinnamon Swirl. Roll the dough out flat. Sprinkle it with cinnamon and sugar. Then roll it back up before the final shaping. Perfect for toast with butter.
Rosemary & Olive Delight. Chop up some fresh rosemary and pitted olives. Fold them in during the stretching step. Doesn’t that smell amazing? Which one would you try first? Comment below!
Serving Your Masterpiece
A warm slice of this bread is a meal by itself. But it’s even better with friends. I love toasting a thick slice for breakfast. I top it with mashed avocado and a sprinkle of salt. It’s so simple and good.
For lunch, I make an open-faced sandwich. A thick layer of creamy goat cheese and thin cucumber slices. Or a spoonful of my homemade tomato jam. It’s a little taste of summer.
What should we drink with it? A cup of hot herbal tea is my go-to. My husband prefers a cold, crisp lager. Both are just wonderful. Which would you choose tonight?

Keeping Your Sourdough Fresh
Let’s talk about keeping your bread lovely. A bread box or a paper bag works best. It keeps the crust just right.
For the freezer, slice the loaf first. This way you can take out one piece. Just pop it in the toaster.
I once froze a whole loaf. It was a rock. I had to let it thaw for hours. Slicing it first is much smarter.
Batch cooking means you always have bread. This saves you so much time. You can enjoy homemade bread anytime.
Have you ever tried storing it this way? Share below!
Simple Sourdough Solutions
Is your dough not rising? Your kitchen might be too cold. Find a warm spot for your bowl.
I remember when my first loaf was flat. My starter was just too young. A strong, bubbly starter is the key.
Is your bread too dense? You might not have let it rest enough. Patience makes a lighter, airy loaf.
Is the crust too hard? You baked it with the lid off too long. Next time, check it a few minutes early.
Fixing these small things builds your confidence. You learn more with every single loaf you bake. Which of these problems have you run into before?
Your Sourdough Questions Answered
Q: Can I make this gluten-free?
A: Spelt does have gluten. For gluten-free, try a special flour blend.
Q: Can I make the dough ahead?
A: Yes. The long fridge proof is perfect for this. Bake it in the morning.
Q: What if I don’t have spelt flour?
A: Use all bread flour instead. The bread will still be wonderfully tasty.
Q: Can I make a bigger batch?
A: You can double the ingredients. Just use a very large bowl for mixing.
Q: Is dusting with flour necessary?
A: No, it is just for looks. It makes your scoring pattern stand out. Which tip will you try first?
From My Kitchen to Yours
I hope you love baking this bread. There is nothing quite like a warm slice. It fills your whole house with a lovely smell.
*Fun fact: Sourdough is one of the oldest forms of baking. People made it over five thousand years ago.
I would be so happy to see your creation. Have you tried this recipe? Tag us on Pinterest!
Happy cooking!
—Grace Ellington.
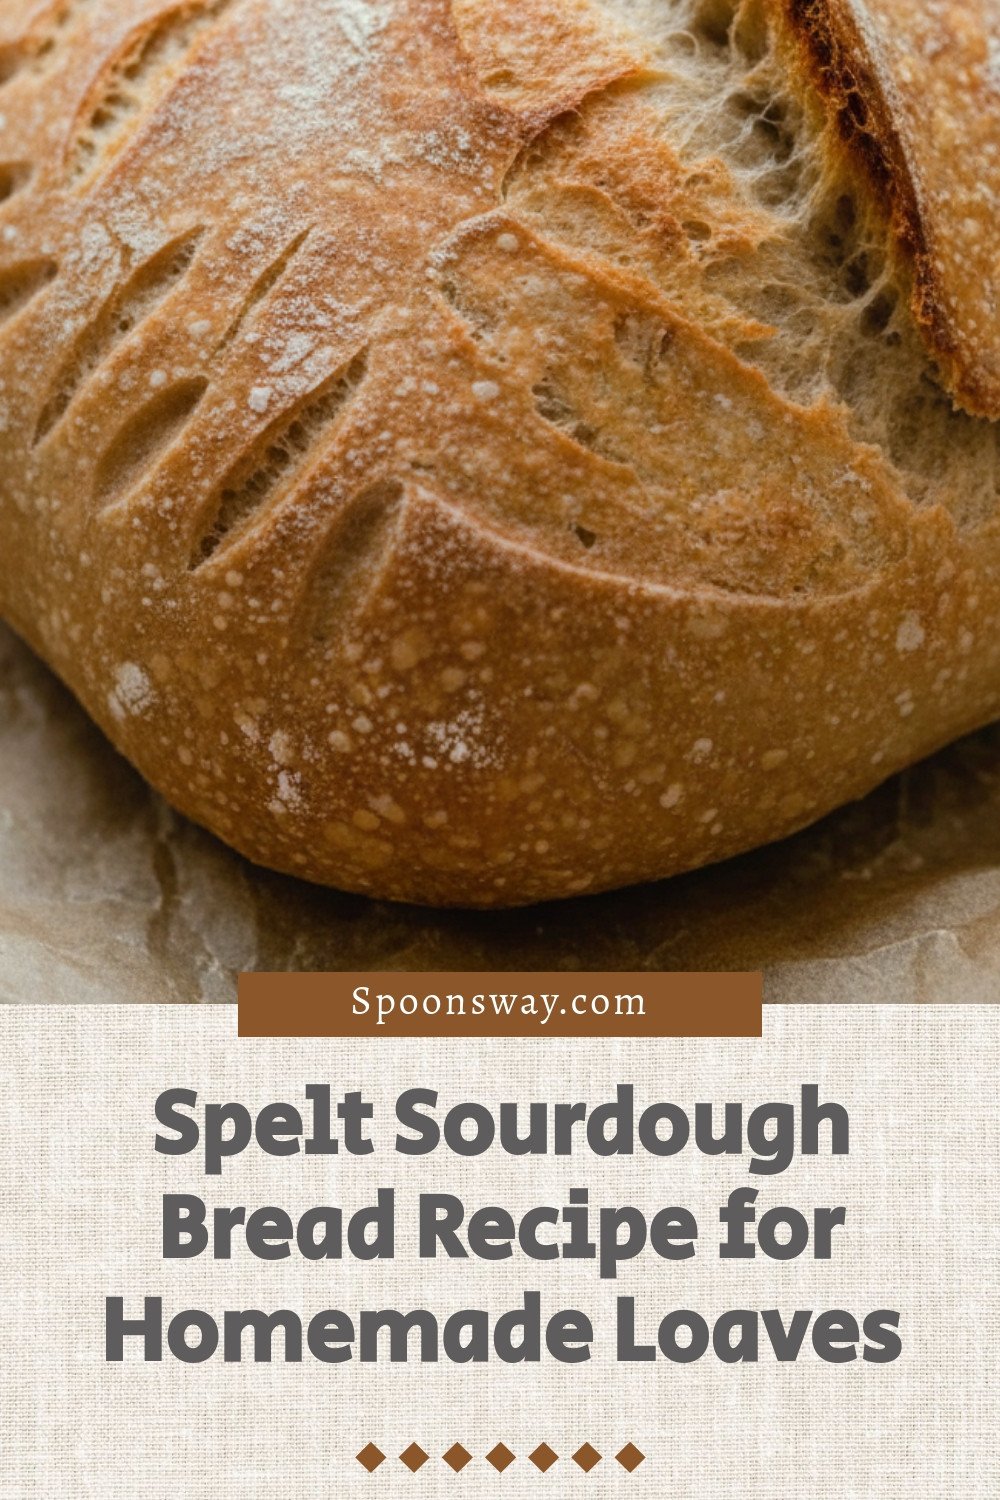

Spelt Sourdough Bread Recipe for Homemade Loaves
Description
A guide to creating delicious, homemade spelt sourdough loaves with a perfect crust and airy crumb.
Ingredients
Instructions
- Feed a sourdough starter 4-12 hours before starting the bread, ensuring it is active and bubbly.
- To a large bowl, add warm water, flours, sourdough starter, and salt. Stir until well combined.
- Cover with damp towel, lid, or plastic wrap while resting. Allow to rest for 30 minutes for the water to hydrate the flour.
- Grab the edge of the dough firmly and pull up, stretching it upwards. Then push the dough that is in your hands back into the center. Turn the bowl about a quarter turn and do this stretch and fold for a total of 3-4 times. This is considered one round of stretch and folding. Repeat for a total of 6 rounds. First 3 stretch and folds – every 15 minutes. Last 3 stretch and folds – every 30 minutes.
- Cover with a wet towel or plastic wrap and allow the dough to bulk-ferment until doubled. This could be anywhere from 3-8 hours depending on the temperature and maturity of your sourdough starter.
- Shape the dough into a ball by gently spinning it toward you. Set out 20-30 minutes uncovered on the counter.
- Turn over the dough (the skin that just developed down) onto a lightly floured surface and shape. I pull each side and fold into the dough, then pull the dough into a shoelace pattern and roll up. Gently pull the dough against the countertop towards you.
- Transfer to a floured banneton or bowl with tea towel, seam side up. Cover with plastic and proof 12-15 hours (or overnight) in refrigerator.
- The next day, preheat dutch oven to 500 degrees for 1 hour. Remove dough from the fridge immediately before scoring and baking.
- Turn over on parchment paper. Dust with flour on top to make the scoring pattern stand out more. Optional. Score with a razor.
- Place the parchment paper and dough into the preheated dutch oven and add lid. Place the dutch oven into the oven and turn down the heat to 475.
- Bake for 20 minutes with lid on. Take lid off and bake for another 20 minutes or until golden brown. Allow to cool before slicing.
Notes
- Bulk fermentation time can vary greatly depending on the temperature of your kitchen and the strength of your starter.