
My First Cheese Straw
I made my first cheese straws when I was a girl. My hands were so small. The dough felt cool and crumbly. I remember my mama showing me how to roll it. We laughed when my square looked more like a lumpy circle. I still laugh at that.
These little pastries are a Southern hello. They say “welcome” and “sit a spell.” That matters. Food is more than eating. It is about sharing time with people you love. What was the first thing you ever baked with a grown-up?
The Magic of Sharp Cheddar
You must use extra-sharp cheddar. Mild cheese just won’t sing. The sharp taste is the star of the show. It bakes into something rich and cozy. Doesn’t that smell amazing? The cayenne pepper is a tiny whisper of heat. It wakes up your tongue just a little.
Fun fact: The orange color in cheddar often comes from a natural dye called annatto. It comes from a tree seed! This recipe matters because it teaches balance. The salty cheese, the spicy pepper, the buttery crust. They all have to work together.
Rolling with Love, Not Fear
Do not be scared of the dough. It might seem dry at first. Just keep working it with your hands. Your warmth helps it come together. Pat it into a square first. Then roll it out to a ten-inch square. It does not have to be perfect.
I always think of my mama’s hands when I roll dough. Her hands were strong and kind. That is the spirit to cook with. Are you a neat roller, or do you like a little messy creativity?
The Fork Trick and a Neat Edge
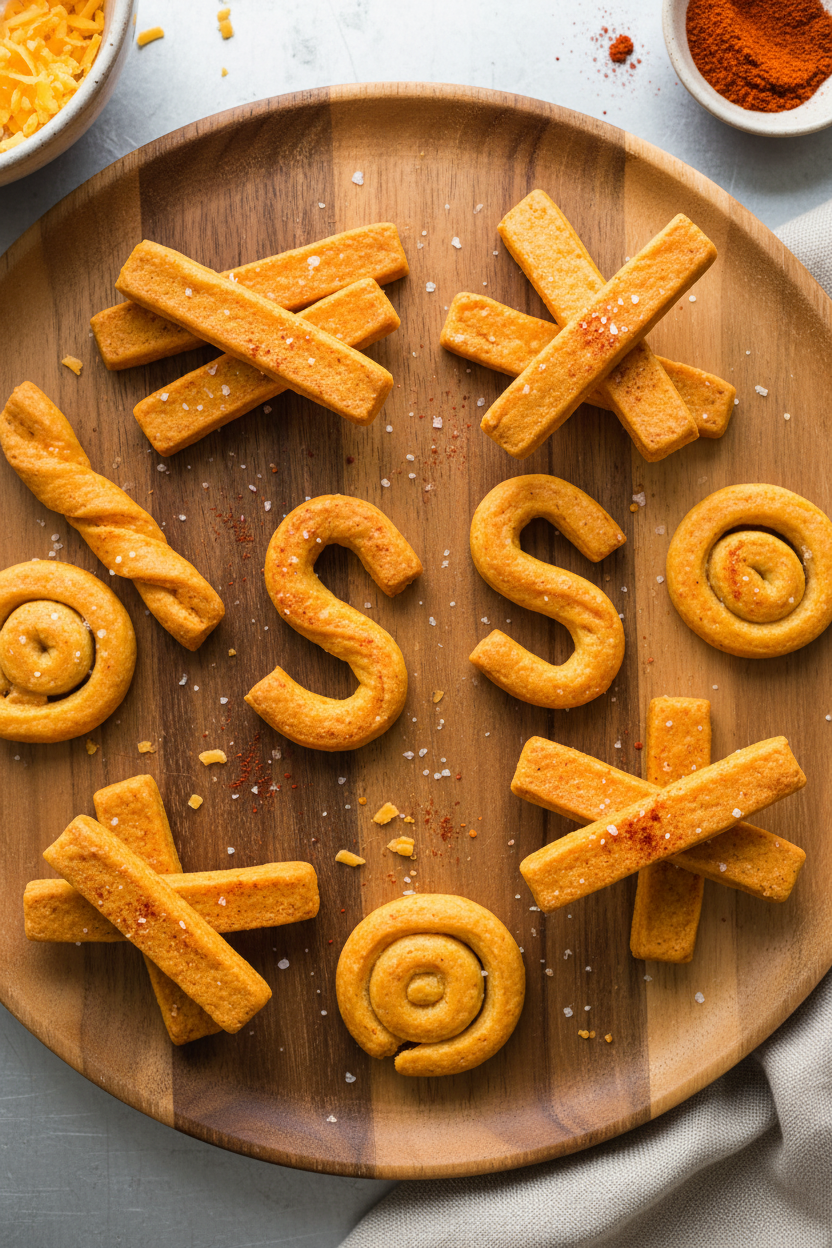
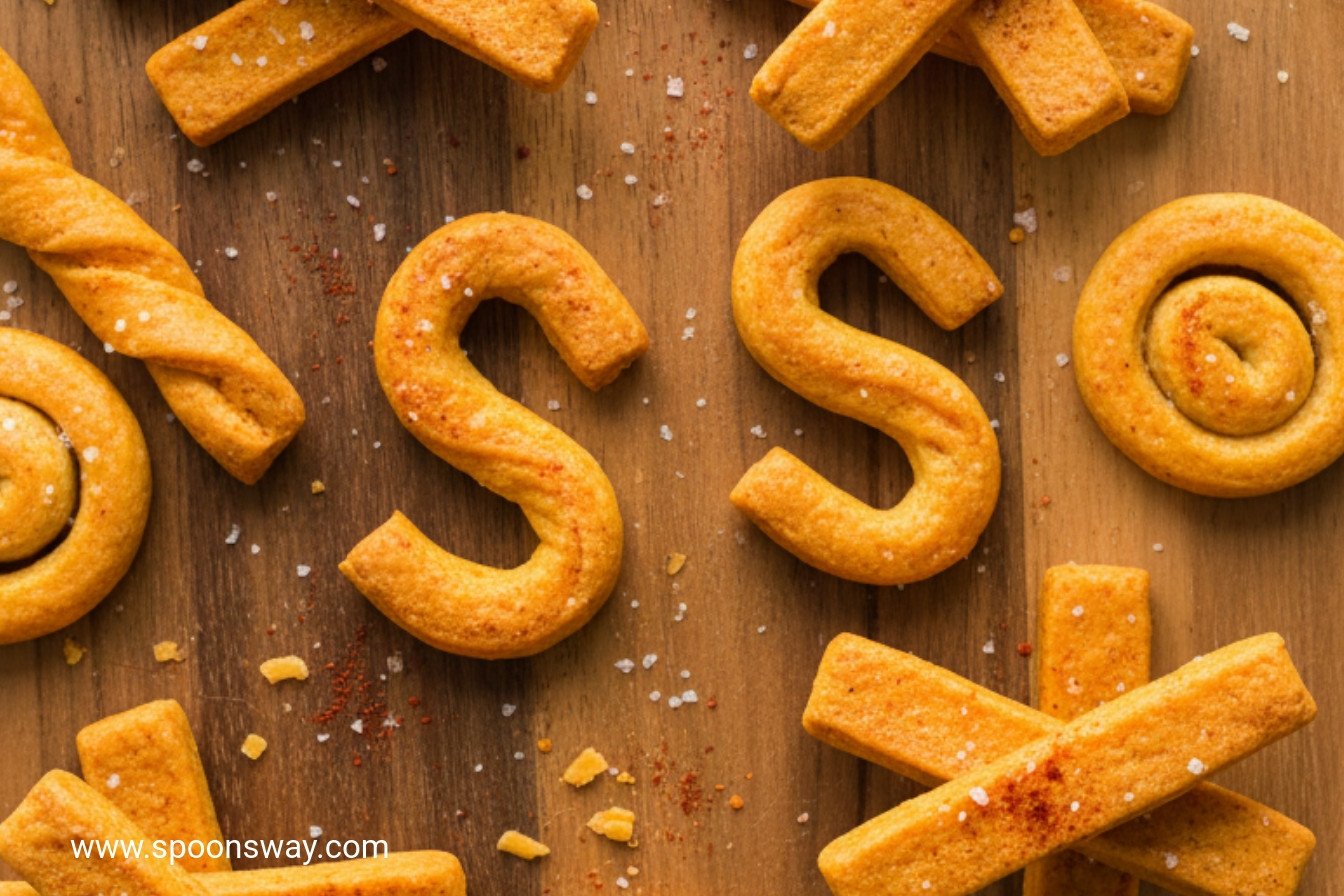
Here is the fun part. Take a fork. Drag the rounded back of it across the dough. You will make pretty lines. This is not just for looks. Those little ridges get extra crispy in the oven.
Then, trim the messy edges. This makes a neat square. It feels good to make things tidy. Those scraps are the cook’s treat. I always pop a few in my mouth. Do you save the cookie dough scraps too?
Watching Them Turn Golden
Space the straws out on the sheet. They need room to breathe. Watch them through the oven window. They will slowly turn a light gold. This is the most important step. Let them cool completely on the sheet.
They get crisp as they cool. If you bite one too soon, it might bend. Patience makes them snap. This matters in cooking and in life. Good things often need a little rest. What is your favorite snack to eat while you wait for something to bake?
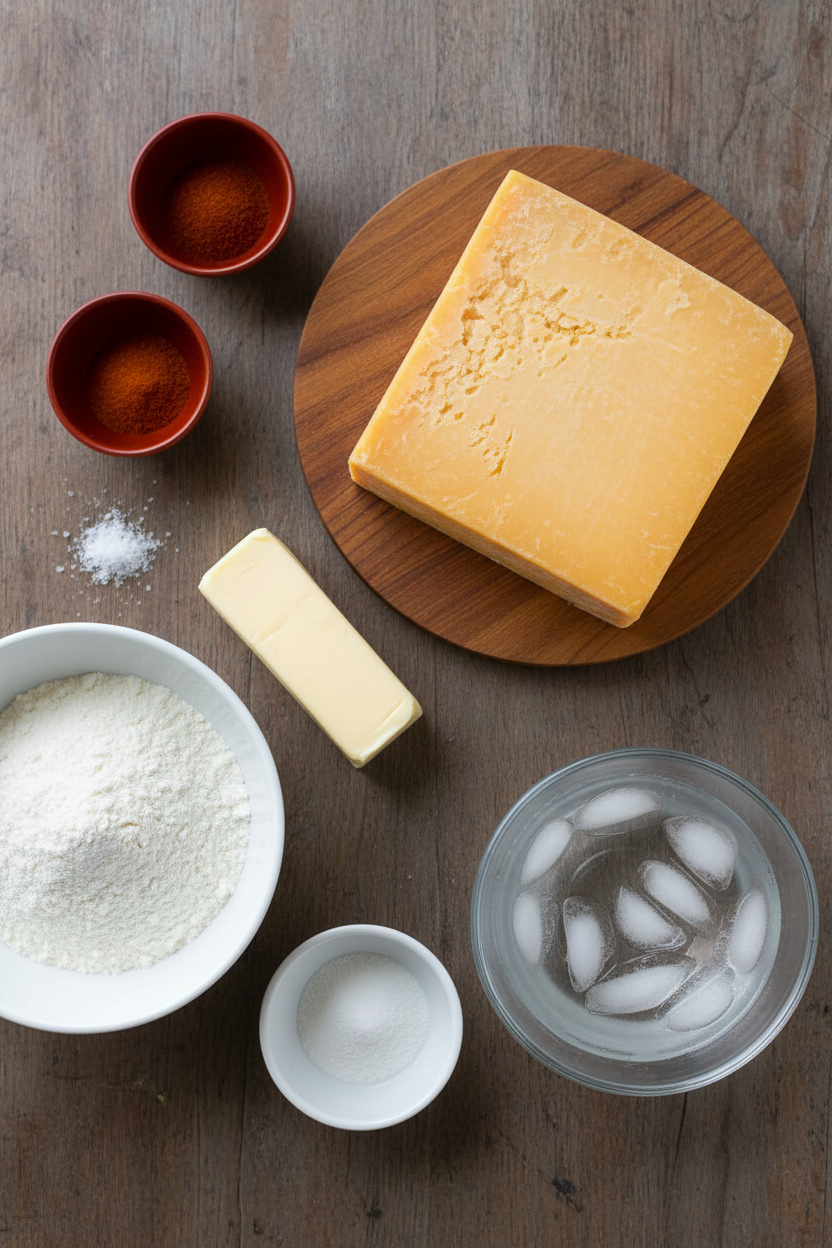
Ingredients:
| Ingredient | Amount | Notes |
|---|---|---|
| Extra-sharp cheddar cheese, shredded | 8 ounces (227 grams / 2 cups) | |
| All-purpose flour | 1 ½ cups (7½ ounces / 213 grams) | |
| Unsalted butter | 8 tablespoons | Cut into 8 pieces and chilled |
| Salt | ¾ teaspoon | |
| Paprika | ¾ teaspoon | |
| Baking powder | ½ teaspoon | |
| Cayenne pepper | ¼ teaspoon | |
| Ice water | 3 tablespoons |
My Southern Cheese Straws: A Little Taste of Sunshine
Hello, my dear. Come sit a spell. Let’s make my cheese straws. They are a little piece of my childhood. I can still see my Aunt May rolling them out on her big wooden table. The kitchen smelled like sharp cheese and warm butter. Doesn’t that smell amazing? These are perfect for a party or a quiet afternoon. They are crispy, cheesy, and have just a tiny kick. You will love them. Let’s get our hands a little dusty with flour.
Step 1: Prepare the Dough
First, get your oven ready. Move the rack to the middle. Heat it to 350 degrees. Line your baking sheet with parchment paper. Now, the fun part. Put almost everything in your food processor. That’s the cheese, flour, butter, and all the spices. Let it whir until it looks like damp sand. Then, add the ice water. Process it again until a shaggy dough forms. (My hard-learned tip: truly use ice water. It keeps the butter cold for flaky straws!).
Step 2: Roll It Out
Dump your dough onto a floured counter. Give it just a few gentle kneads. Two or three turns is plenty. Pat it into a rough square. Then, roll it into a bigger, neater square. Aim for about 10 inches wide and a quarter-inch thick. Flour your rolling pin if it sticks. I still laugh at the lopsided squares I made as a girl. They tasted just as good!
Step 3: Create the Lines
Turn your dough square. Make sure one edge is straight with the counter. Now, take a fork. Use the rounded back of it. Gently drag the tines across the whole surface. This makes pretty lines. It also helps the straws bake evenly. Why do you think we add those lines? Share below!
Step 4: Cut the Straws
Time to make them neat. Use a pizza cutter to trim off the messy edges. This gives you a perfect square. Don’t be sad about the trimmings. We can bake those little bits, too. They are the cook’s treat! Cut the square into three even rectangles. Then, slice each rectangle into skinny strips. Follow the lines you made with the fork.
Step 5: Bake & Cool
Place your straws on the baking sheet. Give them a little space to breathe. Bake them for about half an hour. Remember to turn the pan halfway through. You will know they are done when the edges turn a light gold. Let them cool completely on the sheet. This is the hardest part—waiting! But it makes them super crispy.
Cook Time: 30–35 minutes
Total Time: 1 hour, plus cooling
Yield: About 48 cheese straws
Category: Appetizer, Snack
Three Fun Twists to Try
Once you master the classic, you can play. Here are three of my favorite twists. They are all simple and delicious.
- Everything Bagel Style: Brush straws with egg wash. Sprinkle with everything bagel seasoning before baking.
- Herb Garden Delight: Add a tablespoon of fresh, chopped rosemary or thyme to the dough.
- Smoky Chipotle: Swap the paprika for smoked paprika. Use just a pinch more cayenne for warmth.
Which one would you try first? Comment below!
Serving Them Up Right
These straws are wonderful all on their own. But I love to make a little spread. Pile them high in a mason jar for a cute look. Or fan them out on a pretty plate. They are lovely with a bowl of tomato soup for dipping. Or next to a fresh green salad.
For drinks, a glass of chilled white wine pairs beautifully. For a cozy, non-alcoholic treat, try sparkling apple cider. The bubbles cut through the rich cheese so nicely. Which would you choose tonight?
Keeping Your Cheese Straws Crisp
Let’s keep your cheese straws tasting fresh. First, cool them completely. I learned this the hard way. I once stored warm straws in a tin. They turned soft and sad overnight.
Store them in an airtight container at room temperature. They will stay good for a week. You can also freeze the dough. Just roll it into a log and wrap it tightly. Slice and bake whenever you want a quick snack.
Batch cooking saves so much time. Make a double batch of dough. Bake one now and freeze the rest for later. This matters because good food should be easy to share. You will always be ready for surprise guests. Have you ever tried storing it this way? Share below!
Simple Fixes for Common Snags
Sometimes dough can be tricky. If your dough is too crumbly, add a teaspoon more ice water. If it is too sticky, add a sprinkle more flour. I remember when my first batch spread too much. My butter was too warm.
Always use cold butter straight from the fridge. If your straws are not browning evenly, rotate your baking sheet. This simple step ensures every straw gets golden. Do not skip trimming the edges of your dough square. It gives you neat, pretty straws.
Fixing small problems builds your cooking confidence. You learn by doing. It also makes the flavor perfect every time. Your cheese straws will be just right. Which of these problems have you run into before?
Your Cheese Straw Questions, Answered
Q: Can I make these gluten-free? A: Yes. Use a good gluten-free flour blend. The results are still tasty.
Q: How far ahead can I make the dough? A: You can make it two days ahead. Keep it wrapped in the fridge.
Q: What cheese can I swap for cheddar? A: Try sharp gouda or pepper jack. Fun fact: The first cheese straws were made to use up leftover biscuit dough!
Q: Can I double the recipe? A: Absolutely. Just mix it in two batches for best results.
Q: Any optional add-ins? A: A pinch of garlic powder or smoked paprika is lovely. Which tip will you try first?
From My Kitchen to Yours
I hope you love making these cheese straws. They always remind me of my grandmother’s house. The kitchen was full of laughter and good smells.
Now it is your turn to make memories. Share them with someone you love. I would be so happy to hear about your baking adventure. Have you tried this recipe? Give your experience in the comments.
Happy cooking!
—Grace Ellington.
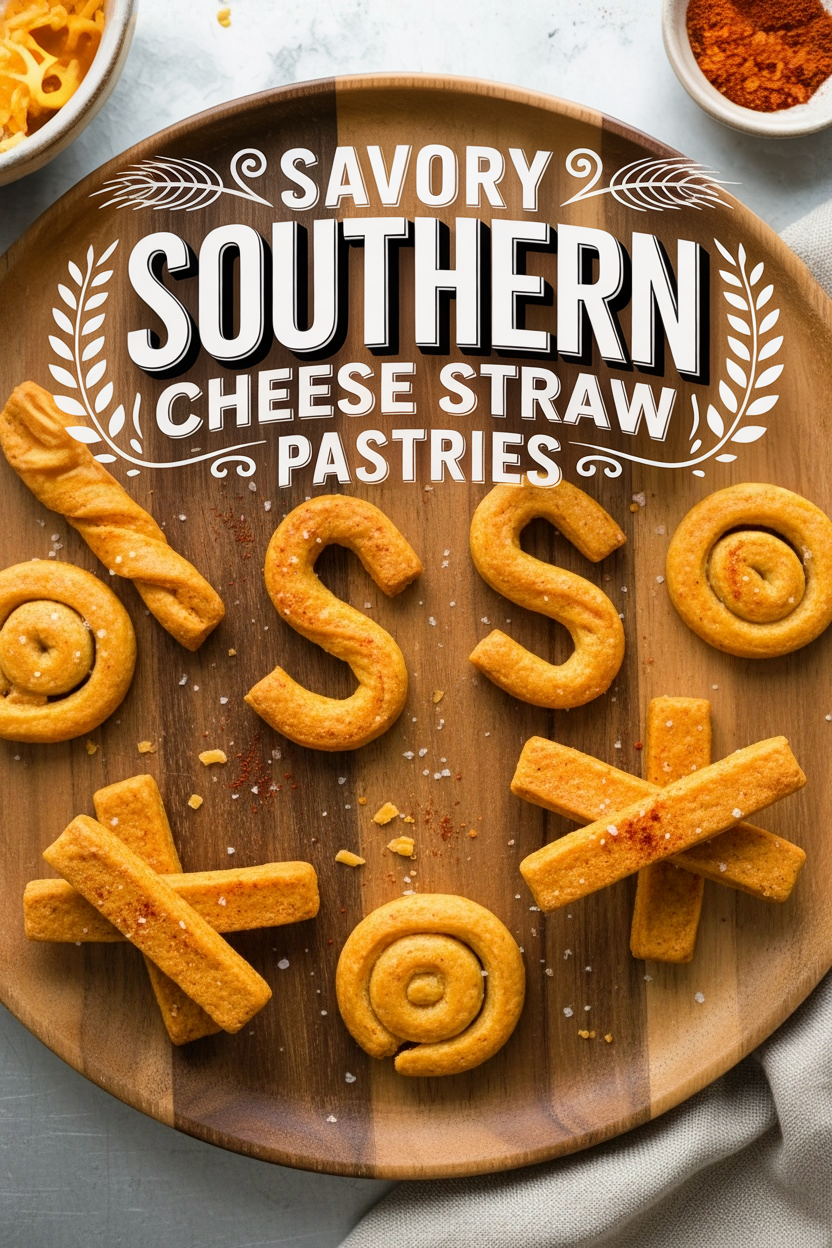
Savory Southern Cheese Straw Pastries
Description
Classic Southern savory pastry straws made with sharp cheddar and a hint of spice.
Ingredients
Instructions
- Adjust oven rack to middle position and heat oven to 350 degrees. Line rimmed baking sheet with parchment paper. Process cheddar, flour, butter, salt, paprika, baking powder, and cayenne in food processor until mixture resembles wet sand, about 20 seconds. Add ice water and process until dough ball starts to form, about 25 seconds.
- Turn out dough onto lightly floured counter. Knead briefly until dough fully comes together, 2 to 3 turns. Using your hands, pat dough into rough 4-inch square. Roll dough into 10-inch square, about ¼ inch thick, flouring counter as needed to prevent sticking.
- Position dough so 1 edge is parallel to edge of counter. Using rounded side of fork, drag tines across entire surface of dough to make decorative lines.
- Using pizza cutter or chef’s knife, trim away and discard outer ½ inch of dough to make neat square. Cut dough into 3 equal pieces perpendicular to decorative lines. Working with 1 section of dough at a time, cut into ½-inch-wide strips in direction of lines.
- Evenly space cheese straws on prepared sheet, about ½ inch apart. Bake until edges of straws are light golden brown, 30 to 35 minutes, rotating sheet halfway through baking. Let straws cool completely on sheet. Serve. (Straws can be stored in airtight container at room temperature for up to 1 week.)
Notes
- For a spicier kick, increase the cayenne pepper to ½ teaspoon. Ensure butter and water are very cold for the flakiest texture.