The Secret to a Calm Thanksgiving
Thanksgiving should be about family, not fuss. I learned this the hard way. One year, I was so busy in the kitchen I missed the whole parade. I still laugh at that. Now I do most of the work two days early.
This recipe lets you cook the turkey and make the gravy ahead. On the big day, you just warm it up. This matters because it gives you time to sit and talk. You can actually enjoy your own party. What’s your favorite part of Thanksgiving day?
A Little Story About Flavor
My grandpa always said good gravy needs a good story. He was right. The secret is in the roasting pan. You cook the turkey right on top of chopped onions, carrots, and celery.
All those little browned bits in the pan are flavor gold. We scrape them all into the pot for the stock. Doesn’t that smell amazing? That long, slow simmer turns simple broth into liquid magic. It’s the heart of your gravy.
Why We Do It This Way
Roasting the turkey pieces separately is a smart trick. The legs need more time than the breast to get tender. This way, nothing dries out. Everything cooks just right.
Letting the cooked turkey cool completely is key. Then you wrap it tight and let it rest in the fridge. This matters because it lets the meat relax. It keeps all its wonderful juices inside. Have you ever tried cooking part of a big meal ahead of time?
The Big Finish
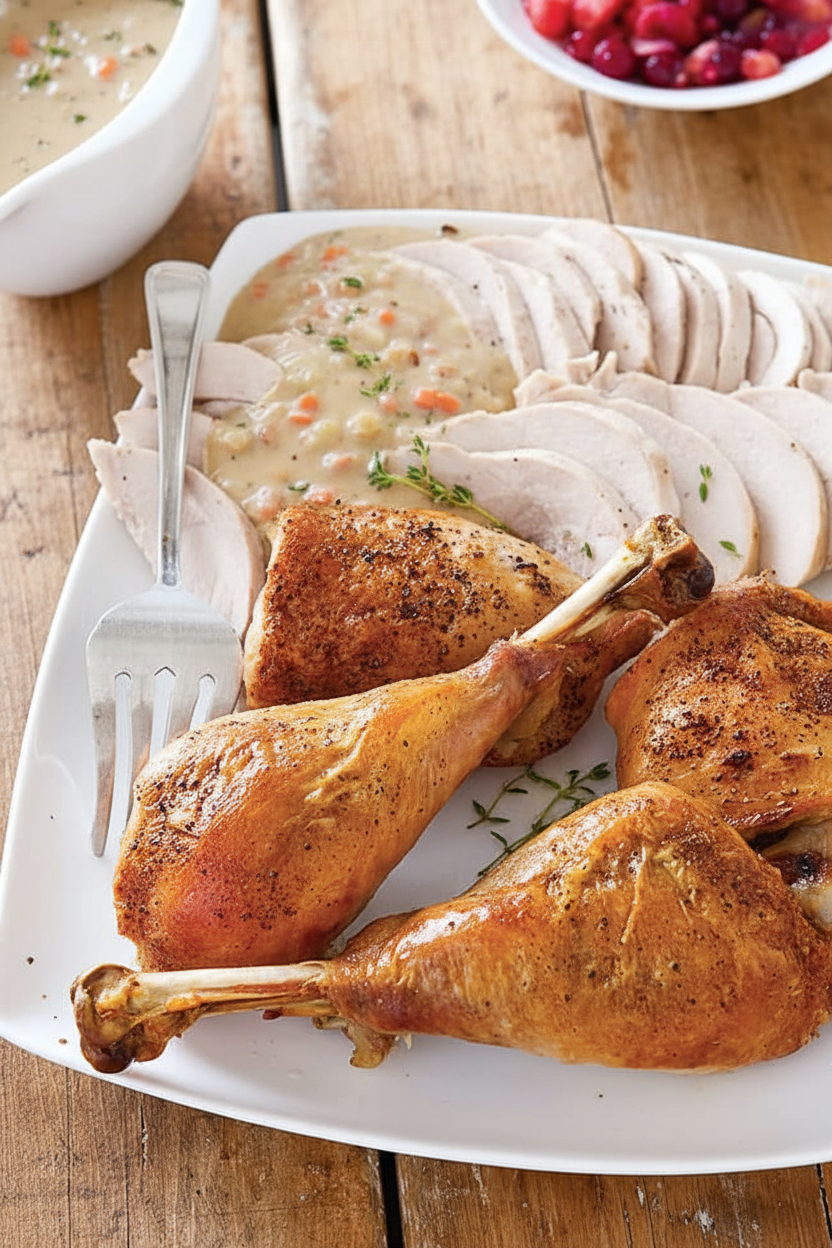
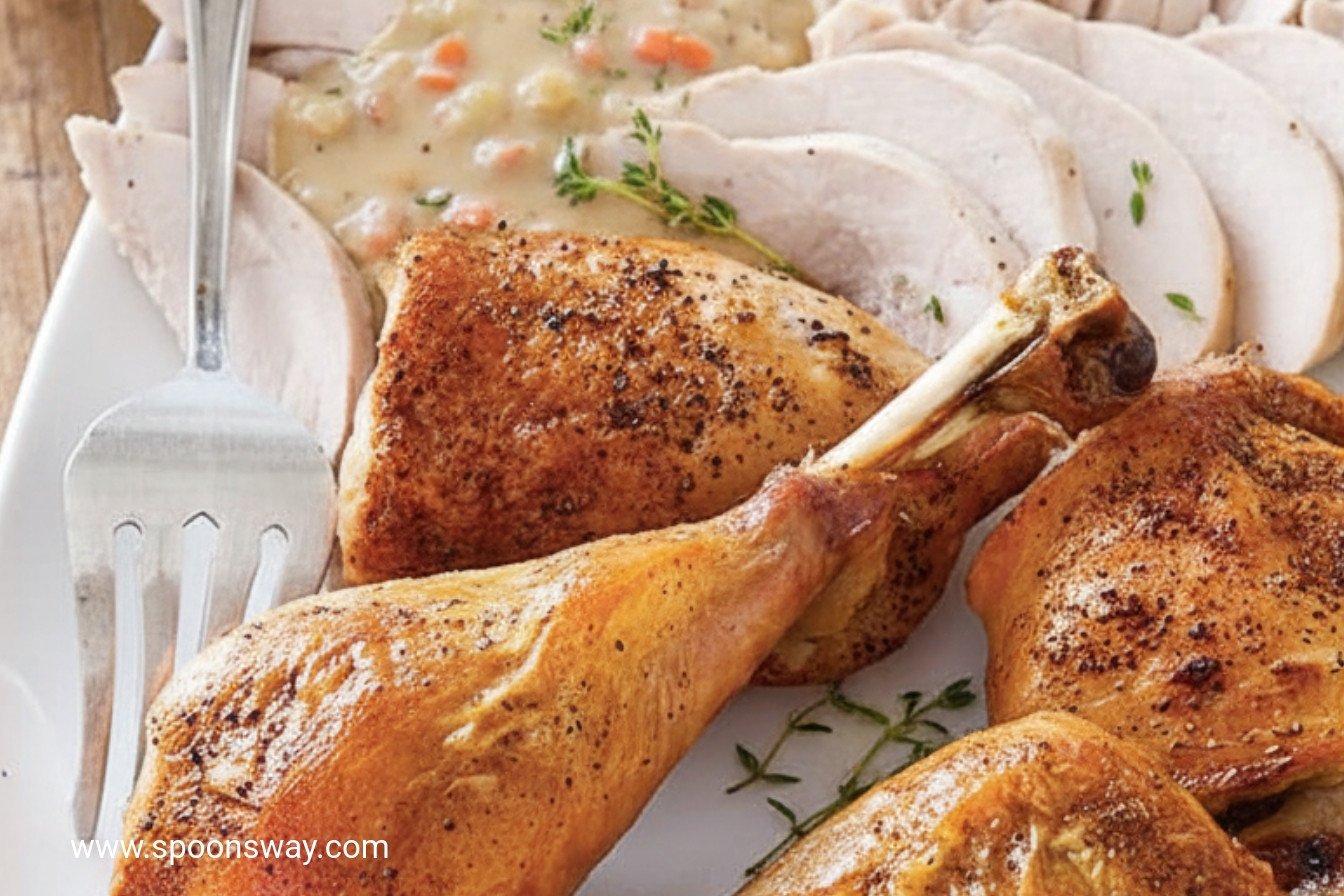
Day two is all about the crisp and the heat. A very hot oven makes the leg skin wonderfully crunchy. For the breast, we have a little trick. We pour a bit of that saved stock over it and cover it with its own skin.
This keeps the white meat super moist while it warms. Fun fact: that final blast of heat also makes your kitchen smell like Thanksgiving all over again. It tells everyone dinner is almost ready. Do you like crispy skin or tender meat best?
Your Gravy, Smooth and Rich
Cold stock from the fridge is a gift. The fat rises and turns solid. You scoop that golden fat off the top. This is what you cook with flour to start your gravy.
Using the turkey’s own fat makes the gravy taste deeply of turkey. It’s the difference between good and “can I have the recipe?” Just whisk slowly and be patient. The gravy will thicken into something perfect for pouring over everything.
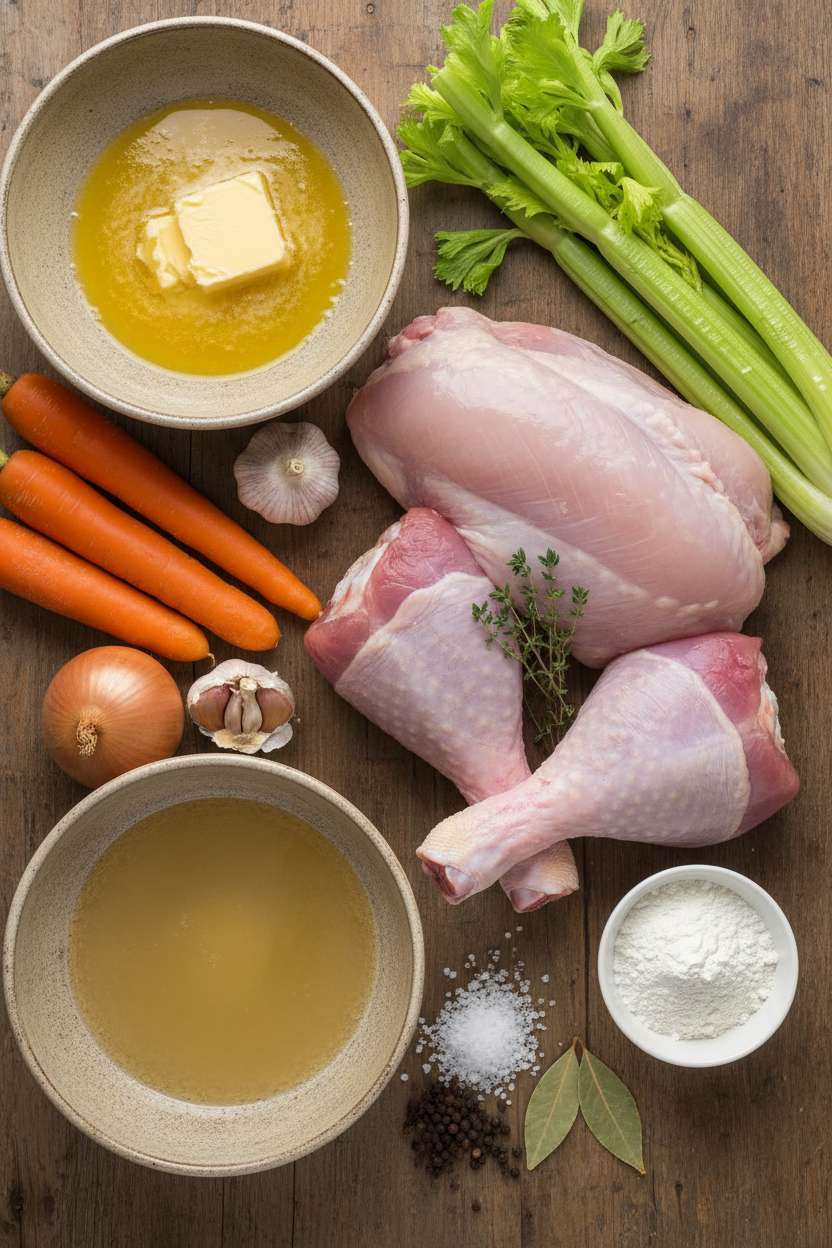
Ingredients:
| Ingredient | Amount | Notes |
|---|---|---|
| Onions | 2 | chopped |
| Carrots | 2 | peeled and chopped |
| Celery ribs | 2 | chopped |
| Garlic cloves | 2 | peeled |
| Fresh thyme | 2 teaspoons | minced |
| Turkey leg quarters | 4 (1 ½- to 1 ¾-pound) | trimmed |
| Whole bone-in turkey breast | 1 (6- to 7-pound) | trimmed |
| Unsalted butter | 4 tablespoons | melted |
| Salt and pepper | to taste | |
| Low-sodium chicken broth | 4 cups | |
| Water | 4 cups | |
| Bay leaf | 1 | |
| All-purpose flour | ½ cup |
The Secret to a Calm Thanksgiving Table
Hello, my dear. Come sit a moment. Let’s talk about Thanksgiving. I remember the old days. I would rush around the kitchen like a startled hen. Everything had to be done at once. My gravy was always a last-minute worry. Doesn’t that sound stressful?
Then I learned this trick. We do most of the work two days before. On the big day, we just warm things up. It feels like magic. The house stays calm. You get to actually talk to your family. I still laugh at that first year I tried it. My grandson asked if I’d hired a helper!
Here is our plan. We will roast the turkey and make the stock ahead. Trust me, the flavor gets even better. It’s like the ingredients have time for a nice, long chat. The next day, we make the gravy and crisp everything up. Your kitchen will smell amazing. You’ll feel like a true holiday wizard.
- Step 1: First, chop your onions, carrots, and celery. Don’t worry about perfect pieces. Toss them in a big roasting pan with garlic and thyme. This is your flavor bed. Pat the turkey pieces dry with paper towels. This helps the skin get nice and crisp later. Brush them with melted butter and sprinkle with salt and pepper.
- Step 2: Now, we roast. Place the big pan in the middle of your oven. Put the extra legs in a dish on the lower rack. Roast until a thermometer says it’s done. Let the big pieces cool completely on a rack. (My hard-learned tip: Letting it cool slowly keeps the meat juicy. Don’t rush this part!).
- Step 3: Time for stock! Put the roasted veggies and the extra legs into a big pot. Scrape all those tasty brown bits from the pan. Add broth, water, a bay leaf, and pepper. Let it bubble softly for over an hour. The smell will make your whole house feel cozy. Strain it into a container and let it cool. Then, pop it in the fridge.
- Step 4: It’s Day Two! Skim the firm fat off your chilled stock. We’ll use it to make the gravy. Whisk flour into the melted fat until it looks golden. Then slowly whisk in your homemade stock. Let it simmer and thicken. What’s the secret to lump-free gravy? Share below! Season it with a little salt and pepper at the end.
- Step 5: Now, heat the turkey. Slice the breast meat and place it on foil. Pour a little reserved stock over it to keep it moist. Put the skin on top like a blanket. Roast everything in a very hot oven until it’s warm and the leg skin is crispy. Discard the breast skin before serving. It did its job keeping the meat tender.
Cook Time: 4–5 hours (mostly hands-off)
Total Time: About 1 hour on Day 2
Yield: 10-12 servings
Category: Dinner, Holiday
Three Fun Twists on the Classic
This recipe is wonderfully forgiving. Once you know the method, you can play. Here are a few ideas that tickle my fancy. They might just start a new tradition at your table.
- Herb Garden Glory: Use rosemary and sage with the thyme. Tuck lemon slices under the turkey skin before the first roast.
- Cozy Mushroom Gravy: Sauté sliced mushrooms until golden. Add them when you make the gravy on Day Two for an earthy flavor.
- Maple & Apple: Add a cup of apple cider to the stock pot. Whisk a tablespoon of maple syrup into the finished gravy. It’s sweet and savory.
Which one would you try first? Comment below!
Setting Your Holiday Table
Now, for the best part: serving. Pile that beautiful turkey on a big platter. Pour the gravy into my old gravy boat. It has a little chip, but I love it. For sides, I always make creamy mashed potatoes. They’re the perfect gravy boat. A bright cranberry sauce adds a pop of color and tang.
For drinks, a crisp apple cider is lovely for everyone. For the grown-ups, a glass of chilled Chardonnay pairs beautifully. It cuts through the rich gravy. Which would you choose tonight? Light some candles. Take a deep breath. You did it. Now, enjoy your feast and your family.
Making It Ahead: Your Future Self Will Thank You
This recipe is a gift to your busy self. Cook it two days before your big meal. Let everything cool completely first. Then wrap the turkey tightly and refrigerate it. Pour the strained stock into a container and chill it too. The fat will rise and harden on top. This makes the best gravy later.
I once tried to rush the cooling step. The steam made everything soggy in the fridge. Patience makes perfect here. You can even freeze the stock for a month. Fun fact: Chilling the stock lets you easily scoop off the fat. That means richer flavor without the grease.
Why does this matter? It takes the panic out of feast day. You just reheat and make gravy. Your kitchen stays calm and cool. Have you ever tried storing a big meal this way? Share below!
Simple Fixes for Common Turkey Troubles
Is your gravy too thin? Whisk a bit of flour with cold broth first. Then stir it into the simmering gravy. This stops lumps from forming. I remember when my gravy was like soup. A little flour paste saved the day.
Worried about dry breast meat? The Day 2 step with broth and foil is key. It adds moisture back as it heats. This matters because juicy turkey is the star of the show. Is the skin not crispy? The high heat at the end fixes that. Pat the skin very dry before roasting.
Why does this matter? Fixing small problems builds your cooking confidence. You learn how flavors and textures work. Which of these problems have you run into before?
Your Questions, My Answers
Q: Can I make this gluten-free?
A: Yes! Use cornstarch or a gluten-free flour blend for the gravy.
Q: How far ahead can I prep?
A: The turkey and stock keep for two days in the fridge.
Q: I don’t have fresh thyme.
A: Dried thyme works fine. Use one teaspoon instead of two.
Q: Can I make a smaller batch?
A: Absolutely. Just use one turkey breast and two leg quarters. Halve the other ingredients.
Q: Any optional tips?
A: Add a spoonful of apple jelly to your gravy. It adds a lovely, gentle sweetness. Which tip will you try first?
From My Kitchen to Yours
I hope this recipe brings comfort to your table. The make-ahead magic is my favorite part. It lets you enjoy your own gathering. Food is about sharing stories and making memories.
I would love to hear about your cooking adventure. Tell me about your family’s favorite side dish. Have you tried this recipe? Share your experience in the comments. Thank you for letting me share my kitchen with you today.
Happy cooking!
—Grace Ellington
Perfect Make-Ahead Turkey and Gravy
Description
Plan your holiday feast with ease using this make-ahead turkey and gravy recipe. Roast turkey parts and prepare a rich stock one day, then crisp and serve with a velvety homemade gravy the next.
Ingredients
Instructions
- Adjust oven racks to middle and lowest positions and heat oven to 325 degrees. Place onions, carrots, celery, garlic, and thyme in large roasting pan. Set V-rack inside pan. Pat turkey legs and breast dry with paper towels. Arrange 2 legs and breast, skin side up, in V-rack. Brush turkey with butter and season with salt and pepper. Place remaining 2 legs in 13 by 9-inch baking dish and season with salt and pepper.
- Place roasting pan on middle rack and baking dish on lower rack. Roast until breast registers 160 degrees and thighs register 175 degrees, 2 to 2 1/2 hours. Transfer 2 legs and breast to wire rack set in rimmed baking sheet and let cool to room temperature, about 2 hours.
- Transfer vegetables in roasting pan and remaining 2 legs to large pot, scraping up any browned bits. Add broth, water, bay leaf, and 1 teaspoon pepper and bring to boil. Simmer over medium-low heat until reduced to 5 cups, 1 1/4 to 1 1/2 hours. Pour through fine-mesh strainer into large container, discarding solids. Let cool for 1 hour, cover, and refrigerate for 4 hours or up to 2 days. Wrap cooled legs and breast tightly in plastic wrap and refrigerate for up to 2 days.
- Scrape fat from top of chilled stock and reserve 5 tablespoons. Bring stock to simmer in medium saucepan. Set aside 1/4 cup stock. Heat reserved fat in large saucepan over medium heat. Add flour and cook, whisking constantly, until golden, 3 to 4 minutes. Slowly whisk in remaining 4 3/4 cups stock and bring to boil. Reduce heat to medium-low and simmer until slightly thickened and reduced to 4 cups, 12 to 14 minutes. Season with salt and pepper to taste.
- Meanwhile, adjust oven rack to middle position and heat oven to 500 degrees. Transfer legs and breast to carving board. Separate legs into thighs and drumsticks and arrange on wire rack set in rimmed baking sheet. Cut breast meat from bone into 2 single breasts. Working one at a time, remove skin from breast in 1 piece; reserve. Slice breast crosswise into 1/4-inch slices and place on 18 by 12-inch sheet of aluminum foil, keeping slices together. Pour 2 tablespoons reserved stock over each breast and top with reserved skin. Wrap tightly and place on rack with legs.
- Roast until turkey is heated through and thighs and drumsticks are crisp, 20 to 25 minutes. Discard breast skin. Season with salt and pepper to taste. Serve with gravy.
Notes
- For the crispiest skin, ensure the turkey pieces are patted very dry before the final high-heat roast. The gravy can be made a day ahead and gently reheated.