

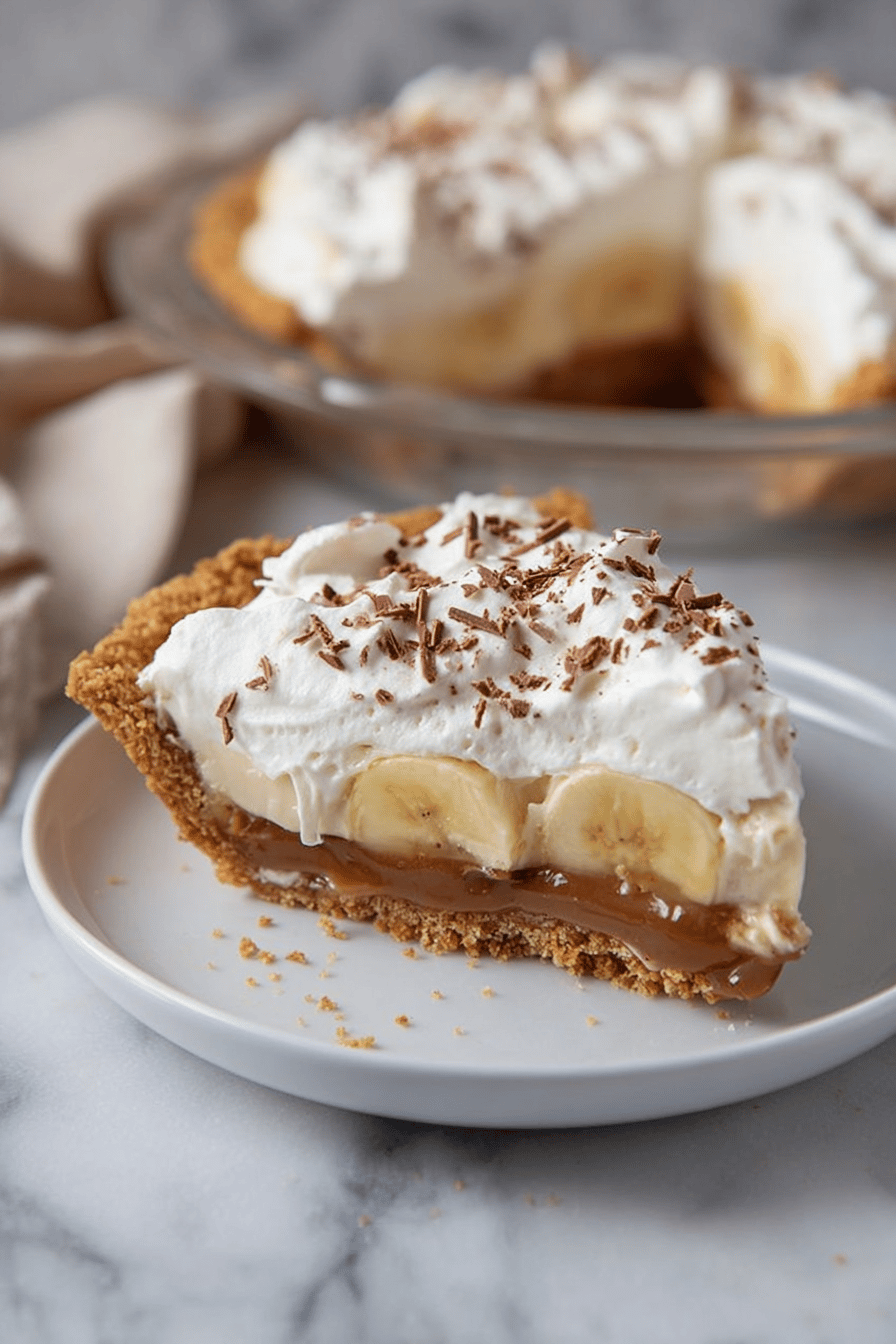
The First Bite That Started It All
The first time I tried this pie, the creamy dulce de leche melted into the crunchy Biscoff crust. The bananas added a fresh sweetness, and the whipped cream felt like a cloud. Ever wondered how you could turn a simple dessert into something unforgettable? That bite made me realize how layers of flavor can surprise you. Now, I crave it every summer when bananas are just right.My Messy (But Delicious) First Try
My first attempt was a comedy of errors. I forgot to chill the dulce de leche, so it oozed everywhere. The whipped cream turned grainy because I rushed it. But here’s the thing: even imperfect homemade pies beat store-bought any day. Cooking teaches patience—and that mistakes still taste pretty great. Share your funniest kitchen fail in the comments!Why This Pie Works So Well
– The Biscoff crust adds a warm spice that balances the sweet dulce de leche. – Bananas keep it light, so it’s rich but not heavy. Which flavor combo surprises you most—caramel and cookie or banana and cream? Let me know below!A Slice of History
Banoffee pie was invented in England in the 1970s. A chef mixed toffee, bananas, and cream—and it became a hit. *Did you know Biscoff cookies were originally served on airplanes?* This version swaps toffee for dulce de leche, making it smoother. Try it and taste how small tweaks create big flavor.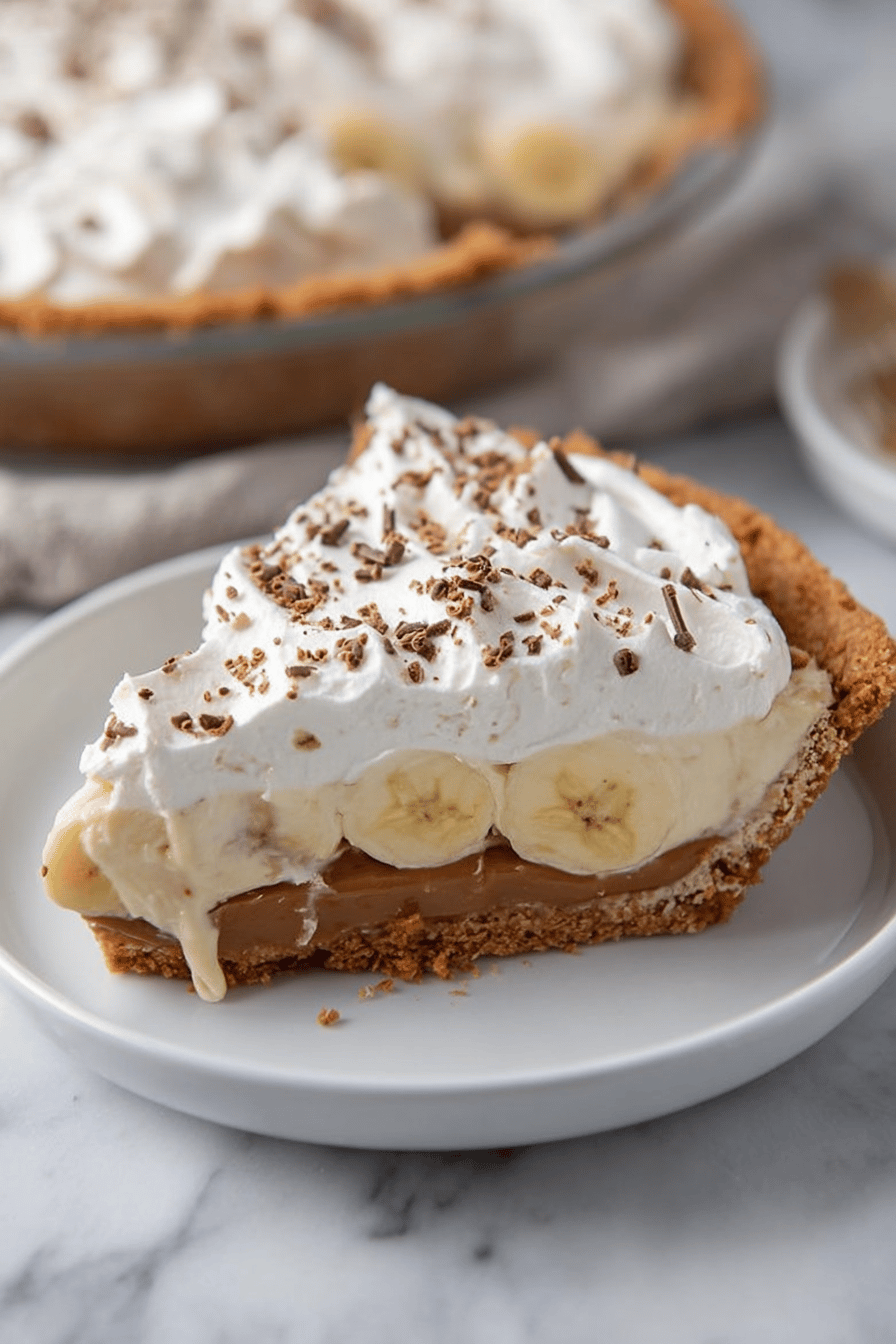
Ingredients:
| Ingredient | Amount | Note |
|---|---|---|
| Biscoff cookie crumbs | 2 cups | about 32 cookies |
| Unsalted butter | 6 tablespoons | melted |
| Dulce de leche | 14 oz | chilled |
| Bananas | 3-4 | sliced into coins, not overripe |
| Heavy whipping cream | 1 ½ cups | cold |
| Powdered sugar | 1 tablespoon | |
| Vanilla extract | 1 teaspoon | |
| Chocolate shavings | As needed | for garnish |
How to Make No-Bake Biscoff Banoffee Pie Delight
Step 1 Mix Biscoff crumbs with melted butter until it feels like wet sand. Press firmly into a pie dish. Cover the bottom and sides evenly. Bake at 350°F for 8-10 minutes to set. (*Hard-learned tip: Freeze crust 10 minutes before baking to prevent crumbling.*)
Step 2 Let the crust cool completely before adding dulce de leche. Spread it in a smooth, even layer. Chilled dulce de leche is easier to work with. Avoid over-stirring to keep it thick.
Step 3 Arrange banana slices over the dulce de leche. Use slightly firm bananas to prevent mushiness. Cover every spot for balanced flavor. Layer them neatly for a pretty look.
Step 4 Whip cold cream, sugar, and vanilla until peaks form. Spread or pipe it over the bananas. Chill the pie 2+ hours to set. Garnish with chocolate shavings before serving. What’s the best way to slice bananas for this pie? Share below! Cook Time: 10 minutes Total Time: 2 hours 30 minutes Yield: 8 servings Category: Dessert, No-Bake
3 Fun Twists on Banoffee Pie
Espresso Boost Add a shot of cooled espresso to the dulce de leche. It cuts the sweetness and adds depth.
Nutty Crunch Swap half the Biscoff crumbs with crushed toasted pecans. Adds a warm, earthy flavor.
Tropical Swap Use caramelized pineapple instead of bananas. Top with toasted coconut for a vacation vibe. Which twist would you try first? Vote in the comments!
Serving & Pairing Ideas
Serve slices with extra Biscoff crumbs on the side. A mint sprig adds fresh contrast. Pair with cold milk or a caramel latte. For adults, try a shot of bourbon alongside. Which would you choose tonight? Tell us below!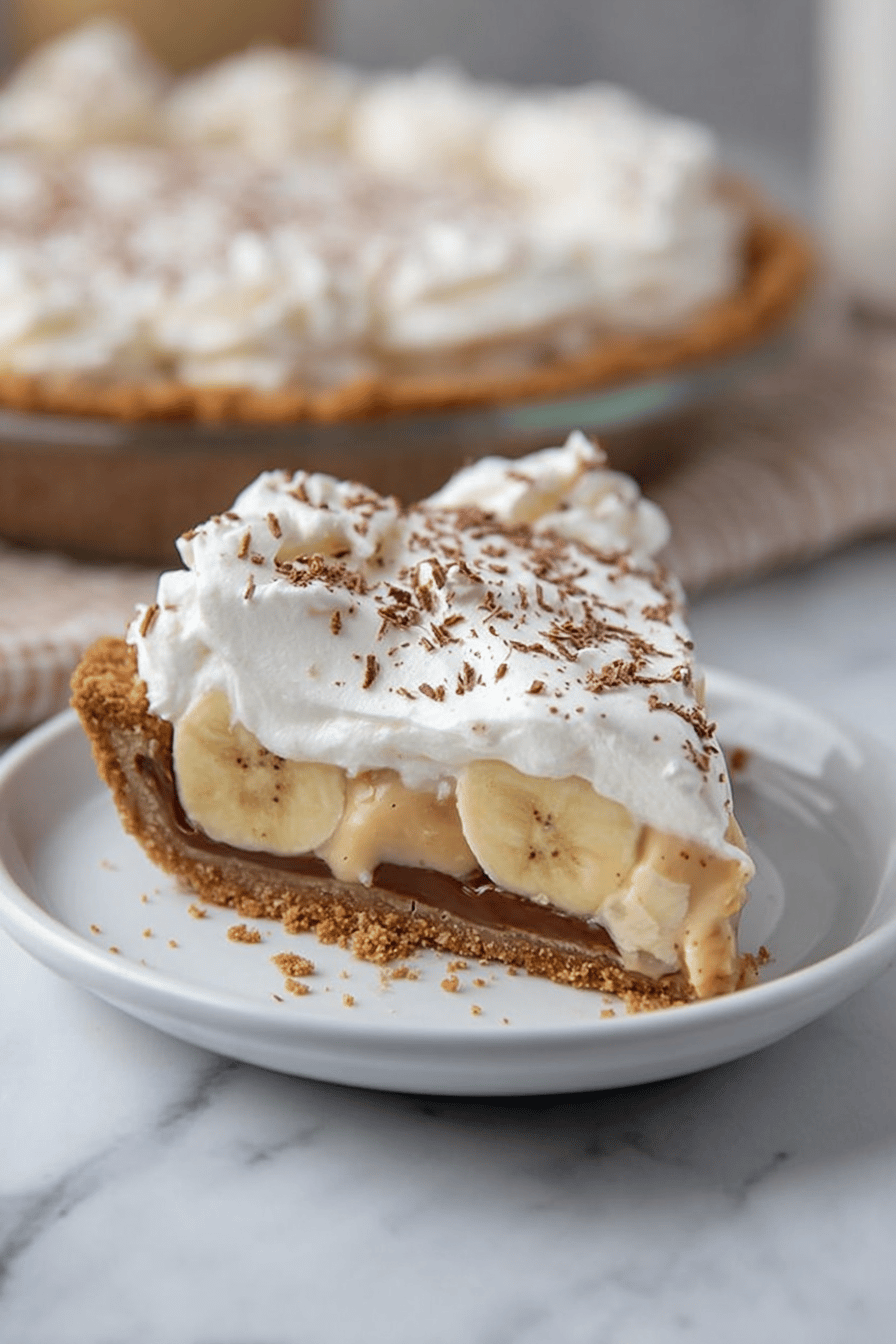
Storing and Serving Tips
Keep your pie in the fridge for up to 3 days. Cover it loosely with foil to avoid soggy crust. Freezing isn’t ideal—the bananas turn mushy. Serve slices cold for the best texture. *Fun fact: Banoffee pie was invented in England in the 1970s!* Double the recipe for a crowd—it disappears fast. Why this matters: Chilling lets the layers set, so patience pays off. Batch-cooking? Prep the crust and dulce de leche ahead. Ever tried adding a sprinkle of sea salt on top? Tell us your twist!Troubleshooting Common Issues
Crust too crumbly? Add 1 more tablespoon melted butter. Whipped cream won’t thicken? Chill the bowl and beaters first. Bananas browning? Brush them with lemon juice before layering. These small fixes save the day. Share your pie fails—we’ve all been there! Why this matters: Simple tweaks keep desserts stress-free. Overripe bananas make the pie too sweet. Vote: Do you prefer chocolate shavings or cocoa powder on top?Your Questions Answered
Q: Can I make this gluten-free?
A: Yes! Use gluten-free cookies for the crust. Check labels on dulce de leche too.
Q: How far ahead can I assemble this?
A: Up to 1 day. Add bananas and cream just before serving.
Q: What’s a good dulce de leche swap?
A: Caramel sauce works, but it’s thinner. Reduce it slightly first.
Q: Can I halve the recipe?
A: Sure! Use a 6-inch dish and adjust chilling time.
Q: Why bake the crust if it’s no-bake?
A: Baking firms it up. Skip it for a softer texture.
Final Thoughts
This pie is a showstopper with minimal effort. Perfect for lazy Sundays or impressing guests.Tag @SpoonSway on Pinterest with your creations—I’d love to see them! Happy cooking! —Sarah Cooper.
No-Bake Biscoff Banoffee Pie Delight
Description
Indulge in the rich and creamy layers of this No-Bake Biscoff Banoffee Pie, featuring a Biscoff cookie crust, dulce de leche, fresh bananas, and whipped cream.
Ingredients
Instructions
- In a bowl, mix Biscoff cookie crumbs with melted butter until the texture resembles wet sand.
- Press the mixture firmly into a 9-inch pie dish, covering the bottom and slightly up the sides.
- Bake the pie crust in the oven for 8-10 minutes in a 350°F oven, while you prep the filling.
- Spread the dulce de leche over the cooled-down crust in an even layer.
- Arrange banana slices over the dulce de leche in an even layer.
- In a cold mixing bowl, beat heavy cream, powdered sugar, and vanilla extract until medium to stiff peaks form.
- Gently spread or pipe the whipped cream over the banana layer. Sprinkle the top with chocolate shavings for an elegant touch.
- Chill the pie for at least 2 hours before slicing to help the layers set.
Notes
- For best results, use firm bananas to prevent excess moisture. Serve chilled.
Biscoff, Banoffee, Pie, Dessert