The Magic of a Messy Cake
This cake is a happy little kitchen trick. You pour a sweet syrup right over the raw batter. Then the oven works its magic. It bakes into a tender cake with a rich, gooey sauce underneath.
When you scoop it out, you flip the spoon. The saucy part ends up on top. It looks like a wonderful mess. I still laugh at the first time I made it. My grandson called it “swamp cake.” He meant it as a great compliment!
Why This Recipe is a Keeper
This matters because it is so forgiving. The batter does not need to be perfect. The syrup finds its own way. You cannot really mess it up. That is a good lesson for cooking and for life.
It also matters because it is pure comfort. The warm maple smell fills your whole house. Doesn’t that smell amazing? It tells everyone that something good is coming. What is your favorite cozy smell from the kitchen?
A Sweet Little History
Pudding cakes have been around for ages. They were a clever way to make a special dessert with simple things. Flour, eggs, milk, and a bit of sweetener. That is all you need.
Fun fact: These are sometimes called “self-saucing” puddings. The sauce makes itself while it bakes. I think that is the best kind of kitchen magic. Do you have a family recipe that feels like magic to you?
Getting Your Layers Just Right
First, you warm the maple syrup and cream. Be patient. Let it just start to bubble. This helps them become friends before they meet the batter.
Then make your cake batter. Whisk it until it is smooth. It will be thick. That is okay. Pour it into your dish. Now, the fun part. Pour the warm syrup slowly into a corner. Watch it flow over the top like a shiny blanket.
The Big Bake
Use that rimmed baking sheet. The syrup might bubble over a bit. The sheet catches any drips. Your oven stays clean. The cake bakes until it is a deep gold. A toothpick in the cake part should come out clean.
Let it cool for just ten minutes. This is the hardest part. You have to wait. But it is worth it. The sauce will be thick and perfect. Do you like your desserts warm from the oven, or cooled down?
Serving Up the Comfort
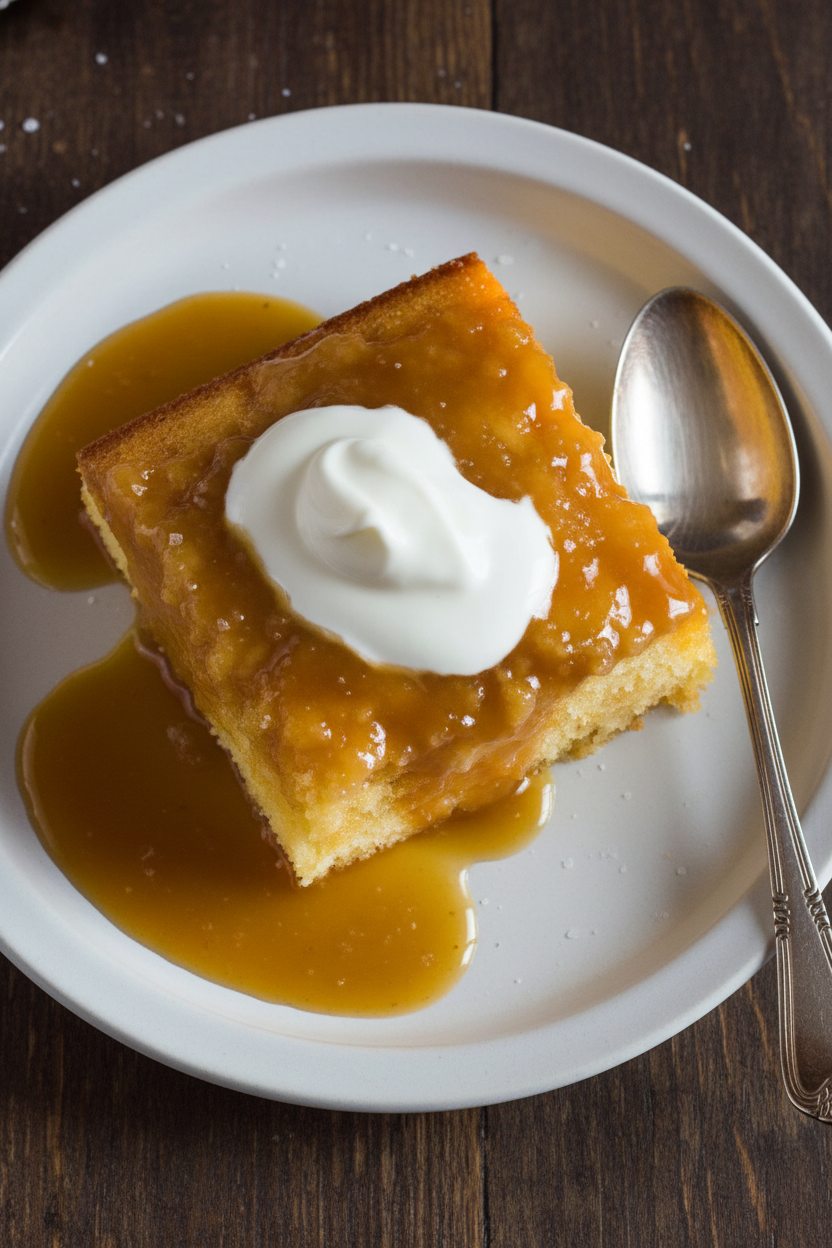
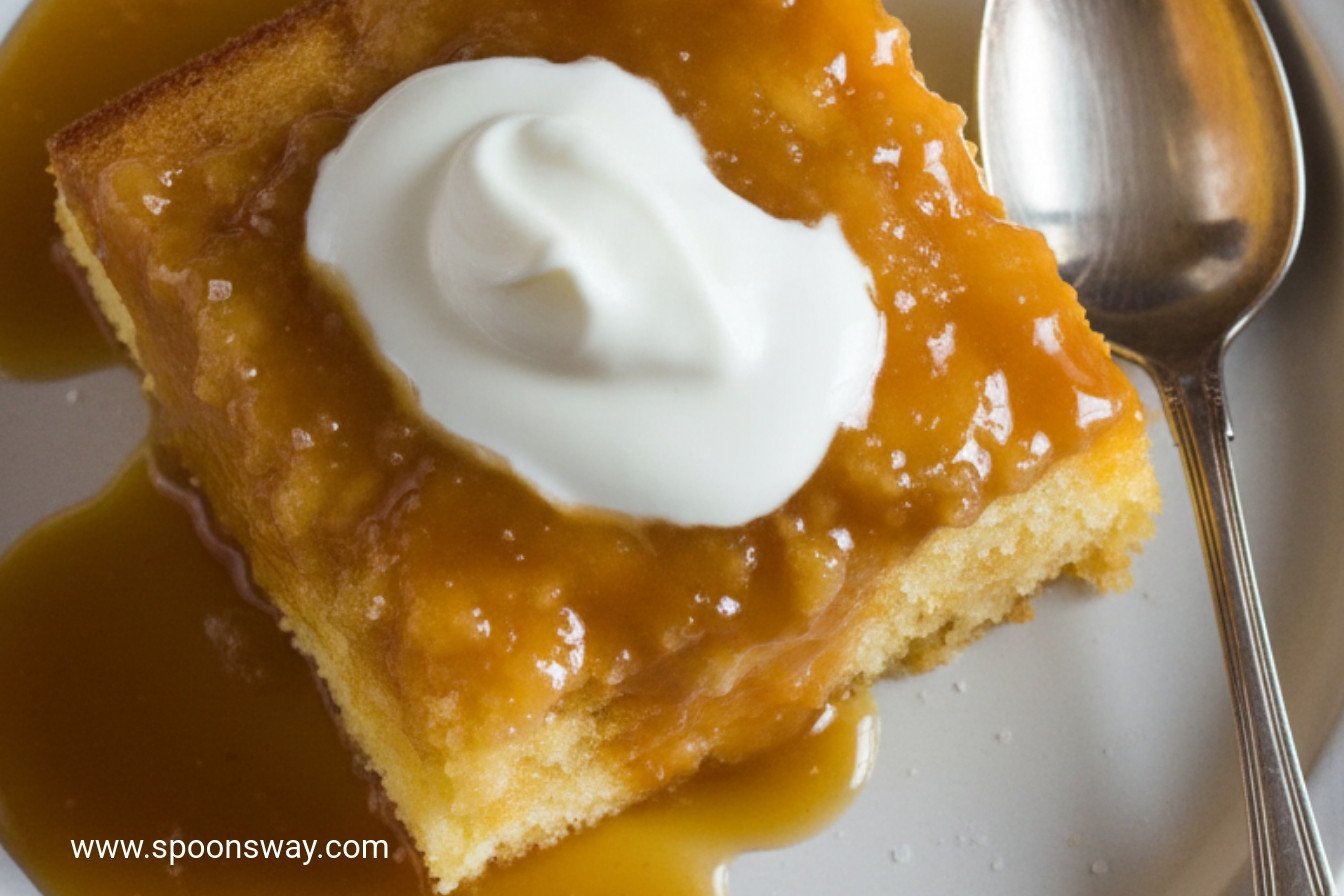
Get a big serving spoon. Scoop right down to the bottom. Then flip your spoon over onto the plate. You will see the beautiful sauce on top. It pools around the cake like a moat.
This cake does not need anything else. Maybe a little extra cream poured over. It is rich, sweet, and so satisfying. It tastes like a hug from the inside. I hope you make it for someone you love soon.
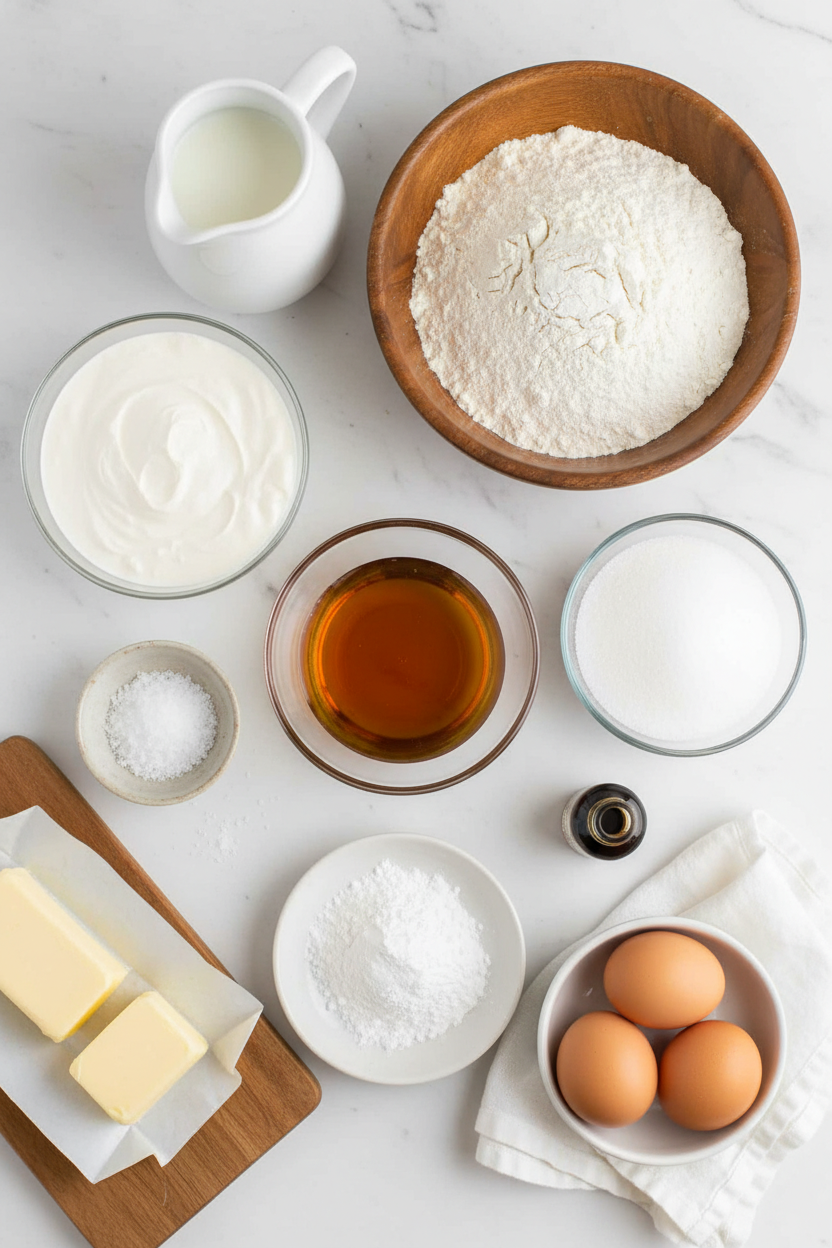
Ingredients:
| Ingredient | Amount | Notes |
|---|---|---|
| Maple Syrup | 1 cup | preferably dark amber |
| Heavy Cream | 1 cup | |
| Table Salt | 1 teaspoon | divided |
| All-Purpose Flour | 1 ¼ cups (6¼ ounces/177 grams) | |
| Sugar | 3 tablespoons | |
| Baking Powder | 1 ½ teaspoons | |
| Milk | ⅔ cup | |
| Large Eggs | 2 | |
| Vanilla Extract | ½ teaspoon | |
| Unsalted Butter | 6 tablespoons | melted |
My Magical Maple Pudding Cake
Hello, my dear. Come sit at the table. I want to tell you about a cake that bakes itself upside down. It sounds like magic, doesn’t it? You pour a sweet maple sauce right over the batter. In the oven, the cake rises through the syrup. It creates its own gooey, wonderful sauce on the bottom. I still laugh at that. It’s a happy little kitchen surprise every single time.
Let’s make some magic together. I’ll walk you through it, step-by-step. It’s easier than you think. Just follow my lead. I’ve made this more times than I can count. The smell will fill your whole house with cozy warmth. Doesn’t that sound lovely?
Step 1: The Maple Sauce
First, we make the maple sauce. Move an oven rack up high. Heat your oven to 375 degrees. Now, grab a saucepan. Warm the maple syrup, cream, and half the salt. Let it just start to bubble. Then take it off the heat. Give it a good whisk. Pour it into a heatproof measuring cup. This keeps it warm and ready. (Hard-learned tip: Use a dark amber maple syrup. It gives the deepest, richest flavor. Trust me on this.)
Step 2: The Cake Batter
Time for the cake batter. Whisk the flour, sugar, baking powder, and the rest of the salt in a big bowl. In another bowl, whisk the milk, eggs, and vanilla. Now, mix the wet into the dry. Stir until it’s just combined. Gently whisk in the melted butter. Your batter will be smooth and lovely. Pour it into an 8-inch square baking dish. Set that dish on a rimmed baking sheet. This catches any bubbly spills. Now, the fun part! Slowly pour your warm maple sauce over the back of a spoon. Let it flow gently over the batter. Don’t stir it! The layers will do their own thing.
Step 3: Bake & Serve
Carefully place your baking sheet in the oven. Bake for about 30 to 35 minutes. The top will become a deep, golden brown. A toothpick poked in the cake part should come out clean. My kitchen window gets the afternoon sun. The light hits the golden cake just right. It’s a beautiful sight. Let it cool on a rack for just 10 minutes. Then, scoop servings with a big spoon. Flip each scoop onto a plate. This puts the saucy part on top. What’s your favorite cozy dessert smell? Share below!
| Cook Time | 30–35 minutes |
| Total Time | About 1 hour |
| Yield | 6 generous servings |
| Category | Dessert, Cake |
Three Fun Twists to Try
This recipe is like a good friend. It’s happy to change its outfit now and then. Here are a few playful ideas for your next bake. They’re all simple and delicious.
- Apple Cider Spice: Swap the milk for apple cider. Add a pinch of cinnamon to the batter. It tastes like a fall afternoon.
- Salty Peanut Butter: Drop little spoonfuls of peanut butter into the batter before adding the syrup. The salty swirl is just wonderful.
- Berry Burst: Scatter a handful of fresh blueberries over the batter. Then pour the syrup on top. The berries pop with sweet juice.
Which one would you try first? Comment below!
Serving It Up With Style
This cake is a star all on its own. But a little friend makes it even better. I love a small scoop of vanilla ice cream melting on the warm cake. A dollop of softly whipped cream is lovely, too. For a pretty plate, add a single mint leaf. It looks so cheerful.
What to drink? A glass of cold milk is the classic choice. It’s perfect. For the grown-ups, a small glass of tawny port wine pairs beautifully. It’s rich and nutty. It sips like a warm hug. Which would you choose tonight?
Keeping Your Pudding Cake Cozy
This cake is best warm from the oven. But leftovers are a treat too. Let it cool completely first. Then cover the dish tightly with plastic wrap. It will keep in the fridge for three days.
I do not recommend freezing this one. The lovely saucy bottom can get grainy. I learned this the hard way. I once froze a piece for my grandson. The texture was just not the same.
To reheat, scoop a portion into a bowl. Warm it in the microwave for 30 seconds. This brings back the gooey sauce. You can also warm the whole dish in a 300-degree oven.
Batch cooking saves time for busy weeks. Making two cakes means dessert is ready. This matters because a sweet treat should be simple. It brings a little joy to any day. Have you ever tried storing it this way? Share below!
Simple Fixes for Common Hiccups
First, the sauce might not sink. Pour it slowly down the dish’s corner. I remember when I poured it too fast. The sauce just sat on top in a puddle.
Second, the cake might be dry. Do not over-bake it. Check it at 30 minutes with a toothpick. It should come out clean from the cake layer.
Third, the sauce can be thin. Use a dark amber maple syrup. The darker syrup has a richer flavor. It also makes a thicker, more luxurious sauce.
Getting it right builds your kitchen confidence. A perfect sauce makes the dessert special. This matters because good food feeds the heart. Which of these problems have you run into before?
Your Pudding Cake Questions, Answered
Q: Can I make this gluten-free? A: Yes. Use a good gluten-free flour blend. The one-for-one kind works best here.
Q: Can I make it ahead? A: You can mix the batter early. Keep it covered on the counter. Pour the hot sauce right before baking.
Q: What if I don’t have heavy cream? A: Whole milk will work in a pinch. The sauce will be a little less rich.
Q: Can I double the recipe? A: Absolutely. Use a 9×13 inch baking dish. You may need a few extra minutes to bake.
Q: Any extra tips? A: A pinch of cinnamon in the batter is nice. Fun fact: This cake is called a “pudding cake” because it makes its own sauce! Which tip will you try first?
From My Kitchen to Yours
I hope you love this cozy dessert. It always makes my kitchen smell wonderful. It reminds me of autumn afternoons with my family.
I would love to hear about your baking adventure. Tell me how it turned out for you. Your stories are my favorite thing to read. Have you tried this recipe? Share your experience in the comments.
Happy cooking!
—Grace Ellington.
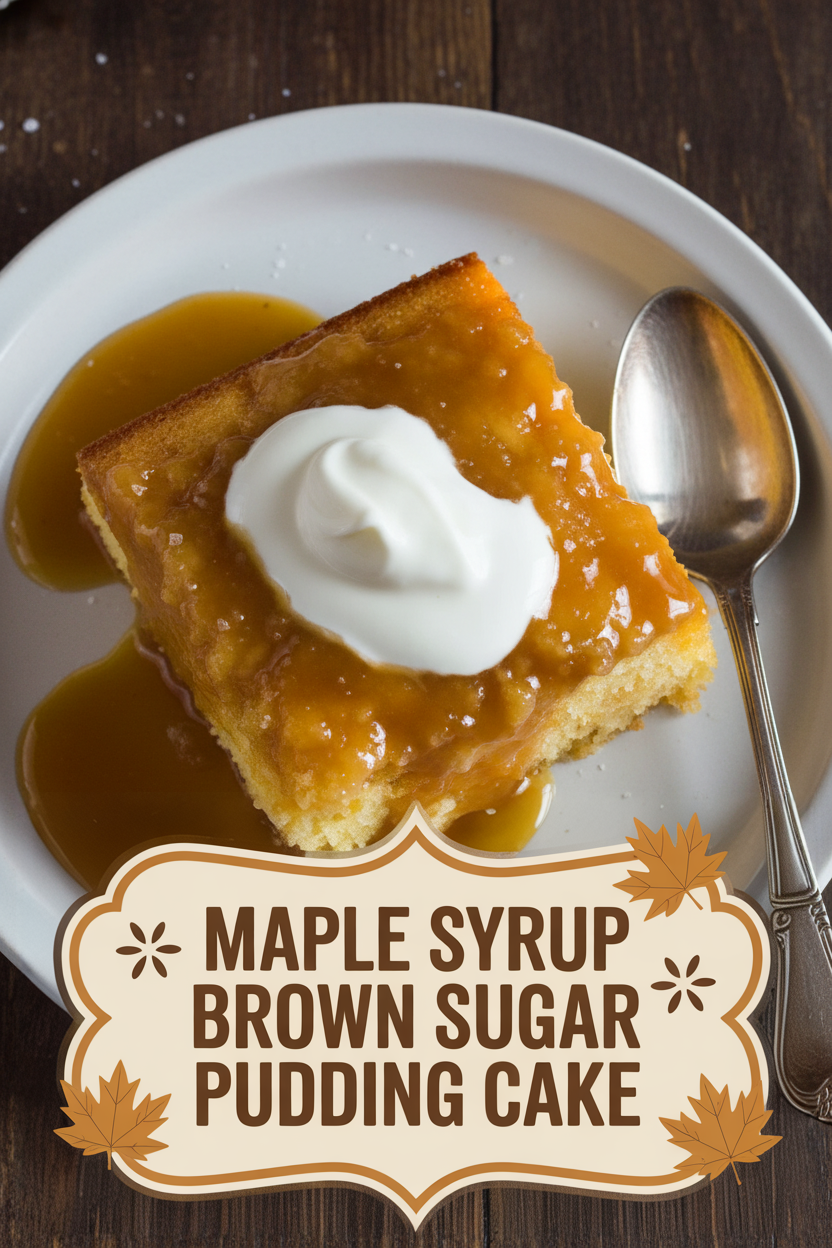
Maple Syrup Brown Sugar Pudding Cake
Description
A warm, comforting dessert cake with a self-saucing layer of rich maple syrup and cream that forms a pudding beneath a golden brown cake top.
Ingredients
Instructions
- Adjust oven rack 6 inches from top of oven and heat oven to 375 degrees. Heat maple syrup, cream and ½ teaspoon salt in medium saucepan over medium heat until simmering, about 5 minutes. Off heat, whisk to combine, then transfer to heatproof 2-cup liquid measuring cup.
- Whisk flour, sugar, baking powder, and remaining ½ teaspoon salt together in large bowl. Whisk milk, eggs, and vanilla in second bowl until combined. Whisk milk mixture into flour mixture until combined. Add melted butter and whisk until smooth. Transfer batter to 8-inch square baking dish set in rimmed baking sheet and spread into even layer with spatula. Pour syrup mixture slowly down corner of baking dish so it flows gently over top of cake batter.
- Bake until deep golden brown and toothpick inserted in center of cake layer comes out clean, 30 to 35 minutes. Let cool on wire rack for 10 minutes. Use serving spoon to scoop onto plates, inverting each spoonful so sauce is on top.
Notes
- Serve warm. For best results, use a high-quality, dark amber maple syrup for a deeper flavor. The cake is best enjoyed the day it is made.