
The Story of a Crown
This roast looks like a king’s crown. I love that. It feels special. My own grandma made it for big holidays. The whole table would go quiet when she brought it out. I still laugh at that.
Making it is a project. That’s okay. Good food takes time. This matters because cooking together makes memories. The work is part of the love. Did your family have a special celebration dish?
Getting Your Pork Ready
You will tie the two roasts together. It seems tricky. But the string holds everything in place. Think of it like giving the meat a big hug. A tight hug makes it cook evenly.
You rub the garlic and herbs inside. Doesn’t that smell amazing? Then you let it rest in the fridge overnight. This matters. The salt in the rub seasons the meat deep down. It makes every bite tasty.
A Slow and Gentle Roast
We cook it low and slow first. Just 250 degrees. This keeps the pork juicy and tender. No one likes dry meat! I like to sit nearby with a cup of tea. The warm smell fills the whole house.
Then we make it pretty. We brush it with herby oil and crank the heat. This gives it a beautiful brown crust. *Fun fact: The sizzle you hear is called the Maillard reaction. It’s science for “making things taste delicious.”*
Don’t Forget the Sauce!
While the roast rests, make the pan sauce. You use those little pork trimmings you saved. They go in a hot pan. They get all brown and crispy. That flavor is the secret.
You add broth and wine. Then you whisk in cold butter. It makes the sauce silky and rich. It’s the perfect pour over your slice of pork. What’s your favorite thing to put sauce on?
Time to Gather and Eat
Let the roast rest for a full 30 minutes. This is important. It lets the juices settle back into the meat. If you cut it too soon, all the good juice runs out onto the plate.
Then, snip the strings. Slice between the bones. Serve it with that lovely sauce. The best part is seeing everyone’s faces. It’s a feast for the eyes first. Do you think you’ll try making this for a special day?
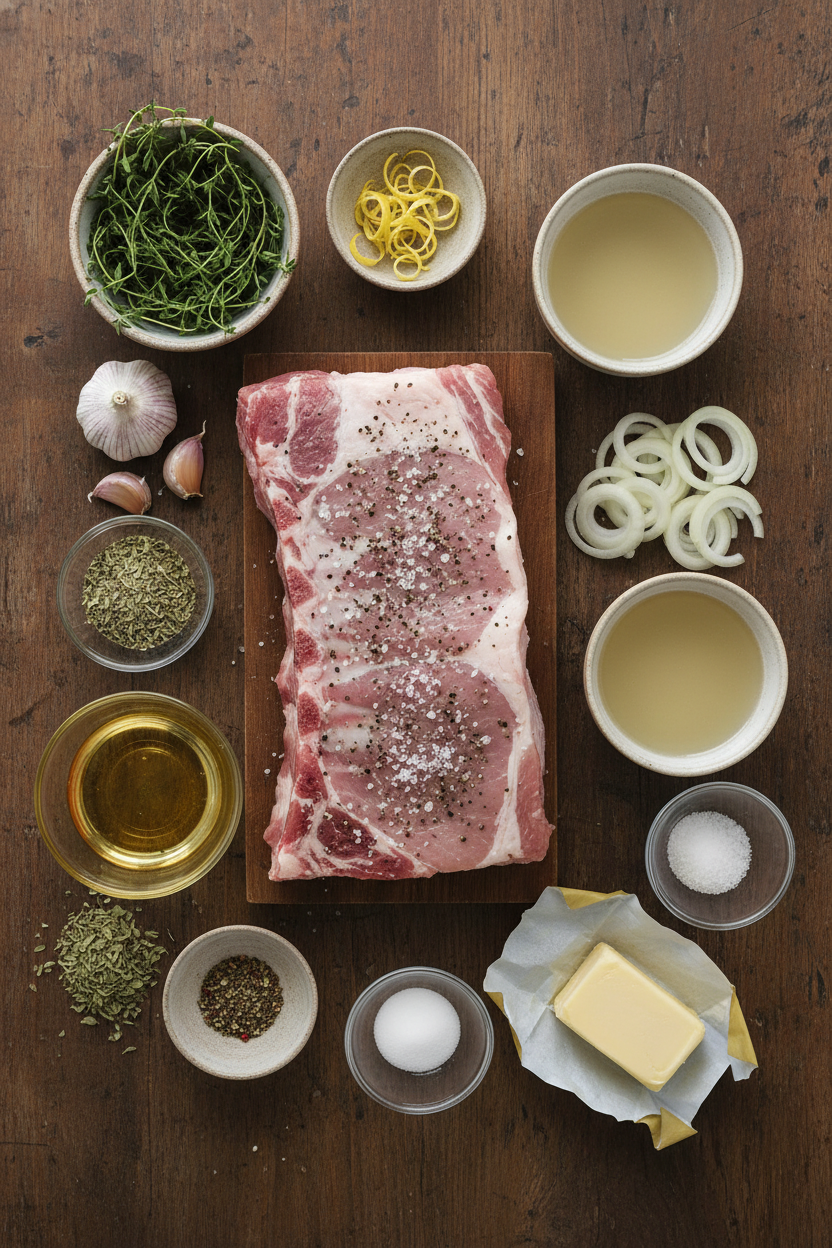
Ingredients:
| Ingredient | Amount | Notes |
|---|---|---|
| Garlic cloves, minced | 12 | For the roast rub |
| Fresh thyme, minced | 2 ½ tablespoons | |
| Fresh oregano, minced | 2 tablespoons | |
| Vegetable oil | 2 tablespoons | |
| Kosher salt | 6 tablespoons | |
| Pepper | 4 teaspoons | |
| Lemon zest, grated | 1 tablespoon | |
| Center-cut bone-in pork rib roasts | 2 (6- to 7-pound) | Chine bones and membranes removed, fat trimmed to 1/4-inch |
| Vegetable oil | 1 tablespoon | For the pan sauce |
| Shallot, minced | 1 | |
| Garlic cloves, minced | 6 | |
| Chicken broth | 2 ¼ cups | |
| Dry white wine | 1 ½ cups | |
| Unsalted butter | 10 tablespoons | Cut into 10 pieces and chilled |
| Fresh thyme, chopped | 1 tablespoon | |
| White wine vinegar | ¾ teaspoon |
Herb Crusted Pork Crown Roast: A Grandmother’s Guide
Hello, my dear. Pull up a chair. Today, we’re making a real showstopper. A Herb Crusted Pork Crown Roast. It looks fancy, but it’s just patience and love. I made this for my husband’s birthday every year. The smell would fill the whole house.
It’s a two-day recipe, but don’t let that scare you. Most of that time, the roast is just resting in the fridge. This makes the flavors deep and wonderful. We’ll work step-by-step together. I still laugh at the first time I tried to tie one. It looked like a lopsided hat!
Step 1: First, get your pan ready. Mix your fresh garlic, thyme, and oregano in a bowl. Doesn’t that smell amazing? Take a spoonful and mix it with oil. Put that in the fridge. We’ll use it later. Add salt, pepper, and lemon zest to the big bowl of herbs.
Step 2: Now, pat your pork roasts dry. We need to prepare the bones. Carefully cut the meat off the top inch or so of the bones. Save about a cup of the trimmings. Put them in the fridge for our sauce. (Hard-learned tip: A sharp boning knife makes this much easier. A dull one will fight you.)
Step 3: Flip the roast over. Make slits between every two bones. Don’t cut all the way through. This helps the roast open up like a book. Then, you’ll butterfly it. Slice into the center, but stop before you cut through the bottom.
Step 4: Open the roast flat. Rub half of that wonderful garlic-salt mix inside. Then fold it back up. Tie it tightly with kitchen twine around each slit. Repeat all this with the second roast. My grandson always asks why we need so much string. I tell him it’s like giving the roast a big hug!
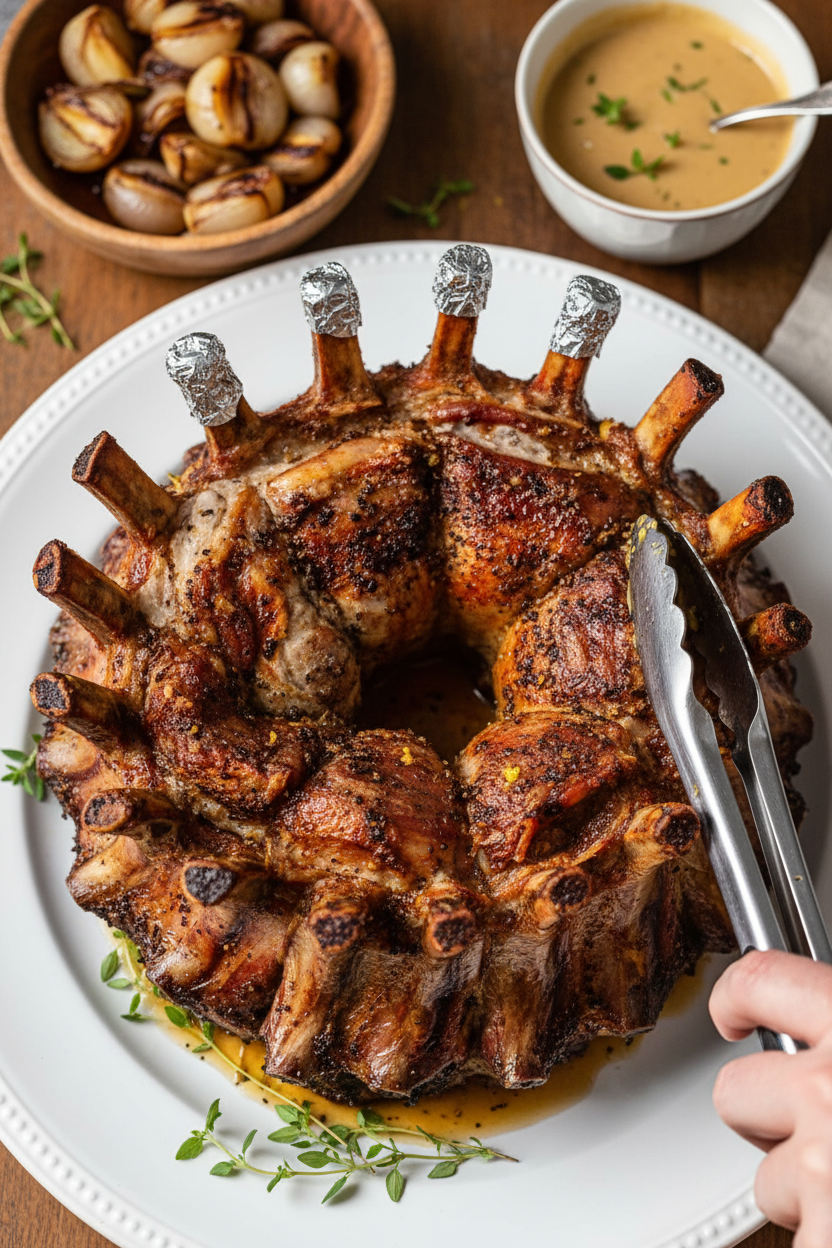
Step 5: This is the fun part. Lay a long string down. Place one roast on it. Put the second roast right on top, but upside down. Tie them together. Stand it up, bones pointing to the sky. Rub the rest of the herb mix all over. Tuck a foil ball in the middle to help it keep its crown shape.
Step 6: Put the whole beautiful thing on a rack in your fridge. Let it rest overnight, uncovered. This dries the surface. That gives us the best, crispiest crust tomorrow. What’s your favorite smell from your grandma’s kitchen? Share below!
Step 7: Next day, heat your oven low and slow. Roast it until a thermometer says 135 degrees. This takes a few hours. Then, crank up the heat! Brush it with that garlic-herb oil from the fridge. Roast again until it’s golden and glorious. Let it rest under a foil tent. This keeps all the juices inside.
Step 8: While it rests, make the pan sauce. Brown those pork trimmings you saved. Add shallot, garlic, broth, and wine. Let it bubble and reduce. Strain it, then whisk in cold butter. It becomes silky and rich. Stir in a little fresh thyme and vinegar. It’s the perfect tangy finish.
Cook Time: 3–3.5 hours active, plus 12–24 hours resting
Total Time: About 16 hours
Yield: 10-12 servings
Category: Dinner, Holiday
Three Fun Twists on the Classic
This recipe is wonderful as-is. But playing with flavors is half the fun. Here are three simple twists to make it your own.
Apple & Sage: Swap the oregano for fresh sage. Add grated apple to the herb rub. It tastes like a cozy autumn day.
Smoky & Spicy: Use smoked paprika in the rub. Add a pinch of cayenne pepper. It gives a warm, gentle kick.
Lemon & Rosemary: Double the lemon zest. Use rosemary instead of oregano. It’s so bright and fresh.
Which one would you try first? Comment below!
Serving Your Masterpiece
Presentation is part of the joy. Place your crown roast on a big platter. I like to fill the center with roasted baby potatoes and carrots. They cook in the pork’s lovely juices. A simple green salad on the side is perfect.
For drinks, a glass of dry apple cider pairs beautifully. The bubbles cut through the richness. For a non-alcoholic option, try sparkling apple juice with a cinnamon stick. It feels just as special.
Which would you choose tonight?
Storing Your Beautiful Crown Roast
Let’s talk about keeping your roast delicious. First, let it cool completely. Then, wrap slices tightly in plastic wrap. Place them in an airtight container in the fridge. They will keep for three days.
For the freezer, wrap slices in foil first. Then place them in a freezer bag. Squeeze out all the air. It will stay good for two months. Thaw it in the fridge overnight.
Reheating is simple. Place slices in a baking dish. Add a splash of broth or water. Cover with foil and warm at 325 degrees. This keeps the meat juicy and tender.
I once reheated pork without any liquid. It dried out! Now I always add that splash. Storing food well means no waste. It also gives you a ready-made feast.
Have you ever tried storing it this way? Share below!
Fixes for Common Crown Roast Hiccups
Is your roast not browning nicely? The oven might not be hot enough. Make sure it reaches 450 degrees for that final blast. A hot oven gives you a beautiful, crispy crust.
The sauce looks too thin? Just let it simmer a bit longer. I remember when my first sauce was like water. Patience lets it reduce and thicken perfectly. A good sauce ties the whole meal together.
Are the bones burning? You can make little foil hats for them. Just wrap foil around the bone tips. This protects them in the oven. Fixing small problems builds your cooking confidence.
Which of these problems have you run into before?
Your Crown Roast Questions, Answered
Q: Is this recipe gluten-free? A: Yes, it is naturally gluten-free. Just check your broth labels to be sure.
Q: Can I make any part ahead? A: Absolutely! The garlic-herb rub can be mixed a day early. This saves you time on the big day.
Q: What if I don’t have fresh herbs? A: Use dried herbs instead. Fun fact: use one-third the amount of dried herbs. They are more potent.
Q: Can I make a smaller roast? A: You can use one smaller roast. Just reduce the salt rub by half. Cook until it reaches 135 degrees.
Q: Is the sauce optional? A: The roast is wonderful alone. But the sauce is a special, flavorful bonus. I always make it.
Which tip will you try first?
A Final Word from My Kitchen to Yours
This roast looks fancy but is just careful steps. Take your time and enjoy the process. The smell in your kitchen will be amazing. I hope it brings your table great joy.
I would love to hear about your cooking adventure. Tell me how it went for your family.
Have you tried this recipe? Share your experience in the comments.
Happy cooking!
—Grace Ellington
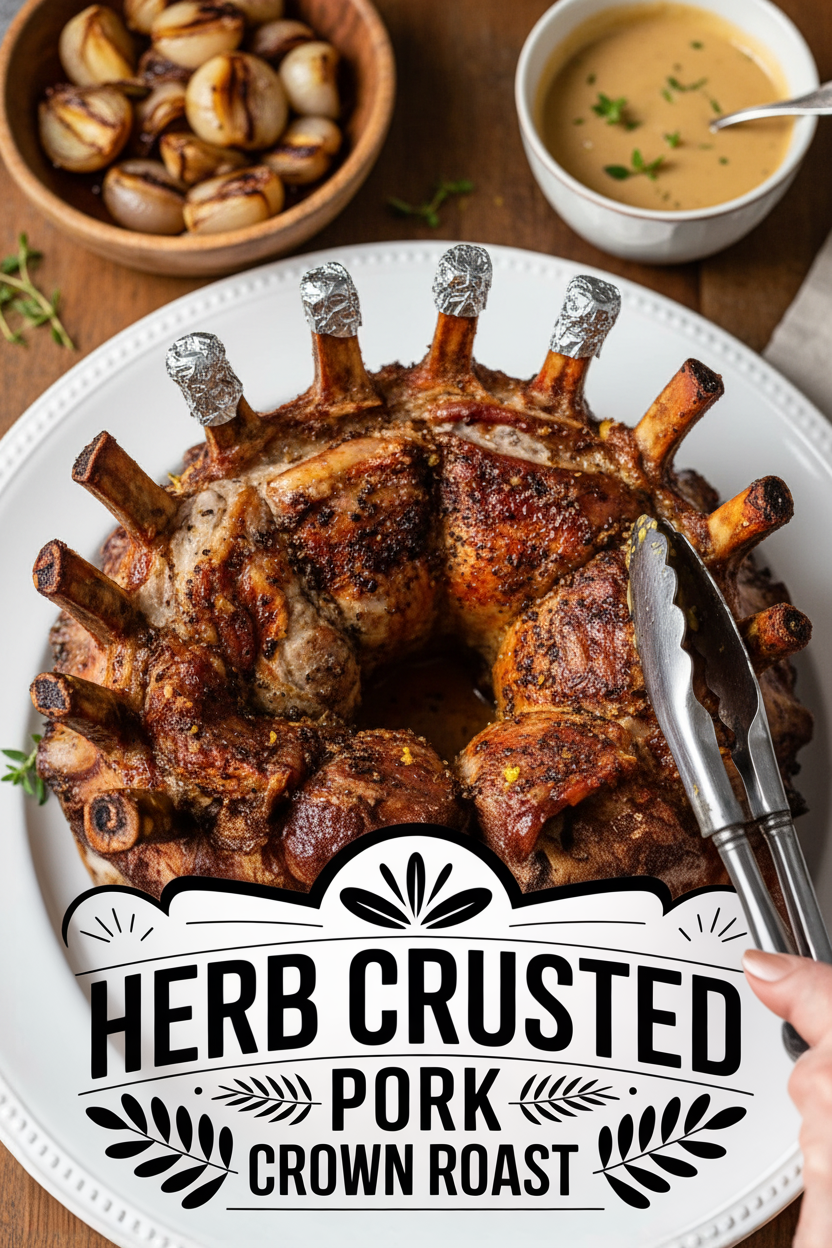
Herb Crusted Pork Crown Roast
Description
An impressive and flavorful centerpiece, this Garlic-and-Herb-Rubbed Pork Crown Roast features a deeply seasoned crust and a rich, buttery pan sauce.
Ingredients
PAN SAUCE
Instructions
- Set wire rack in rimmed baking sheet. Spray rack with vegetable oil spray. Combine garlic, thyme, and oregano in small bowl. Transfer 1 tablespoon garlic mixture to second small bowl and stir in oil; refrigerate garlic-herb oil until needed for brushing. Stir salt, pepper, and lemon zest into remaining garlic mixture.
- Pat roasts dry with paper towels. Place 1 roast fat cap side up on cutting board perpendicular to counter edge. Using boning knife, cut guideline 1½ inches from tips of bones (all the way down to bones), down length of rack. Running knife along bones, cut and scrape meat off tops of bones. Carve out meat between exposed bones, cutting and scraping closely along bones to remove any large pieces of meat (bones needn’t be perfectly clean). Cut any large pork trimmings into rough 2-inch pieces and refrigerate 1 cup trimmings for pan sauce; discard remaining trimmings or reserve for another use.
- Flip roast fat cap side down, parallel to counter edge with tips of bones facing away from you. Cut slits into loin in between every 2 bones, about 1 inch deep and 3 inches long (4 to 5 slits per roast).
- Position roast with bones pointing up and butterfly roast by slicing into center of loin, stopping 1 inch from bottom to keep roast intact, down length of roast. Repeat steps 2 through 4 with second roast.
- Open roasts so they lie flat and rub interior of each roast with 2½ tablespoons garlic-salt mixture (5 tablespoons total). Fold halves together (returning roasts to original shape). Cut one 18-inch length of kitchen twine per slit; tie roasts tightly with twine around each slit to secure roasts.
- Place one 4-foot-long piece of twine parallel to counter edge. Center 1 roast fat cap side up on twine parallel to counter edge. Place second roast on top of first roast, fat cap side down, with bones facing same direction. Bring ends of twine up and around both roasts and tie tightly. Stand assembled roast with bones pointing up. Rub remaining 10 tablespoons garlic-salt mixture all over roast.
- Crumple large piece of aluminum foil into 3-inch ball. Gently separate roasts to form oval shape and tuck foil ball in center. Bend ends of each roast inward to form rounded shape, adjusting twine as needed to keep it taut. Tie second 4-foot-long piece of twine around bones to cinch into crown shape. Transfer tied roast to prepared wire rack and refrigerate, uncovered, for at least 12 hours or up to 24 hours.
- Adjust oven rack to middle position and heat oven to 250 degrees. Insert thermometer probe horizontally into thickest part of meat, about 1 inch below bones. Roast until internal temperature reaches 135 degrees, 2½ to 3 hours.
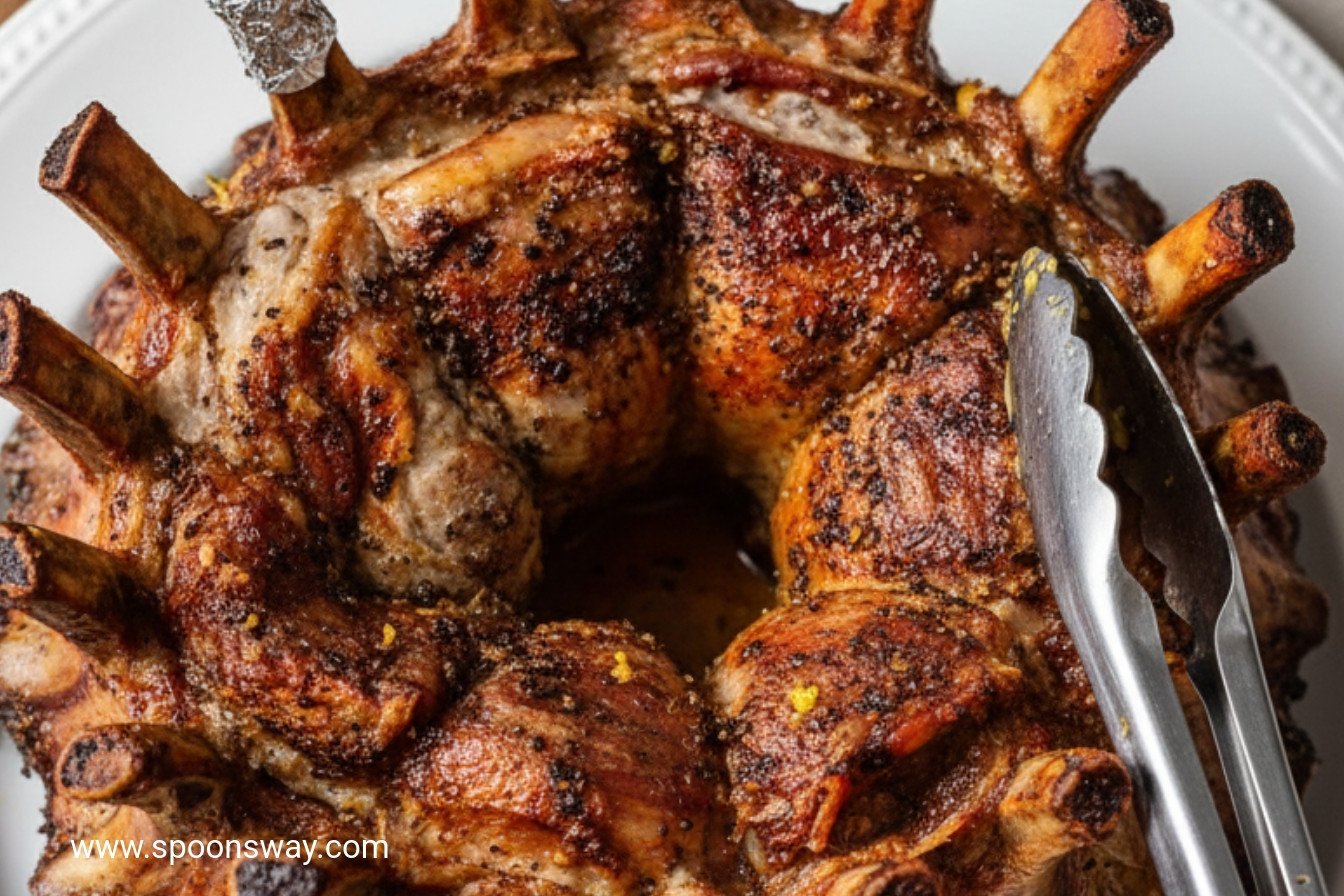
- Remove roast from oven and remove thermometer probe. Increase oven temperature to 450 degrees. Brush roast all over with reserved garlic-herb oil. Once oven has preheated, return roast to oven and roast until well browned, 15 to 20 minutes. Remove roast from oven and tent with foil. Let rest for at least 30 minutes or up to 1 hour.
- While roast rests, heat oil in large saucepan over medium-high heat until just smoking. Add reserved pork trimmings and cook, stirring occasionally, until pieces are browned all over and fond has formed on bottom of saucepan, 5 to 7 minutes. Stir in shallot and garlic and cook until lightly browned, about 2 minutes. Stir in broth and wine, scraping up any browned bits. Bring to boil over high heat and cook until reduced by three-fourths, about 15 minutes.
- Strain liquid through fine-mesh strainer set over measuring cup (you should have about 1 cup); discard solids. Return liquid to now-empty saucepan and simmer over medium heat as needed to reduce to 1 cup. Off heat, whisk in butter, 1 piece at a time, until incorporated (sauce should have consistency of creamy salad dressing). Whisk in thyme and vinegar. Season with salt and pepper to taste. Cover to keep warm.
- Transfer roast to platter. Remove twine and slice meat between bones. Serve with sauce.
Notes
- For best results, do not skip the 12-24 hour dry-brining step in the refrigerator, as this is crucial for flavor and texture. Ensure the internal temperature reaches exactly 135°F before the high-heat browning step.