
The Magic of Roasted Garlic
Let’s start with the garlic. Roasting it makes it sweet and soft. It loses that sharp bite. It becomes like a gentle, creamy spread.
You just drizzle the heads with oil and bake them. Your kitchen will smell wonderful. I still laugh at the first time I did this. I ate half the cloves straight from the oven. They were that good.
Getting Your Dough Ready
Making sourdough is like caring for a friend. You need a happy, bubbly starter. You mix it with warm water and flour. Then you let it rest.
This rest is important. It lets the flour drink all the water. This matters because it helps your bread get a lovely, open texture. Have you ever baked with sourdough before? What’s your biggest challenge?
The Stretch and Fold Dance
Now for the fun part. You do not need to knead this dough hard. Instead, you gently stretch and fold it. You do this every 15 or 30 minutes.
It is a slow dance with the dough. This builds strength for a good rise. On your last few folds, you add the roasted garlic and rosemary. The smell is just amazing.
A Lesson in Patience
The dough needs to rest for a long time. It might take all day or even all night. This is the hardest part for me. I always want to rush it.
But waiting matters. It lets the flavor grow deep and tangy. That is what makes sourdough so special. *Fun fact*: The slow rise is also easier for some people to digest. Do you find it hard to be patient when you bake?
The Big Bake
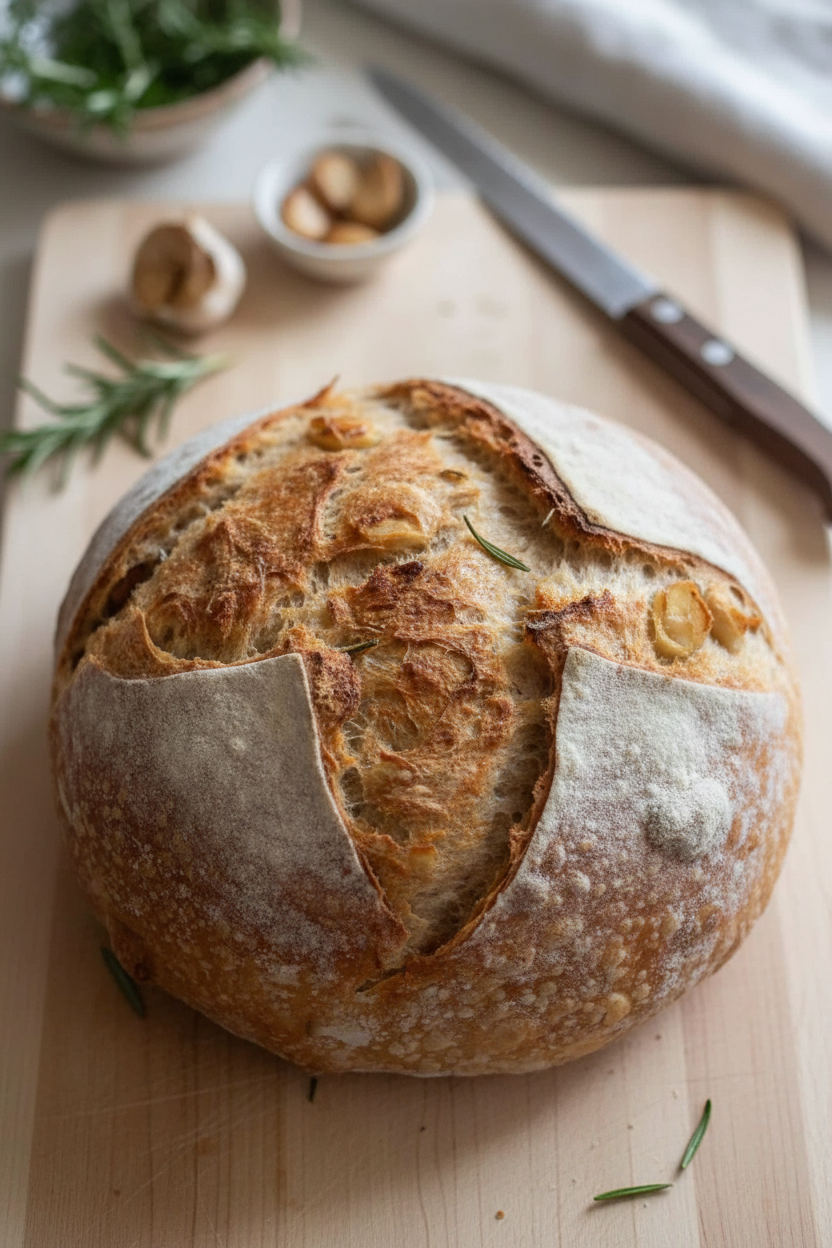
We bake our bread in a very hot Dutch oven. The steam inside gives us a crispy crust. You score the top with a sharp blade. This lets the bread expand as it bakes.
That first peek when you take the lid off is magic. The loaf is golden and puffed up. It is a proud moment for any baker. What is your favorite part of the baking process?
The Final, Important Wait
You must let the bread cool completely. I know it is hard to wait. The smell fills the whole house. You just want to cut a warm slice.
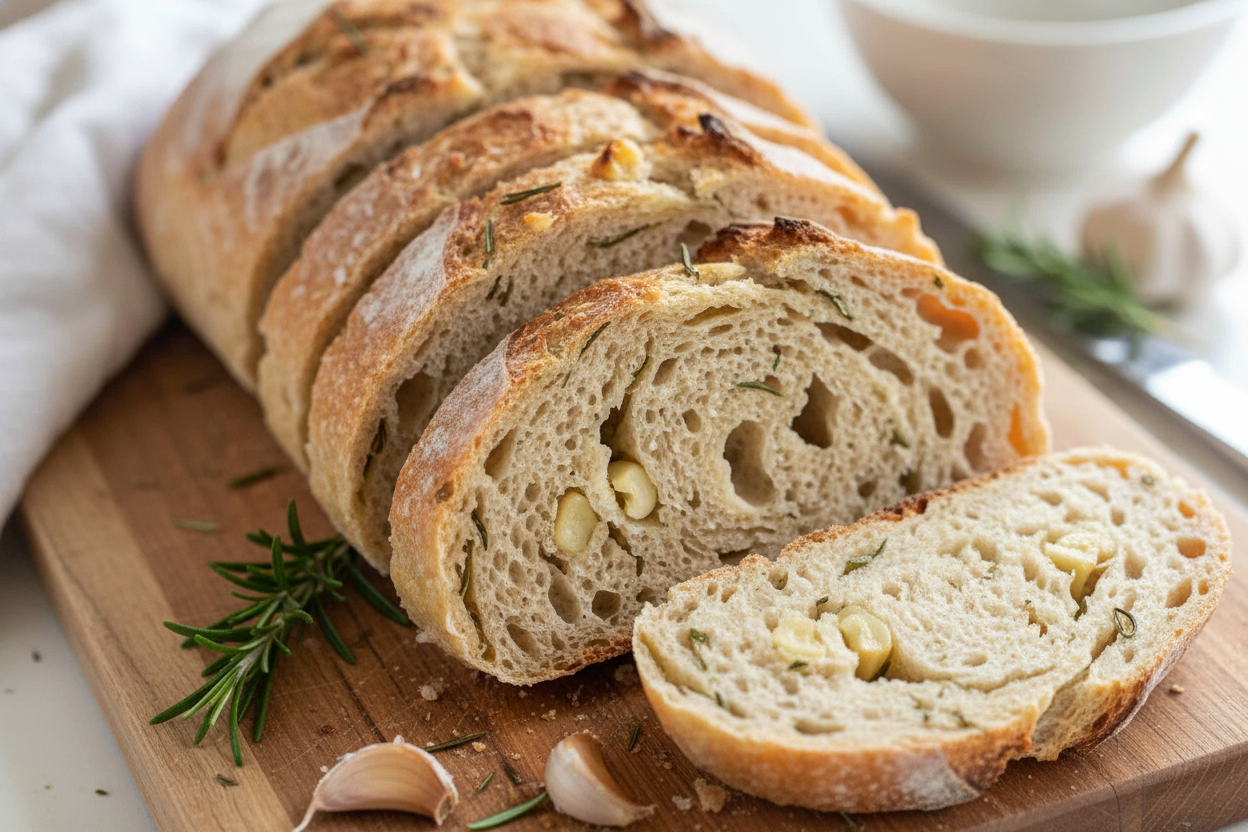
But if you slice it too soon, the inside gets gummy. This matters for the perfect texture. Letting it cool finishes the cooking inside. It is worth the wait, I promise.
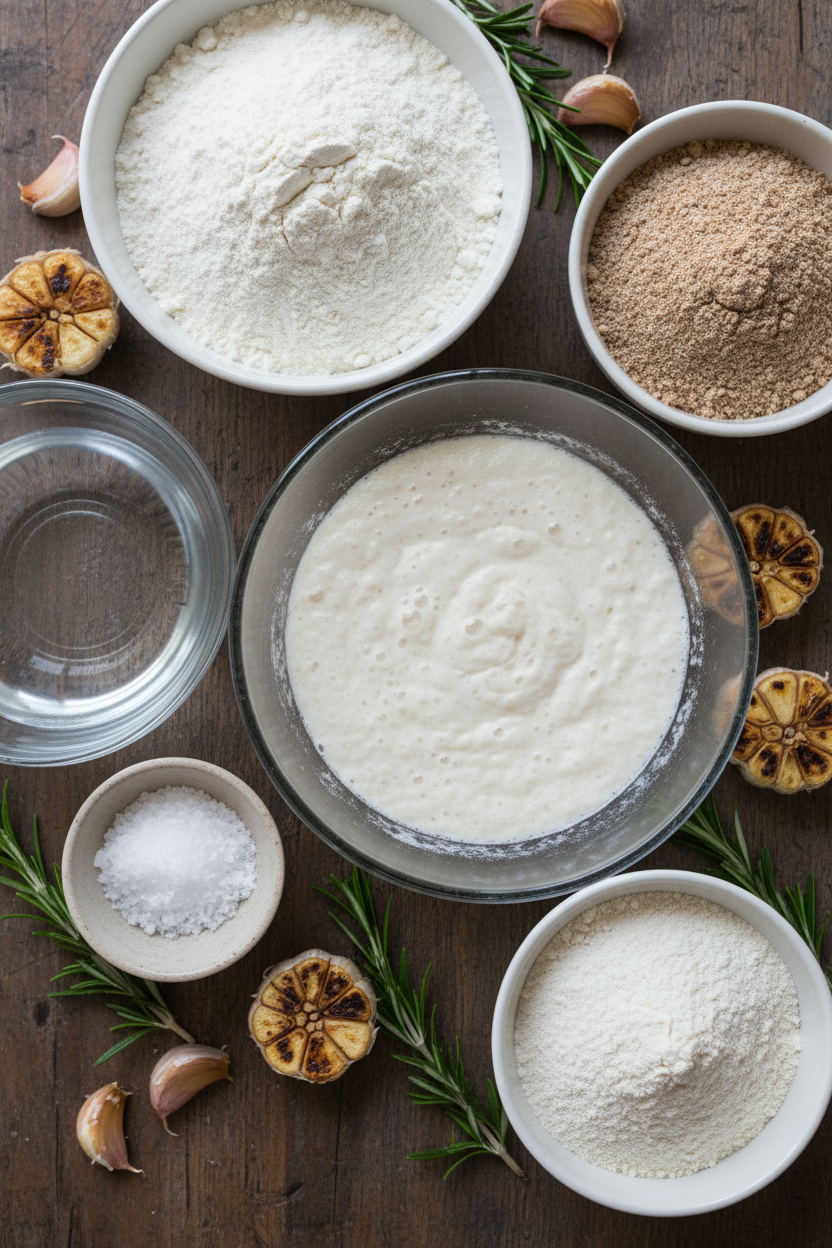
Ingredients:
| Ingredient | Amount | Notes |
|---|---|---|
| All purpose flour | 250 grams | |
| Whole wheat flour | 100 grams | |
| Bread flour | 125 grams | |
| Sourdough starter | 100 grams | Bubbly and active |
| Water | 325 grams | Warm |
| Salt | 10 grams | |
| Roasted garlic | 2 heads | Cooled |
| Fresh rosemary | 1 tablespoon | Finely chopped |
My Cozy Garlic Rosemary Sourdough
There is nothing quite like the smell of baking bread. It makes a house feel like a home. My grandson says it’s the best smell in the world. I have to agree with him. Today, I want to share my special sourdough recipe with you. It’s filled with sweet roasted garlic and fresh rosemary. It sounds fancy, but it’s really just simple, good food. Let’s get our hands a little dusty with flour, shall we?
Ingredients
- 2 heads of garlic
- Olive oil
- Warm water
- Assorted flours
- Sourdough starter
- Salt
- Fresh rosemary
Instructions
Step 1: Roast the Garlic
First, we need to roast the garlic. Preheat your oven to 375 F. Cut the tops off two whole heads of garlic. This lets the yummy inside parts peek out. Drizzle them with a little olive oil. I still laugh at how I used to be scared of roasting garlic. It’s so easy! Roast them until they are soft and golden. That takes about an hour.
Step 2: Make the Dough
Now, let’s make the dough. Mix your warm water and all the flours together in a big bowl. Just let it sit for half an hour. This rest makes the flour happy and hydrated. Then, add your bubbly sourdough starter. Sprinkle the salt on top, but not directly on the starter. Salt can make the little yeasties sleepy.
Step 3: Mix and Rest
Time to get your hands in there! Mix everything together for about five minutes. It will feel sticky and messy. That’s perfectly normal. Cover the bowl with a damp tea towel. Let the dough rest again for 30 minutes. This is a good time to have a cup of tea. I always do.
Step 4: Stretch and Fold
Now for the stretches and folds. This is how we build strength in the dough. Wet your hands so it doesn’t stick too much. Gently pull one edge of the dough up and fold it over itself. Turn the bowl and do it again. We will do this six times over a few hours. (My hard-learned tip: set a timer! I’ve forgotten many a fold while watching the birds outside my window.)
Step 5: Add Flavors and Rise
On your second-to-last fold, add the cooled roasted garlic and chopped rosemary. Just squeeze the garlic right out of its papery skin. Doesn’t that smell amazing? Gently fold these goodies into the dough. They will get mixed in as you finish your folds. Let the dough rise until it’s doubled in size. This takes patience, sometimes all night!
Step 6: Shape and Cold Rest
Shape your dough into a nice, tight ball. Let it rest for 15 minutes so a little skin forms on top. Then, place it smooth-side down into a floured bowl or banneton. Cover it and let it get cold in the fridge for many hours. This slow rest gives the bread its wonderful flavor. What’s your favorite smell coming from the kitchen? Share below!
Step 7: Preheat and Score
Time to bake! Preheat your oven and a Dutch oven to 500 degrees. This is very hot! Carefully take your cold dough out. Place it on parchment paper and dust it with flour. Score the top with a sharp blade. This lets the bread expand beautifully in the oven.
Step 8: Bake and Cool
Put the dough, with its parchment paper, into the hot Dutch oven. Bake with the lid on for 20 minutes. Then, take the lid off. Lower the heat to 475 degrees. Bake for another 25 minutes until it’s a deep, golden brown. Let it cool completely on a rack. I know it’s hard to wait. But slicing it warm makes the bread gummy.
Cook Time: 45 minutes
Total Time: 18-24 hours (mostly waiting!)
Yield: 1 beautiful loaf
Category: Bread, Baking
Three Tasty Twists to Try
This bread is a wonderful canvas for your own ideas. Don’t be afraid to play with it! I love adding different things from my garden or pantry. Here are a few simple twists that are just delightful. They make the recipe feel new again. My neighbor gave me the sun-dried tomato idea last summer.
Sun-Dried Tomato & Basil: Swap the rosemary for chopped fresh basil. Add in a handful of chopped sun-dried tomatoes. It tastes like a summer pizza in a loaf of bread.
Olive & Thyme: Use thyme instead of rosemary. Fold in a half-cup of pitted, chopped kalamata olives. The salty, savory flavor is so good with soup.
Everything Bagel: Skip the garlic and herbs inside the dough. After scoring, brush the top with water and sprinkle on everything bagel seasoning. It gives the crust a fantastic, crunchy flavor.
Which one would you try first? Comment below!
Serving Your Masterpiece
Now, what to do with this gorgeous, crusty loaf? A thick, warm slice with a pat of melting butter is pure joy. That’s my favorite way. For a simple meal, serve it alongside a big bowl of tomato soup. The bread is perfect for dipping. You can also tear pieces to share with friends. It makes any meal feel like a special occasion.
For a drink, a glass of red wine like a Cabernet Sauvignon pairs wonderfully. The wine stands up to the strong garlic and rosemary flavors. If you’re not having wine, try a sparkling apple cider. Its sweet bubbles are a lovely contrast to the savory, hearty bread. Which would you choose tonight?
Keeping Your Sourdough Fresh
This bread is best the day you bake it. But it keeps well for a few days. Just wrap it in a tea towel on the counter.
For longer storage, slice and freeze it. I freeze mine in a big bag. Then I can take out one slice or many.
To reheat, toast a frozen slice straight from the freezer. It gets crispy and warm. It tastes almost fresh from the oven.
I once left a loaf out for three days. It got very hard. My grandson used it for a hockey puck! So freezing is smarter.
Batch cooking matters for busy families. A fresh, homemade snack is always ready. It saves you money and time.
Have you ever tried storing it this way? Share below!
Simple Fixes for Sourdough Troubles
Is your dough too sticky? Wet your hands with water. This stops the dough from sticking to you.
Is your bread too dense? Your starter might not be active enough. It should look bubbly and happy before you use it.
I remember my first flat loaf. I did not let it rise enough. Patience is the secret ingredient in bread baking.
Is your crust not brown enough? Make sure your oven is hot. A hot Dutch oven gives you that perfect crackly crust.
Fixing these small issues builds your confidence. You learn more each time you bake. It also makes the flavor much better.
Which of these problems have you run into before?
Your Sourdough Questions Answered
Q: Can I make this gluten-free?
A: Sourdough is tricky without gluten. I would find a special gluten-free recipe instead.
Q: Can I make the dough ahead?
A: Yes! The long fridge rest is perfect for this. You can bake it the next morning.
Q: What if I don’t have fresh rosemary?
A: Dried rosemary works too. Just use a little less, about one teaspoon.
Q: Can I make a bigger loaf?
A: You can double the recipe. But bake it in two separate loaves. This helps it cook evenly.
Q: Is scoring the dough really needed?
A: Yes, it lets the bread expand. Use a sharp knife if you don’t have a lame.
Fun fact: That long fridge rest is called “cold proofing.” It gives the bread more flavor!
Which tip will you try first?
Share Your Kitchen Creations
I hope you love baking this bread. The smell of garlic and rosemary is so cozy. It fills your whole house with love.
I would be so happy to see your results. Sharing food is how we connect. It brings us all together.
Have you tried this recipe? Tag us on Pinterest! Show me your beautiful, golden loaves. I will be looking for them.
Happy cooking!
—Grace Ellington.

Garlic Rosemary Sourdough Bread Recipe
Description
A flavorful and aromatic sourdough bread featuring roasted garlic and fresh rosemary, baked to perfection with a crisp crust and soft, airy crumb.
Ingredients
Instructions
- Remove the tops of your heads of garlic with a sharp knife, revealing the cloves inside.
- Placing the cloves on the tray, drizzle with olive oil.
- Bake until soft, around one hour.
- Squeeze the papery lining of the garlic to pop out the soft cloves inside, then allow to cool.
- Mix warm water and flour, then let it rest for 30 minutes to autolyse, which is the process of the water hydrating the flour.
- Gently add in your sourdough starter, sprinkling the salt on top.
- Mix for about 5 minutes with your hands to combine all the ingredients.
- Cover with a damp tea towel or plastic wrap and allow to rest for 30 minutes.
- We will use a series of six stretches and folds to develop the gluten for a nice rise.
- After the 30 minute rest, keep your dough in the bowl and pull the nearest edge of the bread dough firmly upwards, then folding it back into the center. Turn your bowl a quarter turn, then stretch and fold again. Repeat this once or twice more to complete your first round. If the dough is too sticky, you can dip your hands in water.
- Repeat this process five more times, according to the times listed below. *During the second to last stretch and fold, you’ll add roasted garlic and rosemary. These will be worked into the dough during the succeeding stretch and folds.* First 3 stretch and folds: every 15 minutes. Last 3 stretch and folds: every 30 minutes.
- After completing the stretch and folds and having added the garlic and rosemary, cover the dough with a wet towel or plastic wrap and allow to double in size. This could take anywhere from 6-12 hours (or longer).
- Shape into a ball by gently spinning the dough toward you on a lightly floured work surface.
- Let the dough rest uncovered for 15-20 minutes so the surface can develop a skin.
- Shape into a boule, by transferring to a floured banneton (or bowl lined with a floured tea towel) with the smooth side (the side you just left up to form a skin) facing down. Pull the sides up to the middle and pinch together. Do this a few times to create more tension.
- Cover with a tea towel or plastic wrap and refrigerate for 12-15 hours. Or if you are in more of a hurry, you can leave it at room temperature until doubled (about 3-4 hours).
- Set oven temperature to 500 degrees and preheat your Dutch oven for one hour.
- Remove dough from refrigerator and place seam side down on a piece of parchment paper. Lightly dust with flour on top, and score with a razor blade or lame.
- Place the still-cold dough with parchment paper inside the very hot Dutch oven.
- Bake with lid on at 500 degrees for 20 minutes.
- After 20 minutes, remove the lid and reduce the temperature to 475, baking an additional 25 minutes or until golden brown.
- Cool on a wire rack completely before slicing.
Preheat oven to 375 F and prepare a baking tray lined with parchment paper. Alternatively, you can wrap the cloves inside foil on your tray.
Feed your sourdough starter around 4-12 hours before beginning this recipe, letting it become active and bubbly.
Notes
- Ensure your sourdough starter is active and bubbly before starting. The long fermentation times are crucial for developing flavor and texture. Do not slice the bread while it’s still warm, as this can make the crumb gummy.