My First Snowball Fight
I made my first snowman cookie when I was ten. It was a messy, lopsided little fellow. I used raisins for eyes. My brother ate him before the frosting even dried. I still laugh at that.
These cookies are not hard. They are just two simple dough logs. One makes the head, one makes the body. You slice and bake them together. It feels like magic when they come out of the oven. Doesn’t that smell amazing?
Why We Shape Them
Shaping the dough matters. It gives us a moment to slow down. Your hands make something real. In a world of screens, that is a special feeling.
Rolling the logs is the secret. It makes every cookie the same size. This way, they all bake evenly. No burnt snowmen in this kitchen! What was the first cookie you ever helped bake?
The Coconut Blanket
The glaze is just sugar and milk. You whisk it until smooth. Then you dip the cookie tops. This next part is my favorite.
You roll the wet glaze in coconut. It looks like a fluffy, white sweater. The coconut sticks to the glaze like snow. Fun fact: processing the coconut makes it extra fluffy, like fresh snow. Then you add chocolate chip eyes and buttons. Do you like coconut, or would you use sprinkles instead?
A Lesson in Patience
You must chill the dough logs. This is the hardest step. I know you want to bake them now. But patience here matters.
Cold dough holds its shape. If you skip the chill, your snowmen will melt in the oven. They will become puddles, not people. Waiting makes them perfect. I use the chill time to wash the dishes. What do you do while you wait for dough to chill?
Sharing the Warmth
These cookies are for sharing. Food tastes better with friends. It is about the smiles, not just the sugar. That is the real recipe.
I pack them in a tin with a napkin. I give them to my neighbor. Her smile is my favorite part of baking. Making food for others is a kind of love. Who will you share your snowmen with this year?
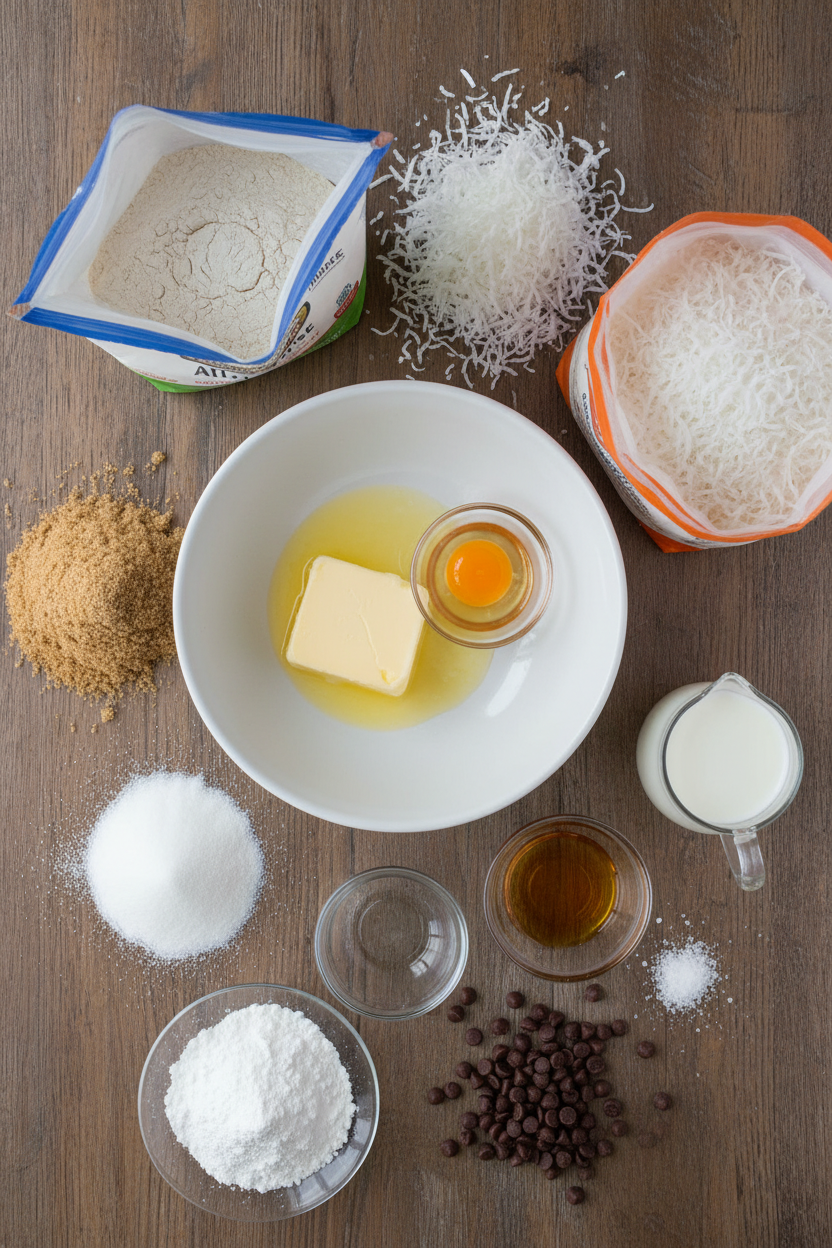
Ingredients:
| Ingredient | Amount | Notes |
|---|---|---|
| Granulated sugar | ⅓ cup (2 ⅓ ounces/66 grams) | |
| Light brown sugar | 2 tablespoons packed | |
| Salt | ½ teaspoon | |
| Unsalted butter | 12 tablespoons, cut into pieces and softened | |
| Large egg yolk | 1 | |
| Vanilla extract | 1 ½ teaspoons | |
| All-purpose flour | 1 ½ cups (7 ½ ounces/213 grams) | |
| Sweetened shredded coconut | 1 cup (3 ounces/85 grams) | For dough |
| Confectioners’ sugar | 1 cup (4 ounces/113 grams) | For glaze |
| Whole milk | 4 teaspoons | For glaze |
| Sweetened shredded coconut | 1 cup (3 ounces/85 grams) | Finely chopped, for coating |
| Mini chocolate chips | As needed | For decoration |
My Little Coconut Snowmen
Hello, my dear. Come sit at the counter. I want to tell you about my snowmen. They are not made of snow, of course. They are sweet, buttery cookies. They look like two stacked snowballs. I first made them with my grandson, Leo. He was about your age. He called them “melting snowmen.” I still laugh at that.
These cookies are a happy project. They fill the kitchen with a wonderful smell. Doesn’t that smell amazing? It’s like vanilla and toasted sugar. The dough is simple to make. We use a food processor for most of it. Then we shape it into two little logs. This is the secret to perfect snowmen. One log is for the big bottom ball. The other is for the small top ball.
Here is how we bring our snowmen to life. Let’s begin.
- Step 1: First, we make the cookie dough. Put the white sugar, brown sugar, and salt in the food processor. Let it whir until the sugar is smooth. Now add the soft butter, egg yolk, and vanilla. Process it until it looks creamy. Scrape the bowl’s sides. Add the flour and pulse until a dough forms. (A hard-learned tip: make sure your butter is just soft, not melted. It makes all the difference.)
- Step 2: Next, we shape and chill. Turn the dough onto the counter. Divide it. Make one piece twice as big as the other. Roll each into a short, 4-inch log. Wrap them tightly in plastic. The fridge makes them firm. This takes at least two hours. I often make the logs a day ahead. It makes baking day so easy.
- Step 3: Time to bake our snowmen! Heat your oven to 350 degrees. Get out two baking sheets with parchment paper. Slice each log into thin rounds. Now, for the fun part. On your sheet, place one big round and one small round. Put their edges together. They become a snowman! Leave space between them. Bake until the edges are just golden. Why do we switch the baking sheets halfway through? Share below!
- Step 4: Let the cookies cool completely. Now, we give them their snowy coats. Chop the shredded coconut in the processor until it’s fine. In another bowl, mix the powdered sugar and milk. This is our gluey, sweet glaze. Spread a little glaze on a cookie. Then, sprinkle it with the fluffy coconut. It sticks like magic.
- Step 5: Finally, we give them faces. Use mini chocolate chips for eyes and buttons. You can make a smile, too. Let the glaze dry for about 30 minutes. Then, they are ready to eat. Leo always ate the ones with crooked smiles first. I think he made them that way on purpose.
Cook Time: 20 minutes
Total Time: 3 hours (includes chilling)
Yield: About 16 snowmen
Category: Dessert, Cookies
Let’s Play with Our Food
Once you know the basic snowman, you can dress him up. Here are three fun twists for your next batch. Which one would you try first? Comment below!
- Lemon Sunshine Snowmen: Add a teaspoon of lemon zest to the dough. Use a lemon juice glaze instead of milk. It’s so bright and cheerful.
- Chocolate Blizzard Snowmen: Replace a quarter of the flour with cocoa powder. Roll them in crushed peppermint candy instead of coconut. Very festive!
- Almond Joy Snowmen: Press a whole almond into each cookie before baking. After glazing, use coconut and a drizzle of melted chocolate. My neighbor adores these.
The Perfect Little Plate
These cookies are a delight all on their own. But I love making a pretty plate. Serve them on a blue dish to look like a winter sky. Scatter a few extra chocolate chips around like pebbles. It makes people smile before they even take a bite.
What to drink with them? For a cozy afternoon, a big mug of hot chocolate is perfect. The marshmallows are optional, but I say yes. For a grown-up gathering, a small glass of cream sherry pairs beautifully. It’s sweet and nutty. Which would you choose tonight?

Keeping Your Snowmen Fresh
These cookies stay happy in a sealed container. They last a week at room temperature. You can also freeze the dough logs for a month. Just slice and bake when you want fresh cookies.
I once baked a whole batch for a party. The party got canceled! I froze the dough instead. It was a lovely surprise for me the next week. Batch cooking matters because it saves time and reduces waste. You always have a treat ready for guests.
Let the glaze dry completely before you store them. This keeps the coconut nice and fluffy. Have you ever tried storing cookie dough this way? Share below!
Snowball Troubleshooting
First, your dough might be too soft. If it is, chill it longer. Firm dough makes neat slices. I remember when my first logs were mushy. They made funny-shaped snowmen!
Second, the cookies might spread too much. This happens if your butter was too warm. Chilling the dough fixes this. Proper texture matters for a cookie that melts in your mouth.
Third, your glaze might be too thick. Just add a few more drops of milk. A smooth glaze acts like glue for the coconut. Good decoration builds your kitchen confidence. Which of these problems have you run into before?
Your Coconut Snowball Questions
Q: Can I make these gluten-free? A: Yes! Use a gluten-free flour blend. The results will be just as good.
Q: Can I make them ahead? A: Absolutely. The dough logs keep for 3 days in the fridge.
Q: What can I use instead of chocolate chips? A: Try dried cranberries for a chewy, tart bit. Fun fact: The first chocolate chip cookie was invented by accident!
Q: Can I double the recipe? A: You can. Just make four dough logs instead of two.
Q: Any optional tips? A: Add a tiny drop of almond extract to the glaze. It tastes wonderful. Which tip will you try first?
From My Kitchen to Yours
I hope you love making these snowy treats. Baking is about sharing joy and making memories. My kitchen is always a little messy with coconut. I would not have it any other way.
I would love to hear about your baking adventure. Tell me about your family’s reaction. Have you tried this recipe? Share your experience in the comments. Happy cooking!
—Grace Ellington.
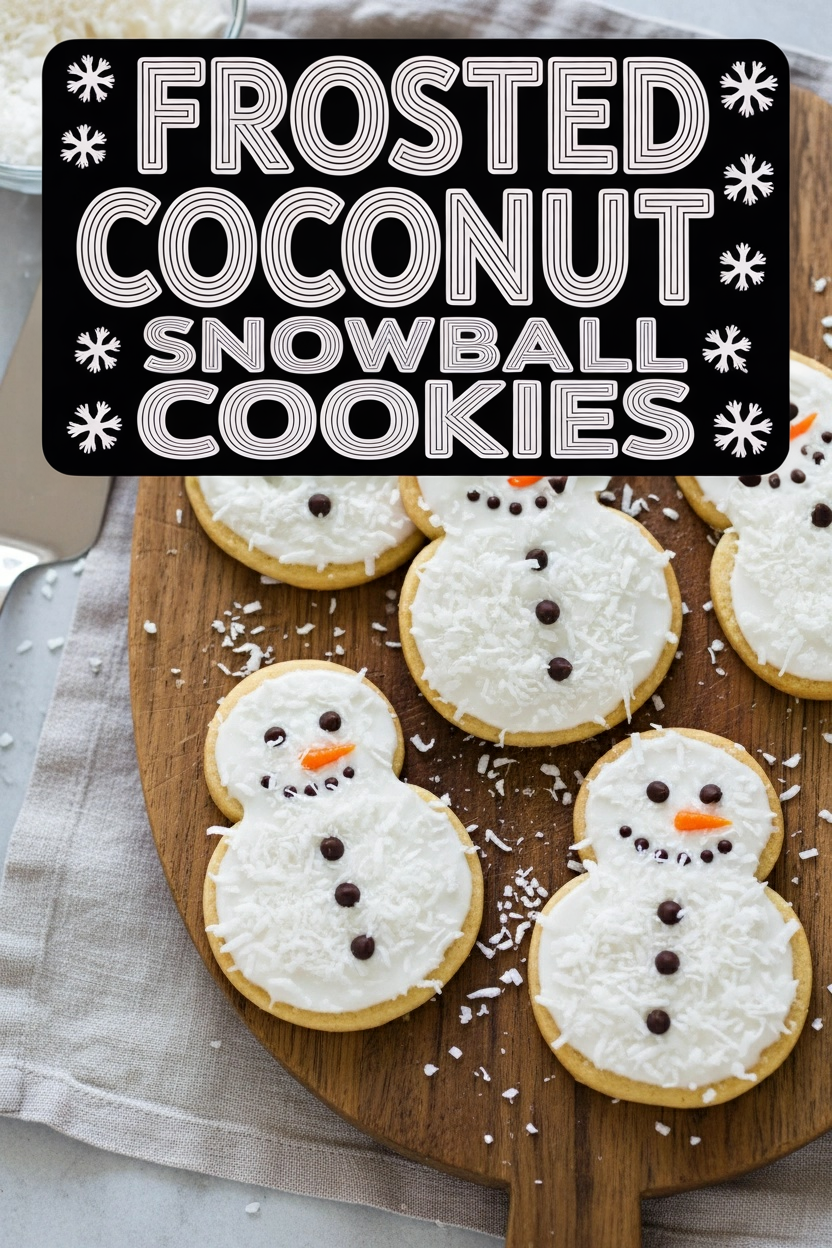

Frosted Coconut Snowball Cookies
Description
These charming Coconut Snowmen are buttery, coconut cookies with a sweet glaze and a fun snowman shape.
Ingredients
Instructions
- Process granulated sugar, brown sugar, and salt in food processor until no lumps remain, about 30 seconds. Add butter, egg yolk, and vanilla and process until smooth and creamy, about 20 seconds. Scrape down sides of bowl, add flour, and pulse until dough forms, 10 to 15 pulses. Transfer dough to counter and divide into 2 pieces, one twice as large as other. Roll small piece of dough into 4-inch log and wrap tightly in plastic wrap. Roll remaining dough into thicker 4-inch log and wrap tightly in plastic. Refrigerate logs until firm, at least 2 hours or up to 3 days.
- Adjust oven racks to upper-middle and lower-middle positions and heat oven to 350 degrees. Line 2 baking sheets with parchment paper. Slice each log into ¼-inch-thick rounds. Place 1 large round and 1 small round with edges touching on prepared sheets. Repeat with remaining rounds, spacing them 1½ inches apart on sheets. Bake until edges are just golden, 17 to 20 minutes, switching and rotating sheets halfway through baking. Let cookies cool on sheets for 10 minutes, then transfer to wire rack and let cool completely.
- Process coconut in food processor until finely chopped, about 10 seconds; transfer to bowl. Whisk confectioners’ sugar and milk in separate bowl until smooth. Working with 1 cookie at a time, spread 1 teaspoon glaze evenly onto cookie, then sprinkle with coconut. Decorate with chocolate chips. Let glaze dry for at least 30 minutes before serving.
Notes
- Nutritional information is estimated per cookie. For a neater look, you can dip the tops of the cookies into the glaze and then into the coconut.