
A Sweet Little Secret
I have a secret for you. The fanciest treats are often the easiest. These Oreo truffle pops are proof of that. They look like you spent all day in the kitchen. But our little secret is how simple they are.
I first made these with my grandson. He was so proud of his creation. I still laugh at that. He told everyone he was a “famous chef.” Making food with someone you love is the best part. That is why this matters. It is about the memories, not just the meal.
Let’s Make the Truffle Heart
First, let’s turn those Oreos into dust. Put the whole package in the food processor. Let it whirr until you have fine black crumbs. Doesn’t that smell amazing?
Now, add the soft cream cheese. Blend it all together. You will get a thick, dark dough. Roll little balls, about the size of a walnut. This is the fun, messy part. What is your favorite Oreo flavor to bake with?
A Stick and a Chill
Push a lollipop stick into the top of each ball. Be gentle so it does not break. Then, the waiting begins. Pop the whole tray into the fridge.
Let them get nice and firm for 30 minutes. This chill time is important. It makes the next step so much easier. A little patience makes a better treat. That is a good lesson for the kitchen and for life.
The Shiny Chocolate Coat
Now for the magic shell. Melt the chocolate chips with the coconut oil. Do this in short bursts in the microwave. Stir it well each time. Fun fact: The coconut oil is our secret. It makes the chocolate super shiny and helps it harden perfectly.
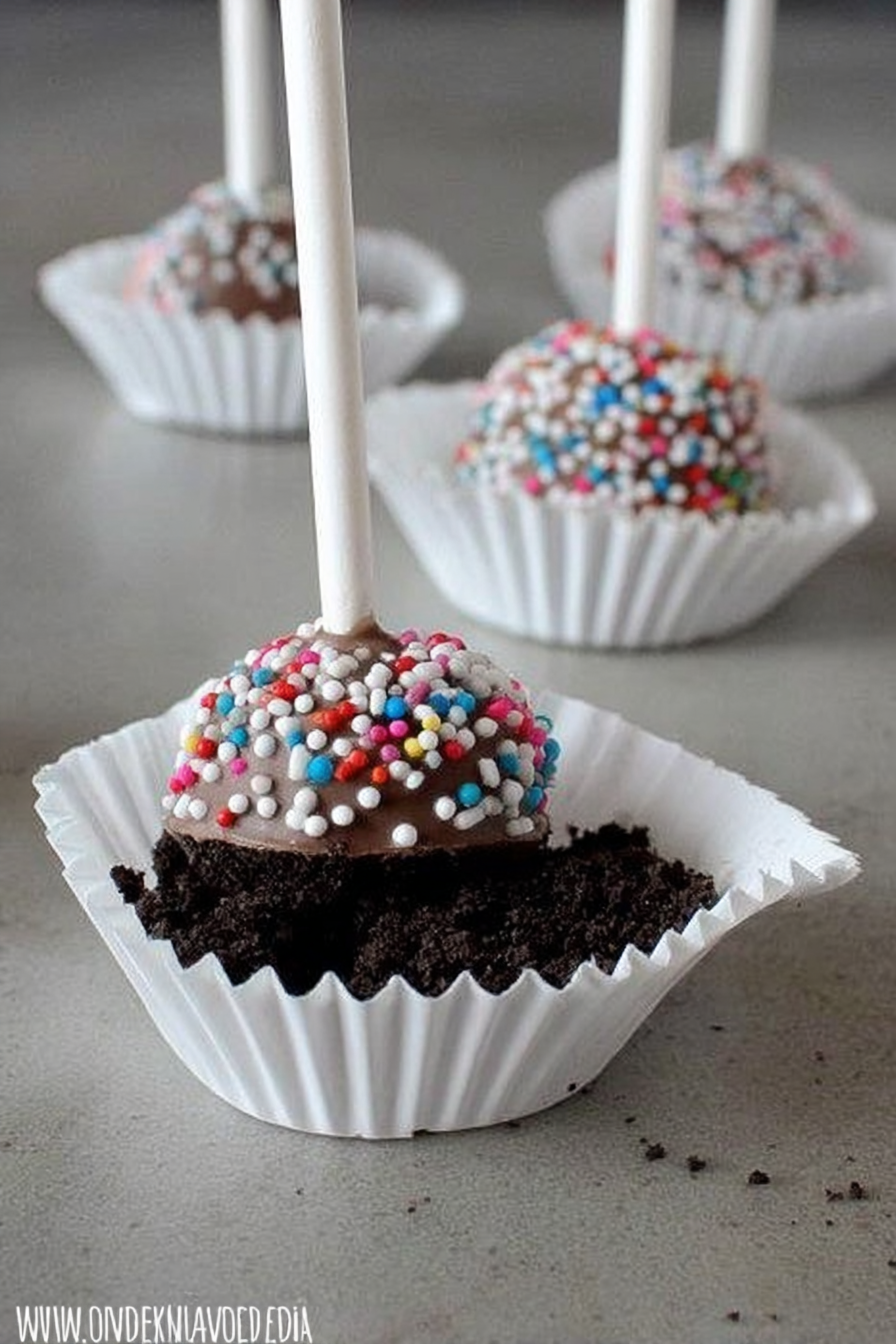
Take your cold truffle pops. Dip each one into the warm chocolate. Use a spoon to help coat it. Let the extra chocolate drip off. This is where they get their fancy look.
Time for Sprinkles!
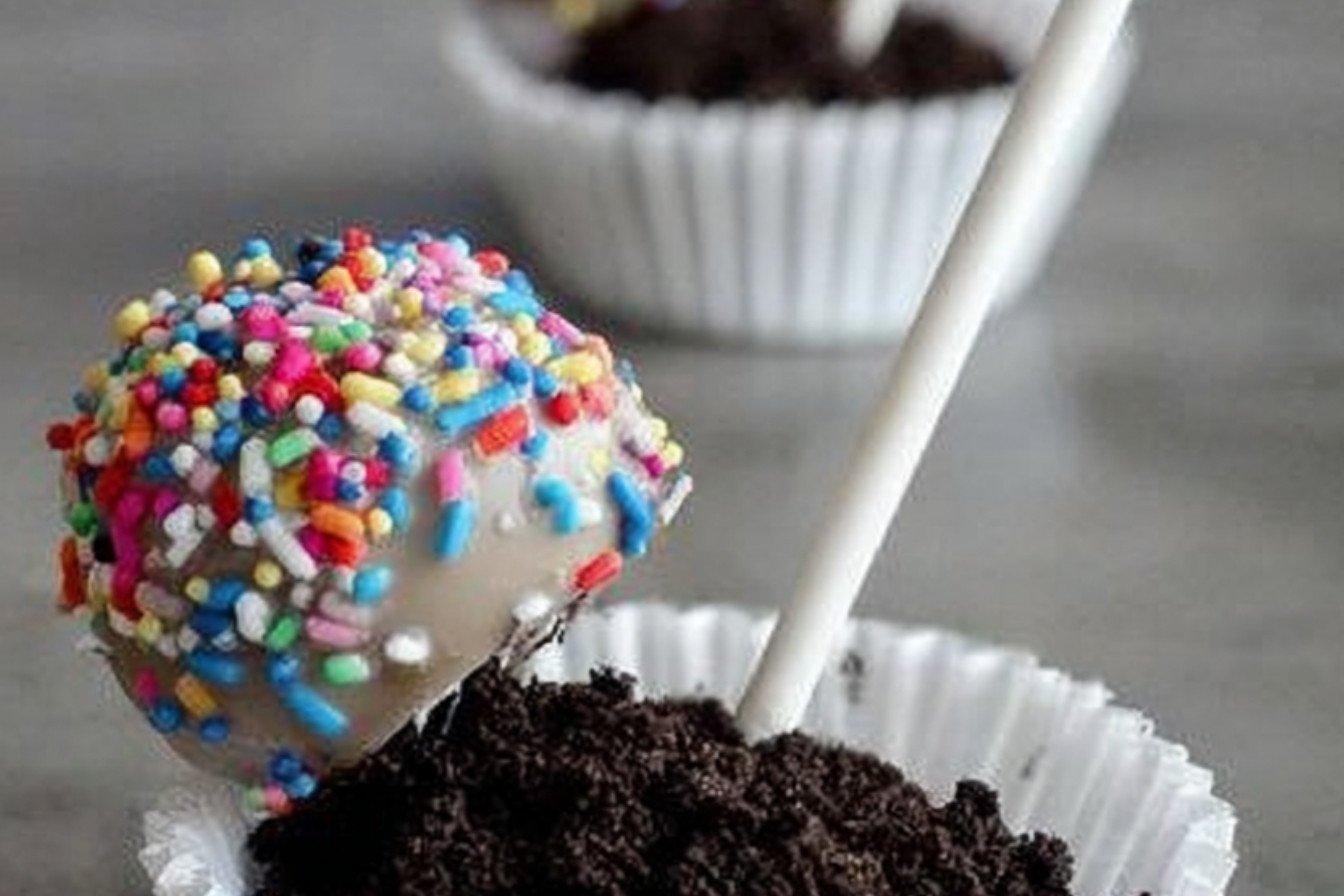
Before the chocolate sets, add your sprinkles. I love the tiny nonpareil balls. They look like little jewels. Hold your pop over a bowl and shower it with color.
This is the best part for kids. And for me, too. Do you like one color of sprinkles or the rainbow mix? Put the finished pops back in the fridge. Let the chocolate set completely. Then they are ready to enjoy.
Sharing Your Creations
These pops are perfect for parties. Or just a happy Tuesday. They make wonderful gifts from the heart. Wrap them in clear bags with a ribbon.
Seeing someone’s face light up is the real reward. That is why this matters. Food is a way to show you care. I would love to see your truffle pops. Will you tell me who you made them for?

Ingredients:
| Ingredient | Amount | Notes |
|---|---|---|
| Oreos | 1 package | Any flavor |
| Cream Cheese | 4 ounces | |
| Dark Chocolate Morsels | 1 cup | |
| Coconut Oil | 2 tsp | |
| Nonpareils (sprinkle balls) | 3-4 ounces | |
| Lollipop Sticks | 4 inch |

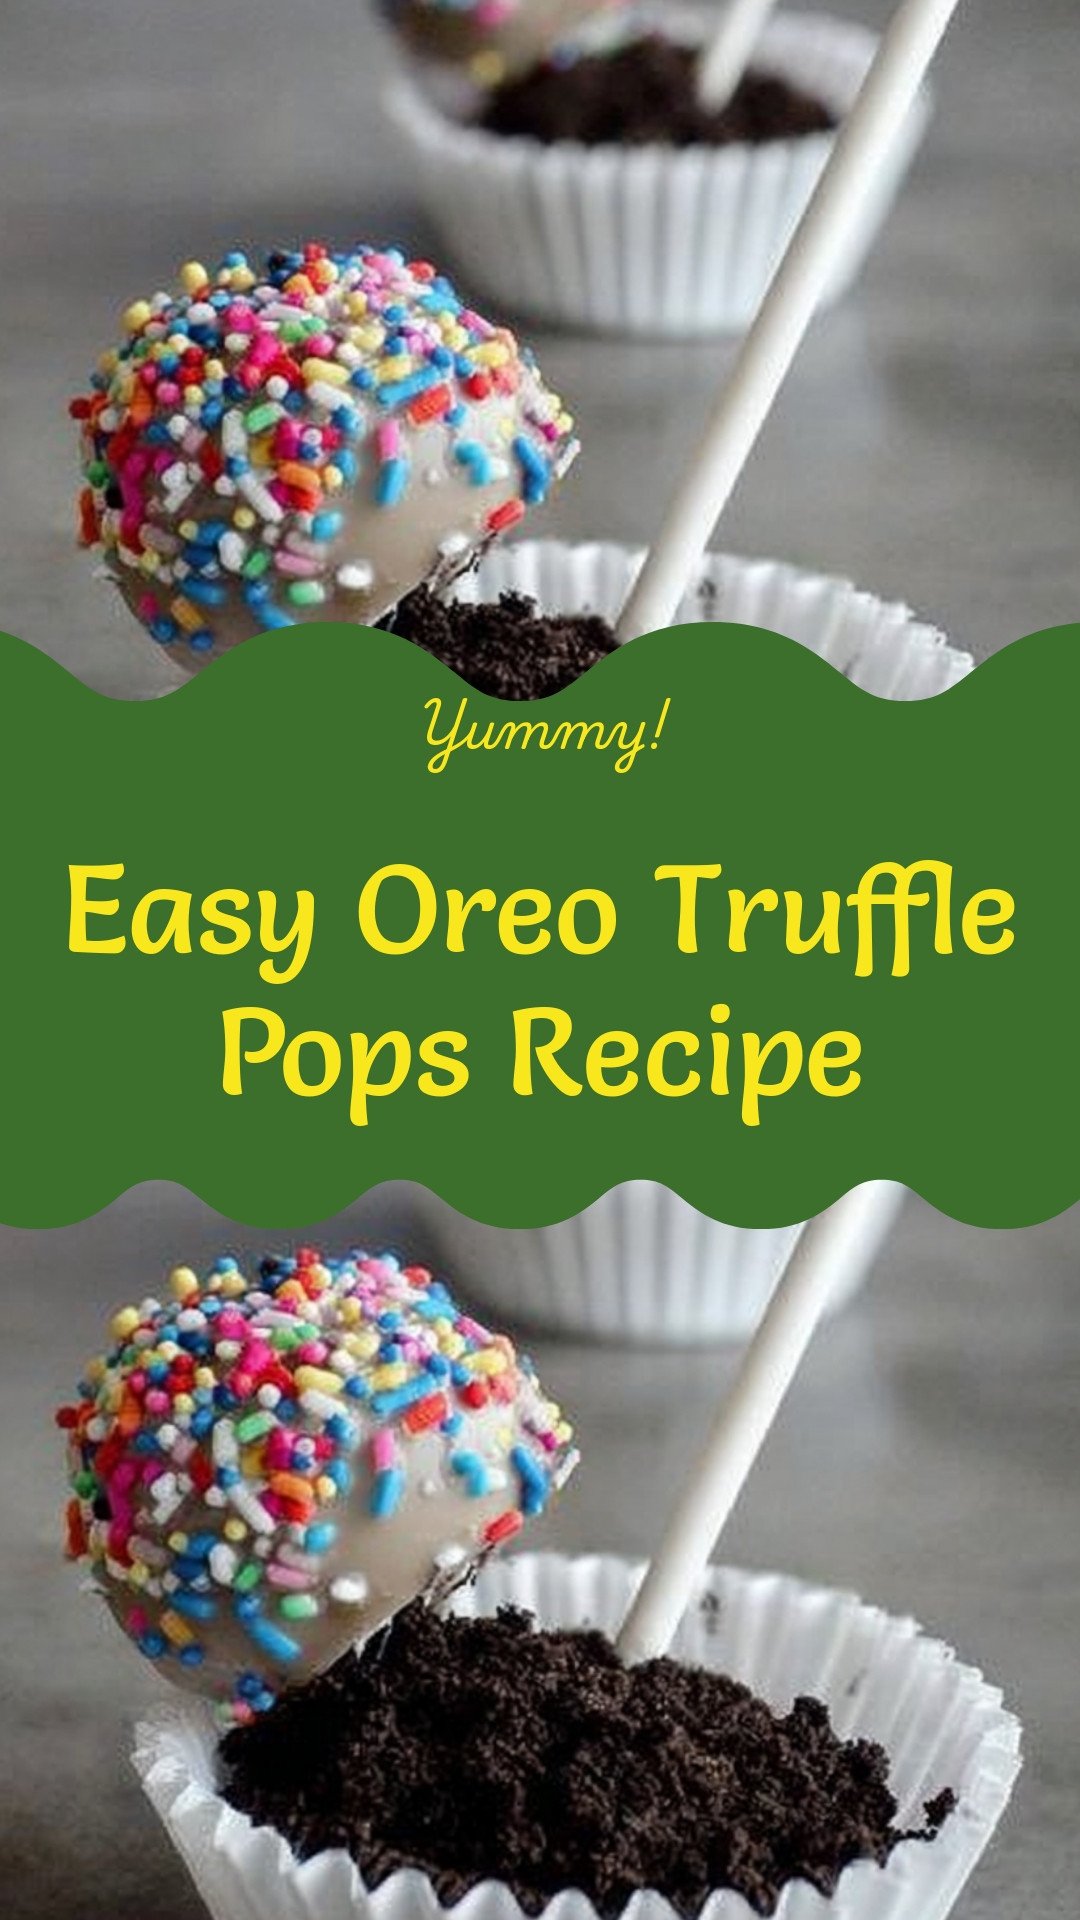
Easy Oreo Truffle Pops Recipe
Oh, these little pops are pure joy. They remind me of my grandson’s birthday. He thought they were magic. The best part is, you don’t even need an oven. Just a food processor and your own two hands. Let’s make some kitchen magic together.
- Step 1: First, let’s turn those Oreos into dust. Put the whole package in your food processor. Let it whir until you have fine, dark crumbs. I still laugh at that sound. It’s like a little kitchen thunderstorm.
- Step 2: Now, add your cream cheese to the crumbs. Process it again until it’s all mixed. It will look like a dark, sticky dough. Doesn’t that smell amazing? (A hard-learned tip: make sure your cream cheese is soft. It mixes so much easier that way.)
- Step 3: Time to get your hands dirty. Roll the dough into little balls, about the size of a walnut. Place them on a baking sheet with parchment paper. This part is fun and a little messy. It reminds me of making mud pies as a child.
- Step 4: Gently push a lollipop stick into the top of each ball. Don’t push too hard or it might poke through. Now, the hard part is waiting. Pop the whole tray into the fridge for at least 30 minutes. This makes them firm and ready for their chocolate coat.
- Step 5: While they chill, melt your chocolate. Mix the chocolate morsels and coconut oil in a bowl. Microwave it, but stop every 15 seconds to stir. Be patient. Burnt chocolate is a sad thing. Do you know what the coconut oil does? It makes the chocolate super shiny and helps it harden. Share below!
- Step 6: Take your truffles from the fridge. Dip each one into the melted chocolate. Use a spoon to help coat it and drip off the extra. Then, hold it over a bowl of sprinkles. Use your fingers to shower it with those little colorful balls. It’s like a tiny winter snowstorm, but much sweeter.
- Step 7: Place the finished pops back on the parchment paper. Return them to the refrigerator for another 30 minutes. This lets the chocolate shell set perfectly. Then, they are ready to share. Or, you might just hide one for yourself first. I won’t tell.
Cook Time: 20 minutes
Total Time: 1 hour 20 minutes
Yield: About 24 pops
Category: Dessert, Snack
Three Fun Twists to Try
Once you master the classic, you can play. I love adding little surprises. It makes each batch a new adventure. Here are a few of my favorite ideas to get you started.
- Minty Fresh: Use mint Oreos. Add a tiny drop of peppermint extract to the filling. It’s so cool and refreshing.
- Peanut Butter Cup: Before you roll the balls, hide a mini peanut butter cup inside. It’s a delicious secret in the middle.
- Orange Zest: Add the zest of one orange to the cream cheese mixture. Dip them in white chocolate. It tastes like a chocolate orange.
Which one would you try first? Comment below!
Serving Your Sweet Creations
These pops are a delight all on their own. But you can make them extra special. Stand them up in a tall glass filled with sugar or dried beans. It makes a lovely centerpiece for a party.
For a drink, a cold glass of milk is always the best friend to an Oreo. For the grown-ups, a little glass of coffee liqueur or a creamy Baileys pairs wonderfully. The bitter coffee taste cuts through the sweet chocolate.
Which would you choose tonight?
Keeping Your Truffle Pops Perfect
These little treats are best kept cold. Store them in the fridge in a sealed container. They will be happy there for up to a week.
You can also freeze them for a month. I wrap them gently in parchment paper first. This stops them from sticking together.
I once left a batch on the counter too long. They became a soft, melty mess. Now I always put them right back in the fridge.
Making a big batch saves you time later. You can have a sweet treat ready for any surprise guests. This makes life a little bit easier.
Have you ever tried storing it this way? Share below!
Easy Fixes for Common Truffle Troubles
Is your cream cheese mixture too sticky? Just chill it. A cool mixture is much easier to roll into neat balls.
I remember when my first truffle fell off the stick. The chocolate was not set enough. Chilling the balls first helps the stick stay put.
If your chocolate is too thick, add a tiny bit more oil. This helps it coat the truffle smoothly. A smooth coat makes them look pretty.
Fixing small problems builds your cooking confidence. You learn that mistakes are okay. It also makes your food taste and look better.
Which of these problems have you run into before?
Your Truffle Pop Questions Answered
Q: Can I make these gluten-free?
A: Yes! Just use your favorite gluten-free sandwich cookies instead of Oreos.
Q: How far ahead can I make them?
A: You can make them up to three days before you need them.
Q: What can I use instead of coconut oil?
A: You can use a little vegetable oil or shortening.
Q: Can I double the recipe?
A: Of course! Just use a bigger bowl for mixing.
Q: Are the sprinkles necessary?
A: No, but they add a fun crunch. You can also use crushed nuts.
Fun fact: The word “nonpareil” means “having no equal.” They are the perfect sprinkle for these!
Which tip will you try first?
A Sweet Note From My Kitchen
I hope you have fun making these truffle pops. Cooking is about sharing joy with others. It is one of my favorite things to do.
I would love to see your creations. Show me your beautiful, delicious truffle pops. Your pictures always make my day brighter.
Have you tried this recipe? Tag us on Pinterest!
Happy cooking!
—Grace Ellington.
Easy Oreo Truffle Pops Recipe
Description
These irresistible Oreo Truffle Pops are a no-bake delight, featuring a creamy Oreo and cream cheese center coated in a rich chocolate shell and colorful sprinkles.
Ingredients
Instructions
- Blend an entire package of Oreos in food processor until it is powdered crumbs.
- Add the cream cheese and process until thoroughly blended.
- Shape into walnut sized balls and place on a parchment lined tray or baking sheet.
- Insert the lollipop sticks into the tops of the truffle balls.
- Cool in the refrigerator for at least 30 minutes or until the truffle balls are firm.
- Combine chocolate morsels and coconut oil in a microwave safe bowl.
- Microwave until melted and smooth, stopping every 15 seconds to stir. (about 1 minute total)
- Remove truffle balls from refrigerator.
- Pour nonpareil sprinkles into a bowl.
- Dip truffles into melted chocolate while using a small spoon to gently remove the excess chocolate.
- After dipping truffle in chocolate hold it over the nonpareil bowl and sprinkle on the nonpareils using your hands.
- Place dipped and sprinkled truffles back onto parchment and return to the refrigerator for another 30 minutes or until the chocolate has cooled.
Notes
- For best results, ensure the truffle balls are very firm before dipping. You can use white or milk chocolate instead of dark chocolate. Store finished pops in the refrigerator.