
The Sunshine in a Cookie Jar
Hello, my dear. Come sit. Let’s talk about sunshine. Sometimes you need to catch it in a jar. Well, these cookies are the next best thing. They are my Crispy Lemon Wafers. One bite is like a bright, happy day.
I make them when the sky is gray. Or when I miss my friend Margie. We baked these every spring. I still laugh at that. She always got more glaze on her apron than the cookies. What food makes you feel sunny inside? Tell me, I’d love to know.
A Little Secret in the Dough
These wafers are thin and crisp. They snap just right. The secret is a little cornstarch. It makes them tender. And we chill the dough. This matters. It gives the flour time to relax. Then your cookies won’t shrink up in the oven.
Roll the dough nice and thin. Don’t worry about perfect circles. My first batch looked like little clouds. They tasted wonderful. Fun fact: The acid in lemon juice reacts with the baking soda. That gives our cookies a lovely, light lift.
The Glaze That Sparkles
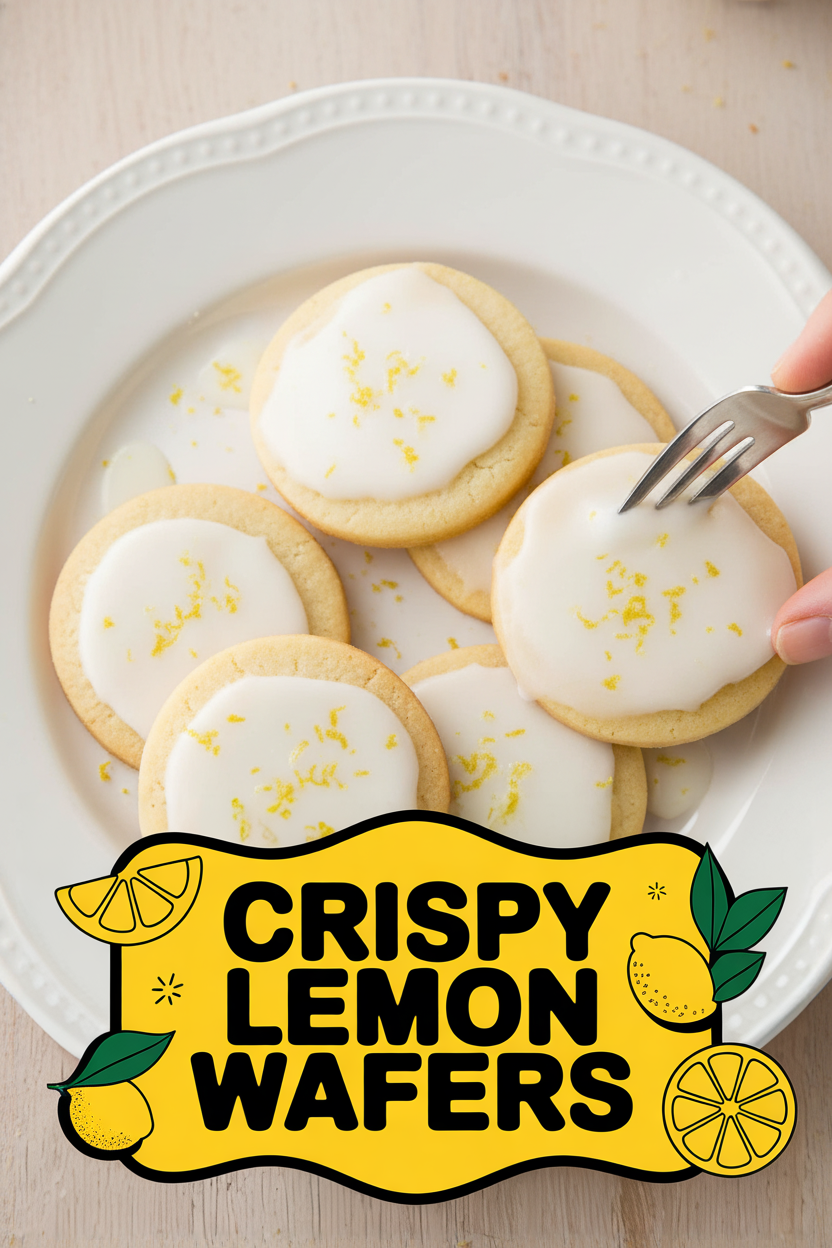
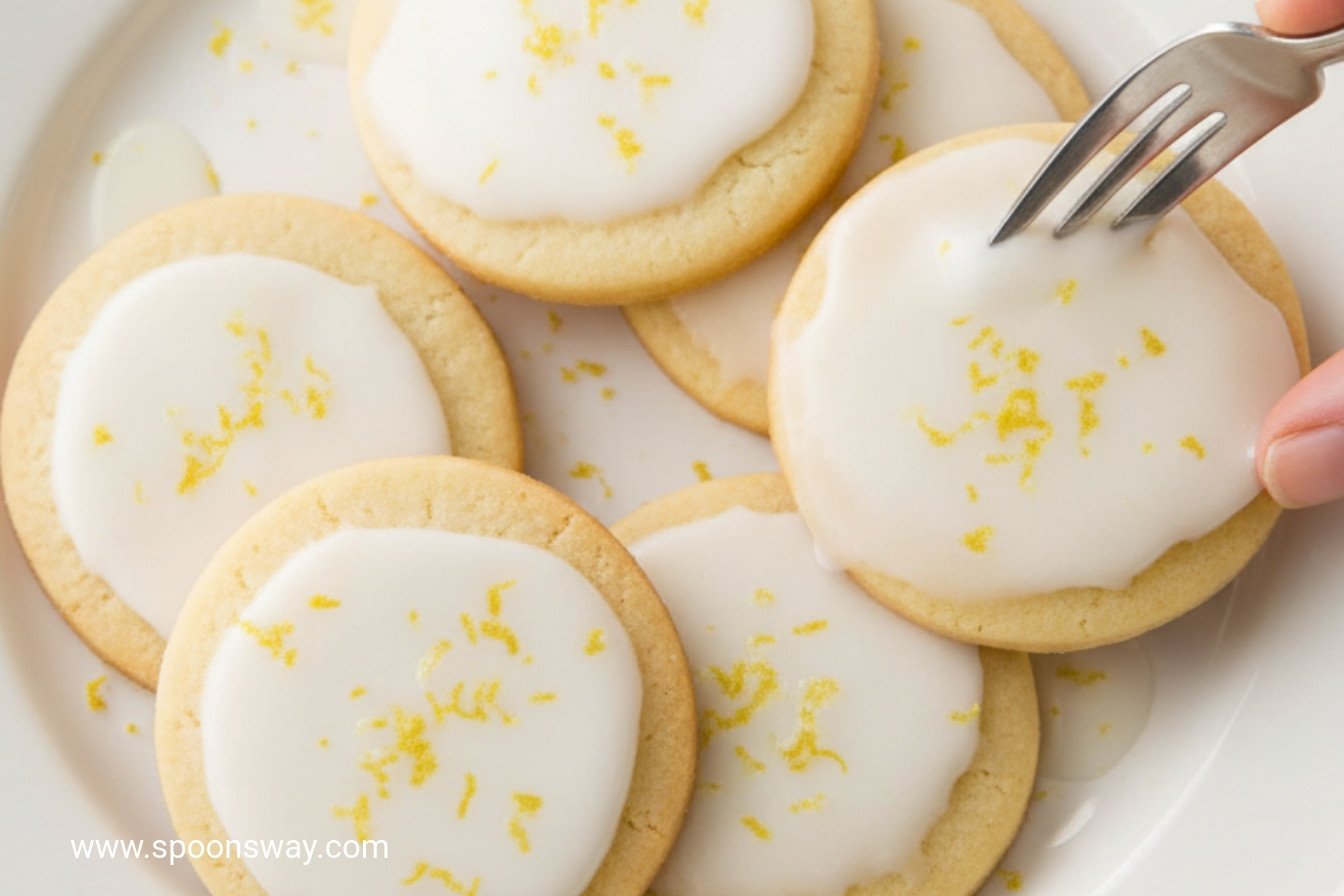
Now for the magic. The glaze is just sugar and lemon. Use the zest, that yellow skin. That’s where the best flavor lives. Doesn’t that smell amazing? It’s pure lemon sunshine.
Dip the top, let the extra drip off. A thin coat is perfect. It will dry shiny and sweet. This step matters because it’s a gift. You are adding a final layer of joy. Do you like your cookies plain or with a shiny glaze? I’m a glaze girl, myself.
Patience is a Warm Cookie
Here is the hard part. You must let them cool. I know, I know. It’s tough. But a warm cookie will melt the glaze right off. So let them sit. Set the timer for 15 minutes.
Use that time to wash one bowl. Or just sit and breathe in the lemony air. Waiting makes the first bite even better. It’s a tiny lesson in good things coming. What’s your favorite smell from the kitchen? Mine will always be lemon and butter.
Sharing the Brightness
These cookies are for sharing. They are too happy to keep alone. Put them in a tin with a pretty cloth. Give them to a neighbor. Or take them to a friend who needs a smile.
Food is more than eating. It’s a way to say, “I thought of you.” That is the most important ingredient of all. It never goes in the bowl, but you always taste it. Who would you share a batch of these with first?
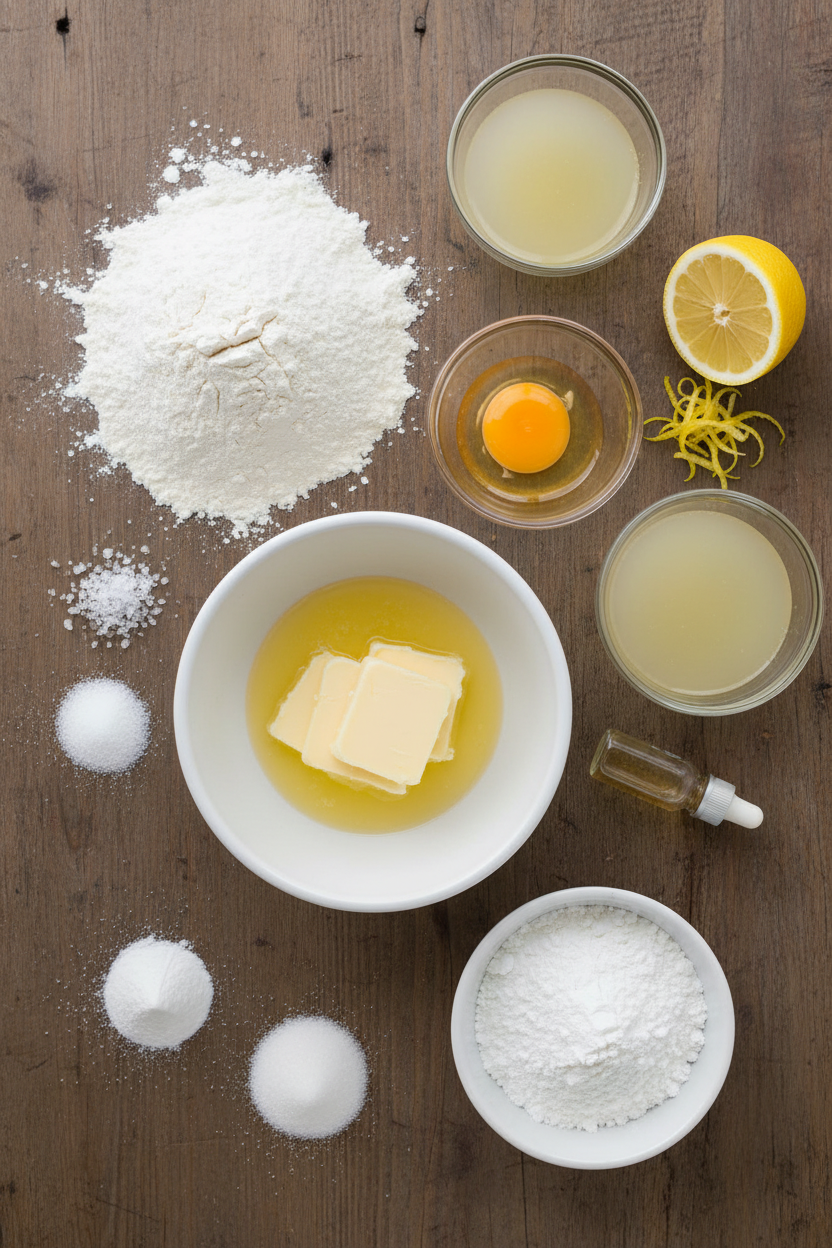
Ingredients:
| Ingredient | Amount | Notes |
|---|---|---|
| All-purpose flour | 1 ½ cups (7 ½ ounces/213 grams) | For the cookies |
| Cornstarch | 2 tablespoons | For the cookies |
| Salt | ¼ teaspoon | For the cookies |
| Baking powder | ¼ teaspoon | For the cookies |
| Baking soda | ⅛ teaspoon | For the cookies |
| Unsalted butter, softened | 10 tablespoons | For the cookies |
| Granulated sugar | ½ cup (3 ½ ounces/99 grams) | For the cookies |
| Lemon juice | 2 tablespoons | For the cookies |
| Large egg yolk | 1 | For the cookies |
| Lemon extract | 1 ½ teaspoons | For the cookies |
| Confectioners’ sugar | 1 cup (4 ounces/113 grams) | For the glaze |
| Lemon zest plus juice | 1 teaspoon zest plus 7 teaspoons juice | For the glaze |
| Salt | Pinch | For the glaze |
My Crispy Lemon Wafers: A Little Slice of Sunshine
Hello, my dear. Come sit for a moment. I want to tell you about my lemon wafers. They are like eating a crisp, sweet sunbeam. I first made them for a spring picnic years ago. The whole batch vanished in minutes! Doesn’t that smell amazing? The lemon just fills your kitchen with happiness. These cookies are thin, delicate, and oh-so-snappy. They have a lovely, simple glaze that makes them shine. Let’s bake some sunshine together.
Step 1: First, we mix our dry friends. Whisk the flour, cornstarch, salt, baking powder, and soda in a bowl. Set it aside. Now, beat the soft butter and sugar in your mixer. Beat until it looks pale and fluffy. This takes about three minutes. It reminds me of a soft, yellow cloud. Add the lemon juice, egg yolk, and lemon extract next. Mix it all until it’s one happy family.
Step 2: Turn the mixer to low. Add the flour mixture in three parts. Mix just until you see no more dry flour. Now, turn the dough onto your counter. Divide it in half. Shape each half into a flat disk, like a little pancake. Wrap them tightly in plastic. They need a long nap in the fridge. Chill for at least one hour. (Hard-learned tip: Chilling makes the dough easy to roll. Without it, it’s a sticky mess!)
Step 3: Heat your oven to 325 degrees. Line your baking sheets with parchment. Take one dough disk from the fridge. Knead it gently for a few turns to soften it. On a lightly floured surface, roll it into a big circle. Roll it about as thick as two stacked dimes. I still laugh at that. My first time, I rolled them too thick! They were more like little cakes.
Step 4: Use a two-inch round cutter to stamp out cookies. You should get about 14 or 15 from the first roll. Gently gather the scraps. You can reroll them once or twice. Place the cookies an inch apart on your sheet. Why do we space cookies apart on the sheet? Share below! They need room to breathe and get crispy.
Step 5: Bake one sheet at a time. This is important for even baking. Bake until the edges are a very light golden brown. This takes 12 to 14 minutes. Rotate the sheet halfway through. Let them cool on the sheet for five minutes. Then, move them to a rack to cool completely. Repeat with your second dough disk.
Step 6: Time for the glaze! Whisk the powdered sugar, lemon zest, juice, and a pinch of salt. Dip the top of each cool cookie into the glaze. Lightly drag it on the bowl’s edge to remove the extra. Let the glaze set for about 15 minutes. Then, they are ready to bring someone joy.
Cook Time: 25–30 minutes
Total Time: About 2 hours (with chilling)
Yield: About 40 cookies
Category: Dessert, Cookies
Three Zesty Twists to Try
These wafers are wonderful as they are. But sometimes, it’s fun to play. Here are three simple twists. Lavender Lemon: Add one teaspoon of dried culinary lavender to the dry ingredients. It’s so floral and pretty. Poppy Seed Crunch: Stir two tablespoons of poppy seeds into the dough. They add a lovely little crunch and look. Berry Glaze: Replace the lemon juice in the glaze with mashed raspberry juice. You get a beautiful pink and a berry-lemon flavor. Which one would you try first? Comment below!
Serving Your Sunny Wafers
I love serving these on a pretty, vintage plate. They look like little jewels. For a special tea, pair them with fresh berries or a dollop of whipped cream. They are perfect with a hot drink. For a non-alcoholic pairing, try a glass of cold, sparkling lemonade. It doubles down on the citrus joy! For a grown-up treat, a small glass of chilled Moscato wine is lovely. The sweetness dances with the lemon. Which would you choose tonight?

Keeping Your Lemon Wafers Crisp and Bright
These wafers stay wonderfully crisp. Store them in a tight tin at room temperature. They will last for about five days. You can also freeze the unglazed cookies for a month. Just thaw them on the counter before glazing.
I love to make a double batch of dough. I freeze one disk for a future treat. This is perfect for a sudden visit from friends. My first time, I forgot to wrap the dough tightly. It dried out and was no good. Wrapping matters!
Batch cooking saves you time and energy. It means a fresh, homemade cookie is always close. A little planning makes spontaneous joy easy. Have you ever tried storing it this way? Share below!
Sunny Cookie Troubles and Simple Fixes
Is your dough too sticky? Just chill it longer. A cold dough is much easier to roll. I once tried to roll warm dough. It stuck to everything, even my elbows!
Are the cookies spreading too much? Your butter might be too soft. Cool dough bakes into a perfect shape. This gives you that lovely, crisp bite we love.
Is the glaze too thick or too thin? Add juice by the teaspoon. You want it to coat the back of a spoon nicely. Getting the glaze right makes them look special. It shows you took care. Which of these problems have you run into before?
Your Lemon Wafer Questions, Answered
Q: Can I make these gluten-free? A: Try a 1-to-1 gluten-free flour blend. The texture may be slightly more delicate.
Q: Can I make the dough ahead? A: Yes! The disks keep in the fridge for a full day. This is a great make-ahead step.
Q: No lemon extract? A: Use two more teaspoons of fresh lemon juice instead. The flavor will be milder but still good.
Q: Can I double the recipe? A: Absolutely. Just mix in two separate batches for best results.
Q: Any fun add-ins? A: A teaspoon of poppy seeds in the dough is lovely. It adds a little crunch. Fun fact: Poppy seeds come from the same flower family as the opium poppy, but the seeds used for baking are perfectly safe and non-narcotic. Which tip will you try first?
Bake a Little Sunshine
I hope these wafers bring a sparkle to your day. They always remind me of my mother’s sunny kitchen. Baking is about sharing simple, sweet moments.
I would love to hear from you in my kitchen. Tell me about your baking adventures. Have you tried this recipe? Share your experience in the comments.
Happy cooking!
—Grace Ellington.
Crispy Lemon Wafers
Description
Delicate, buttery lemon cookies with a crisp texture and a sweet-tart lemon glaze.
Ingredients
Cookies:
Glaze:
Instructions
- Combine flour, cornstarch, salt, baking powder, and baking soda in medium bowl; set aside. Using stand mixer fitted with paddle, beat butter and sugar on medium-high speed until pale and fluffy, about 3 minutes. Add lemon juice, egg yolk, and lemon extract and beat until combined.
- Reduce speed to low and add flour mixture in 3 additions until just combined, scraping down bowl as needed. Turn out dough onto counter and divide in half. Form each half into 5-inch disk, wrap disks tightly in plastic wrap, and refrigerate for at least 1 hour or up to 24 hours.
- Adjust oven rack to middle position and heat oven to 325 degrees. Line 2 baking sheets with parchment paper. Remove 1 dough disk from refrigerator and knead dough for 3 to 5 turns to make more pliable. Roll into 10-inch circle, about 1/4 inch thick, on lightly floured counter.
- Using 2-inch round cookie cutter, cut 14 to 15 rounds from dough. Reroll scraps up to 2 times to similar thickness and cut out remaining 5 to 6 rounds to yield 20 cookies. Space cookies 1 inch apart on 1 prepared sheet.
- Bake cookies, 1 sheet at a time, until edges are lightly browned, 12 to 14 minutes, rotating sheet halfway through baking. Let cookies cool on sheet for 5 minutes, then transfer to wire rack to cool completely. Repeat with second dough disk and second baking sheet.
- Whisk sugar, lemon zest and juice, and salt together in bowl. Working with 1 cookie at a time, dip top of cookie into glaze, then drag top lightly against rim of bowl to remove excess glaze. Repeat. (If glaze thickens as it sits, add extra lemon juice as needed to maintain proper consistency.) Let glazed cookies set fully before serving, about 15 minutes.
Notes
- For a more intense lemon flavor, add an extra ½ teaspoon of lemon zest to the cookie dough. Store unglazed cookies in an airtight container at room temperature for up to 5 days; glaze just before serving.