My Minty Mistake
I once made these for my book club. I was in a big hurry. I forgot to let the dough cool in the fridge.
My cookies spread all over the pan like little chocolate puddles. I still laugh at that. Patience matters in baking. It gives the cookie its shape and a perfect texture.
Why This Recipe Works
You melt the chocolate right into the butter and sugar. This makes the cookie deeply chocolatey. Doesn’t that smell amazing?
Chilling the dough is the secret step. It keeps your cookies thick and chewy. Skipping it is like my puddle-cookies. Trust me on this one.
A Little Chocolate History
Mint and chocolate are old friends. People have paired them for centuries. They just taste right together, cool and sweet.
Fun fact: The Andes Mint was named after the Andes Mountains. The creators thought the name sounded cool and tall, like the candy layers! What’s your favorite chocolate-mint treat? Is it these, or maybe ice cream?
The Best Part: Topping Time
You bake the cookies first. Then you pop a mint right on top. The warm cookie softens the mint.
After five minutes, you swirl it with a knife. You make a pretty, shiny frosting. This matters because it’s fun. You finish each cookie with your own hands.
Your Turn in the Kitchen
These are perfect for a rainy afternoon. The mixing is simple. The waiting is the hardest part.
Share them with someone special. Food tastes better when it’s shared. Do you have a grandma or friend you love to bake with? Tell me about them.
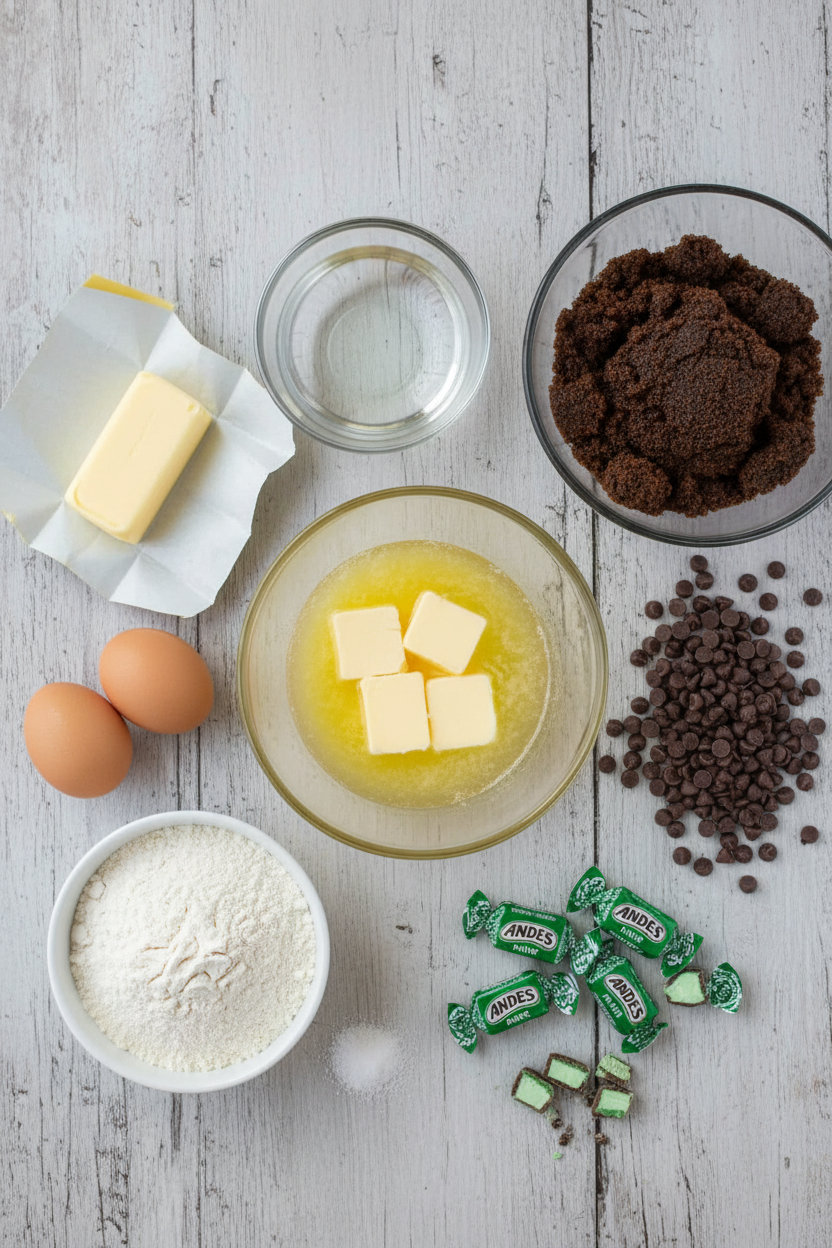
Ingredients:
| Ingredient | Amount | Notes |
|---|---|---|
| Unsalted butter, softened | 12 tablespoons | |
| Brown sugar | 1 ½ cups packed (10 ½ ounces/298 grams) | |
| Water | 2 tablespoons | |
| Semisweet chocolate chips | 2 cups (12 ounces/340 grams) | |
| All-purpose flour | 2 ½ cups (12 ½ ounces/354 grams) | |
| Baking soda | 1 ¼ teaspoons | |
| Salt | ½ teaspoon | |
| Large eggs | 2 | |
| Crème de Menthe Andes Mints | 45 | Foil wrappers removed |
Cool Mint Chocolate Crunch Cookies: A Sweet Little Memory
My grandson Leo calls these his “magic cookies.” He loves how the mint melts right on top. I love the smell that fills my kitchen. It reminds me of old-fashioned candy shops.
These cookies are a fun project for a lazy afternoon. The dough needs a little rest in the fridge first. That’s a good time to wash the bowls and tell a story. I still laugh at the time I forgot to take the foil off the mints. Let’s avoid that together!
Step 1: First, we gently melt the butter, sugar, and water. Stir it slowly until everything is friendly and combined. Then add all those chocolate chips. Keep stirring until you have a smooth, glossy pool. Doesn’t that smell amazing? Let it cool for a bit before the next step. (A hard-learned tip: Let this mixture cool for the full 10 minutes. If it’s too hot, it will cook the eggs!)
Step 2: Now, beat in the eggs with your mixer. It will look shiny and beautiful. In a separate bowl, whisk your flour, baking soda, and salt. Add this dry mix to the chocolate in three parts. Mix until the flour just disappears. Then the dough takes a nap in the fridge. This makes the cookies just right.
Step 3: Heat your oven and line your sheets with parchment. Roll the cold dough into little balls. Give them space to grow on the sheet. Bake them just until they look set. Do you switch your baking sheets halfway through? Share below! This helps them bake evenly. They will look soft but perfect.
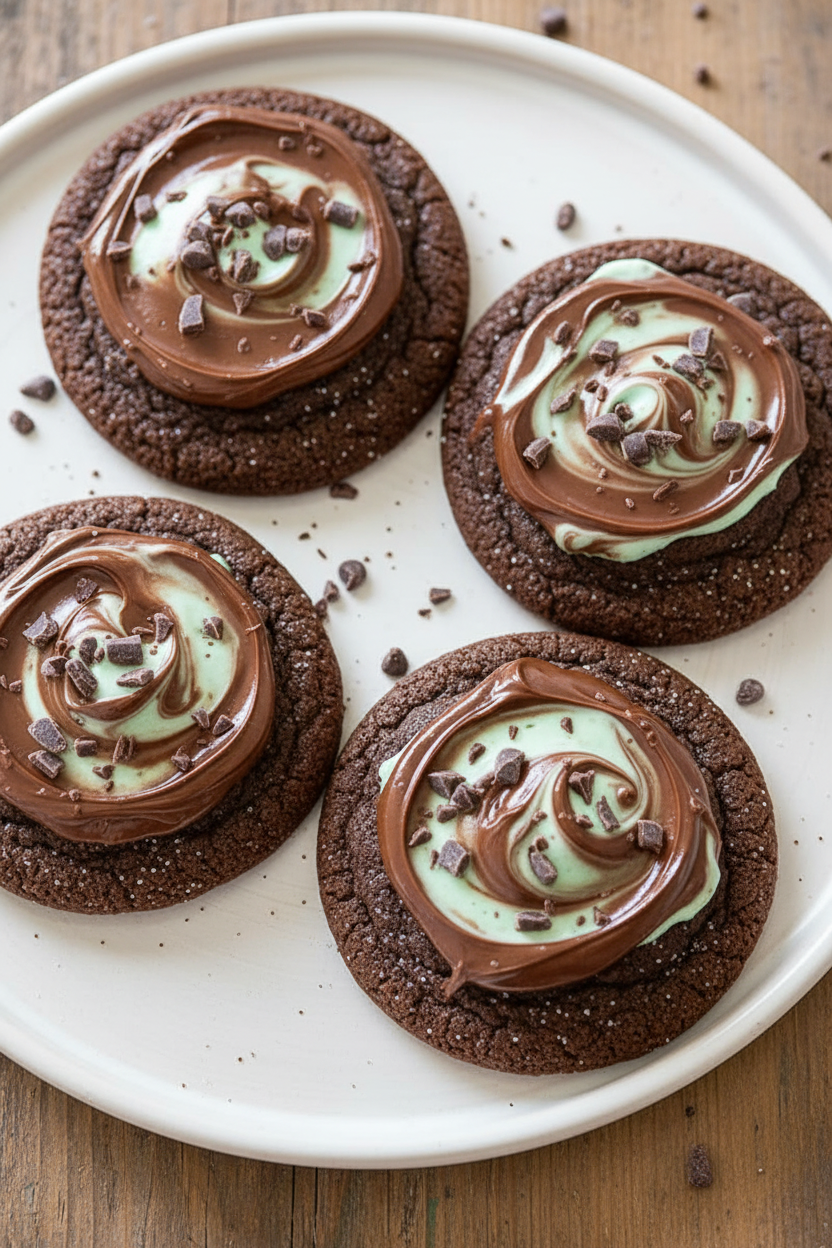
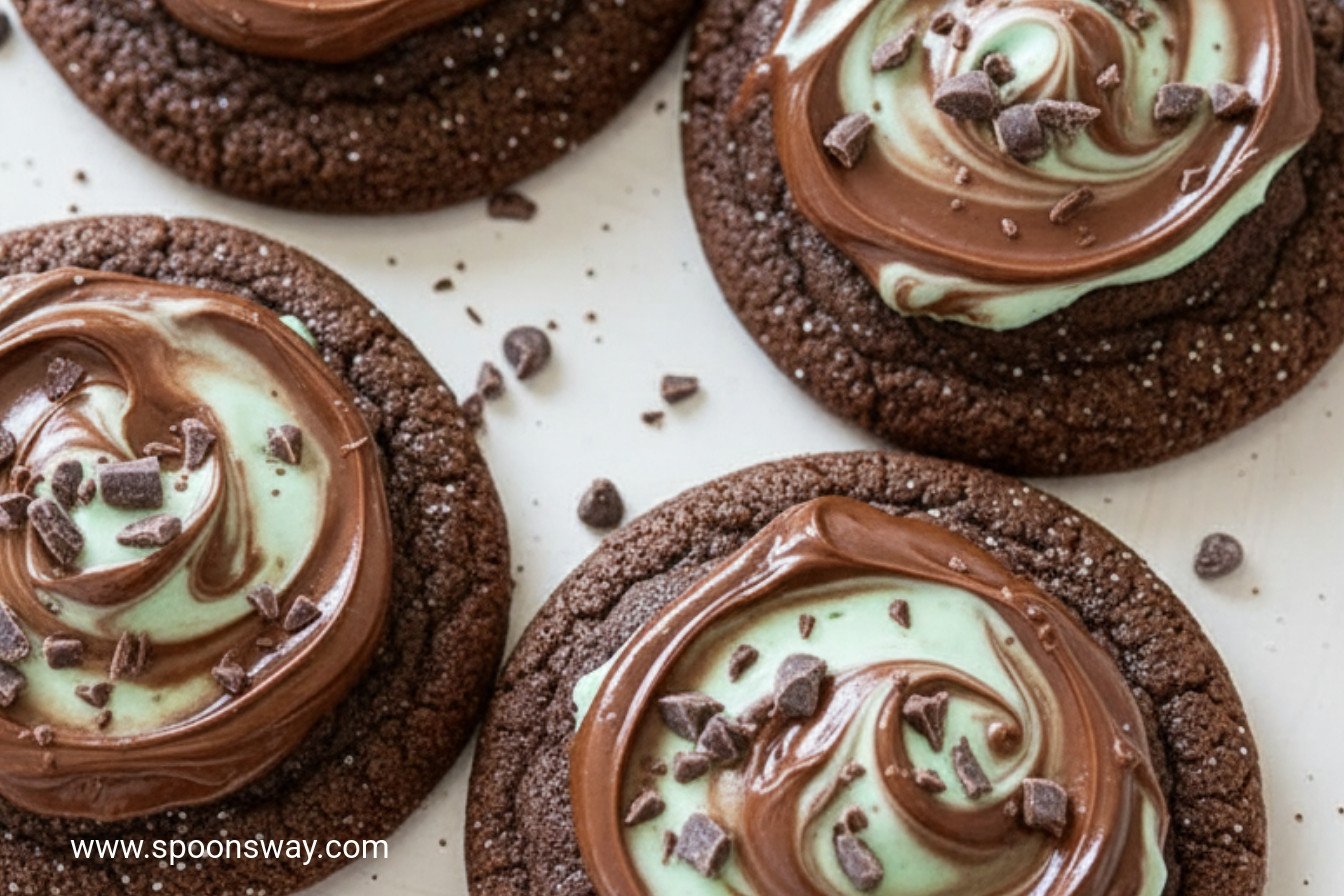
Step 4: Here comes the magic part. As soon as the cookies come out, place a mint on each one. Wait five minutes. See how it gets soft? Then, use a spoon to swirl the mint into a green pool. Let them cool completely. The chocolate will set into a crunchy, minty top. Patience is the secret ingredient here.
Cook Time: 7-9 minutes per batch
Total Time: About 2 hours (includes chilling)
Yield: About 45 cookies
Category: Dessert, Cookies
Three Fun Twists to Try
Once you master the classic, try playing with the recipe. It’s how new family favorites are born. Here are three simple ideas I’ve loved over the years.
Peppermint Patty Swap: Use small peppermint patties instead of Andes Mints. You’ll get a bigger, gooier mint center.
Double Chocolate Chip: Add a half-cup of white chocolate chips to the dough. It gives a pretty, sweet little surprise inside.
Cookie Sandwich: Let two cookies cool completely. Spread mint frosting between them. It’s a decadent treat for a special day.
Which one would you try first? Comment below!
Serving Them Up With Style
These cookies are stars all on their own. But a little presentation makes everything more fun. I like to stack them on my grandmother’s floral plate. For a party, crush a few extra mints to sprinkle on top before the chocolate sets. It looks so pretty.
For drinks, a glass of cold milk is the classic choice. It always is. For the grown-ups, a small glass of coffee liqueur over ice is a nice match. The coffee and mint sing together. Which would you choose tonight?
Keeping Your Mint Chocolate Crunch Cookies Perfect
These cookies are best enjoyed fresh. But I always make a double batch. The dough keeps beautifully in the fridge for two days. You can also freeze the dough balls for a future treat.
Just place them on a tray until frozen solid. Then pop them into a bag. Bake straight from the freezer, adding a minute or two. I once forgot a batch in the back of the fridge. It baked up perfectly a week later!
Storing matters because life gets busy. Having cookie dough ready is a little gift to your future self. It means a warm, homemade treat is always close. Have you ever tried storing cookie dough this way? Share below!
Cookie Troubles? Here Are My Easy Fixes
First, if your cookies spread too much, your dough was too warm. Chilling the dough is the secret. I remember when I skipped this step. I ended up with one giant, flat cookie sheet!
Second, if the mint topping hardens too fast, your cookies cooled too much. Place the mint on the hot cookie right away. The heat will melt it perfectly for spreading.
Third, for dry cookies, you might have over-measured the flour. Spoon the flour into your cup. Then level it off with a knife. Getting this right matters for a soft, chewy bite. It builds your confidence when you know the fixes. Which of these problems have you run into before?
Your Cookie Questions, Answered
Q: Can I make these gluten-free? A: Yes! Use a good gluten-free flour blend. I like the one-for-one kind.
Q: How far ahead can I make the dough? A: You can make it up to two days ahead. Keep it covered in the refrigerator.
Q: What if I don’t have Andes Mints? A: Try other chocolate-mint candies. You could even use peppermint extract in the dough.
Q: Can I halve the recipe? A: Absolutely. Just halve all the ingredients. Your baking time will be the same.
Q: Any fun extra tip? A: A fun fact: adding the water with the butter helps the sugar dissolve. This gives the cookie a nicer texture. Which tip will you try first?
Bake a Little Joy
I hope you love making these cookies. The kitchen is my favorite place for making memories. I would love to hear about your baking adventure.
Share a picture of your cookie tray. Tell me if your family loved them. Your stories are my favorite thing to read. Have you tried this recipe? Share your experience in the comments.
Happy cooking!
—Grace Ellington.

Cool Mint Chocolate Crunch Cookies
Description
Chocolate-Mint Cookies
Ingredients
Instructions
- Combine butter, sugar, and water in medium saucepan and cook over low heat, stirring occasionally, until butter is melted, about 3 minutes. Add chocolate chips and stir constantly until chips are melted. Transfer mixture to bowl of stand mixer and let cool for 10 minutes. Combine flour, baking soda, and salt in separate bowl.
- Fit mixer with paddle, add eggs to bowl with chocolate mixture, and beat on medium-high speed until smooth, about 2 minutes. Reduce speed to low, add flour mixture in 3 additions, and mix until just combined, scraping down bowl as needed. Refrigerate until dough is firm, at least 1 hour or up to 2 days.
- Adjust oven racks to upper-middle and lower-middle positions and heat oven to 350 degrees. Line 2 baking sheets with parchment paper. Working with half of dough, roll heaping tablespoons of dough into balls and place 2 inches apart on prepared sheets. Bake until just set, 7 to 9 minutes, switching and rotating sheets halfway through baking.
- After removing cookies from oven, immediately place 1 Andes Mint in center of each cookie. Let stand until chocolate is softened, about 5 minutes, then spread chocolate over tops of cookies. Transfer cookies to wire rack and let cool completely before serving, about 30 minutes. Repeat with remaining dough and Andes Mints. (Cookies can be stored at room temperature for up to 3 days.)
Notes
- Nutrition information (per cookie, estimated): Calories: 150, Fat: 7g, Carbs: 21g, Protein: 2g.