
A Little Magic in the Kitchen
Hello, my dear. Come sit for a spell. Let’s talk about cookies. Not just any cookies. These are checkerboard cookies. They look fancy, don’t they? Like a tiny game board you can eat. But I promise you, they are just simple dough and patience. The magic happens with your own two hands. I still laugh at the first time I made them. My squares were a bit wobbly! But they tasted wonderful.
That’s the first lesson right there. It doesn’t have to be perfect to be good. The trying is what matters. What’s the last kitchen project you tried that made you proud? I’d love to hear about it.
The Secret of the Cooked Egg
Now, you might see the first step and wonder. Why cook the eggs? It seems odd for cookies. This is our little trick. A cooked egg yolk makes the dough rich and tender. It also helps it hold its sharp shape. That’s key for our checkerboards.
You just boil them, then cool them in ice water. Peeling them is the fun part. Fun fact: The green ring around a hard-cooked yolk means it cooked too long. We avoid that! Our yolks should be sunny yellow. Doesn’t that smell amazing? Like a gentle, warm promise.
Two Doughs, One Bowl
We make two doughs. One vanilla, one chocolate. They are almost the same. The chocolate just has cocoa powder. I make the vanilla dough first. Then I use the same mixer bowl for the chocolate. No need to wash it! A little chocolate mixed in is just fine.
You beat the butter and sugar until it’s light. This puts tiny air bubbles in the dough. Those bubbles make the cookie melt in your mouth. This matters because texture is just as important as taste. A crumbly, tender bite is pure joy.
Building the Checkerboard
This is the puzzle part. You roll each dough into a little rectangle. Then you stack them. Vanilla on chocolate. After a chill, you slice them into strips. Now the fun begins. You flip and stack the strips to make the pattern. It’s like building with edible blocks.
Press them gently together. Then wrap them up. The long chill is important. It lets the dough relax. This keeps our squares neat when we slice them. Do you like puzzles or building things? This step feels just like that.
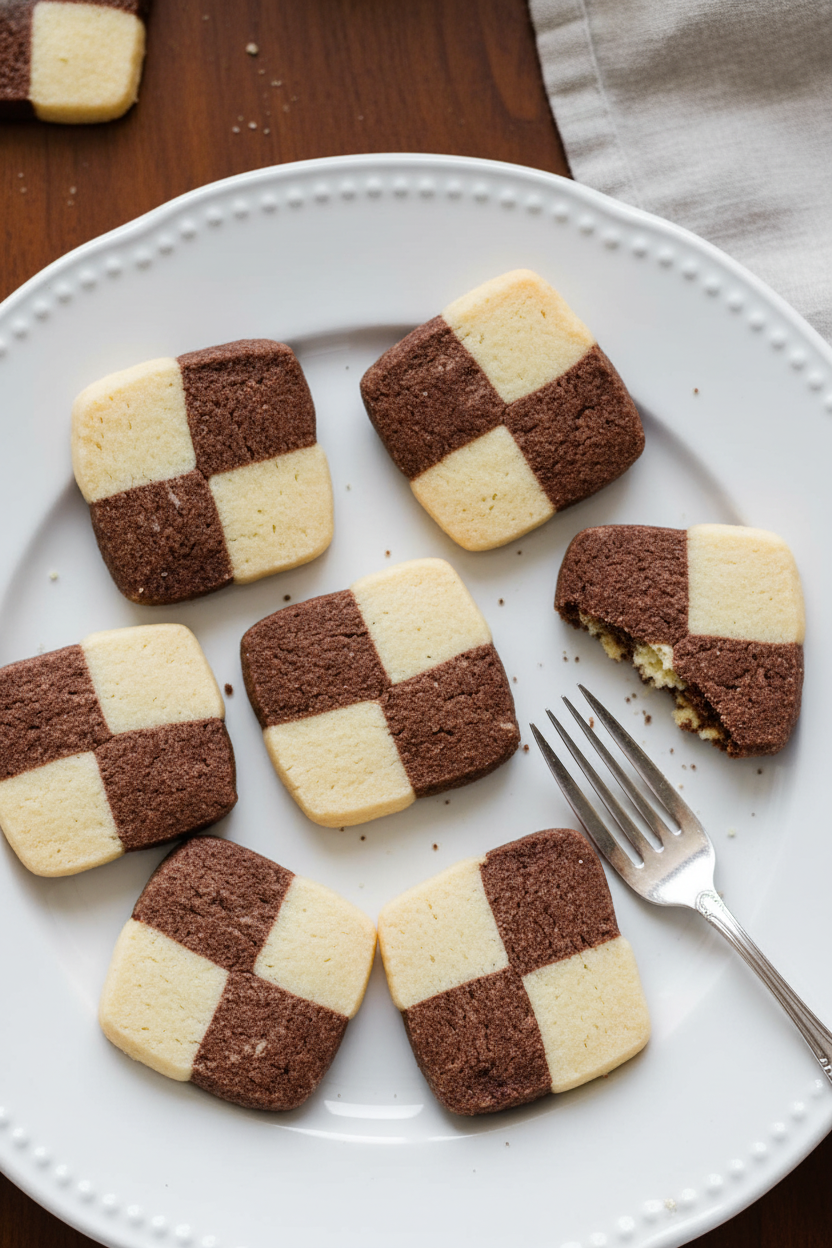
Slice, Bake, and Share
Time to see our work. Use a sharp knife. Slice thin, even pieces. You’ll see the pattern appear! It always feels like a surprise. Bake them until they are just golden. Let them cool on the sheet for a bit. They firm up as they cool.
This matters, too. Sharing something you built is special. These cookies are a gift of your time. They tell someone you thought about them. Which do you think is more fun: the making or the sharing? For me, it’s both.
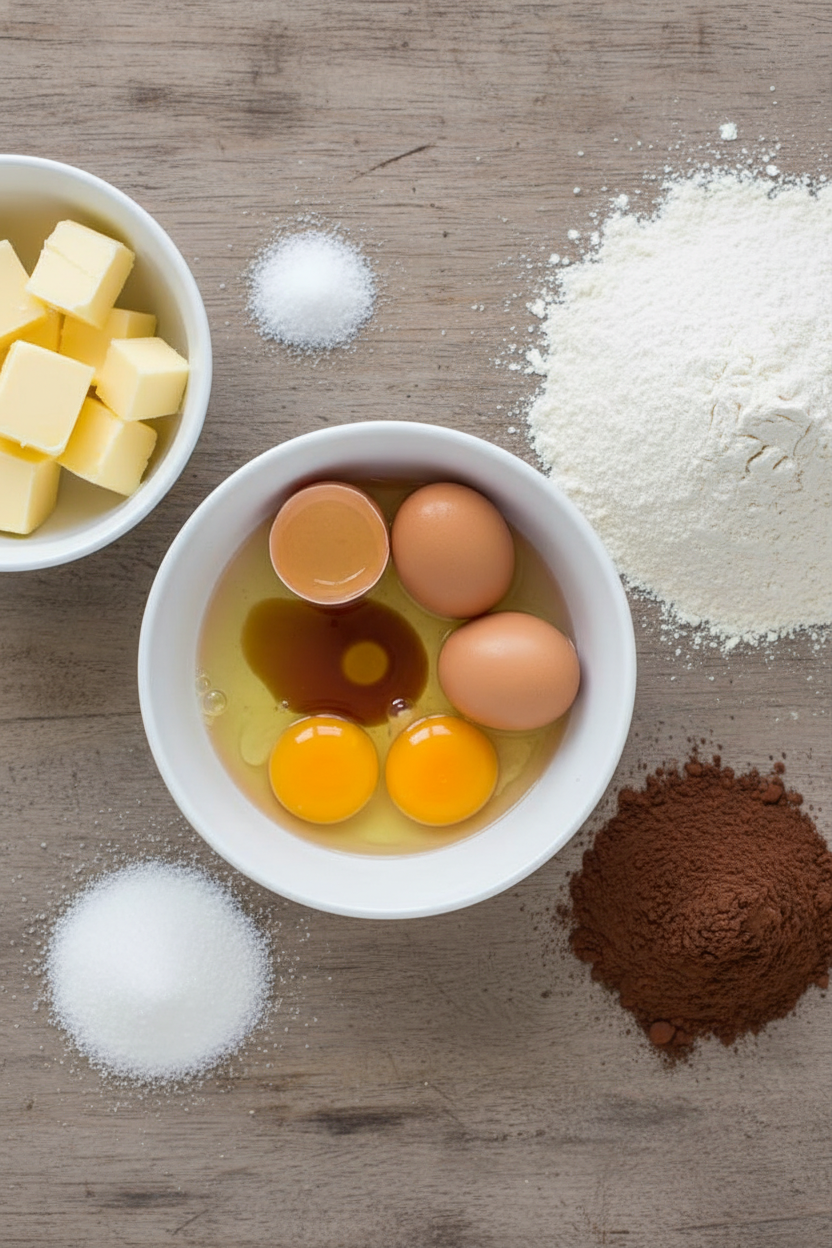
Ingredients:
| Ingredient | Amount | Notes |
|---|---|---|
| Unsalted butter, softened | 20 tablespoons (2 ½ sticks) | Divided equally for vanilla and chocolate doughs |
| Granulated sugar | ⅔ cup plus 2 tablespoons (5½ ounces/156g) | Divided equally for vanilla and chocolate doughs |
| Large eggs | 2 | Hard-cooked, yolks only, separated |
| Table salt | ½ teaspoon | Divided equally for vanilla and chocolate doughs |
| Vanilla extract | 2 teaspoons | Divided equally for vanilla and chocolate doughs |
| Unbleached all-purpose flour | 2 ⅔ cups (14 ⅙ ounces/402g) | 1 ½ cups for vanilla, 1 ⅓ cups for chocolate dough |
| Dutch-processed cocoa | ¼ cup (1 ounce/28g) | For chocolate dough only |
My Checkerboard Cookie Magic Trick
Hello, my dear! Come sit at the table. Let’s make some magic. These cookies look fancy, don’t they? But they are just two simple doughs. One vanilla, one chocolate. My grandson calls them “puzzle cookies.” I still laugh at that. We put the pieces together to make a checkerboard. It’s like a little kitchen game. The secret is a cooked egg yolk. It makes the dough so tender. Doesn’t that smell amazing already?
Now, let’s get our hands busy. I’ll walk you through it. Just follow these steps. Take your time. I once rushed and my squares got wobbly. We can fix anything with a little chill in the fridge. Ready? Here we go.
Step 1: First, we cook the eggs. Put two eggs in a small pot. Cover them with water and bring it to a boil. Then, turn off the heat and let them sit for 10 minutes. Move them to a bowl of ice water. This makes them easy to peel. We only need the soft, cooked yolks. Push each yolk through a strainer into its own little bowl. (A hard-learned tip: Keep the yolks separate! We need one for each dough.)
Step 2: Let’s make the vanilla dough. In your mixer, beat the soft butter, sugar, salt, and one egg yolk. Beat it until it’s fluffy and light. This takes about 4 minutes. Scrape the bowl down. Then mix in the vanilla. Finally, add the flour and mix just until it comes together. Use a spatula to press it into a ball. Set it aside on a plate.
Step 3: Now for the chocolate dough! No need to wash the bowl. Just beat the other butter, sugar, salt, and the second egg yolk. Make it nice and fluffy again. Mix in the vanilla. Then stop the mixer. Add the flour and the cocoa powder. Mix until it just forms a dough. Press it into a ball, just like the first one.
Step 4: Here comes the fun part. Divide each dough ball in half. Roll each piece into a small rectangle. Place a vanilla rectangle on top of a chocolate one. Gently press them together. You’ll have two dough sandwiches. Wrap them up and chill for 30 minutes. This helps them stay neat. Why do we chill the dough? Share below!
Step 5: Take one dough sandwich out. Slice it lengthwise into four long strips. Now, look at the layers. Turn one strip on its side. The vanilla and chocolate will be side-by-side. Take a second strip, flip it over, and stack it on top. See the checkerboard? Gently press and wrap it in plastic. Chill for one hour. Do this with all the strips. You’ll get four checkerboard logs!
Step 6: Heat your oven to 350 degrees. Line your baking sheets. Take out two logs. Use a sharp knife to slice cookies about ¼-inch thick. Turn the log a little after each slice. This keeps it round. Place the slices on your sheets. They don’t spread much.
Step 7: Bake for about 15 minutes. Switch the pans halfway through. The cookies will be pale golden. Let them cool on the sheet for 5 minutes. Then move them to a rack. Repeat with the last two logs. Store them in a tin with parchment between layers. They keep for a week, if they last that long!
Cook Time: About 20 minutes per batch
Total Time: 3 hours (includes chilling)
Yield: About 48 cookies
Category: Dessert, Cookies
Three Fun Twists to Try
Once you master the classic, you can play! Here are three of my favorite twists. They make lovely gifts. My book club always asks for the peppermint ones.
Peppermint Checkers: Add a drop of peppermint extract to the vanilla dough. So festive and cool.
Citrus Sunshine: Add lemon or orange zest to the vanilla dough. It brightens everything up.
Confetti Celebration: Mix colorful sprinkles into the vanilla dough. It’s just so happy and fun.
Which one would you try first? Comment below!
Serving Them Up with Style
These cookies are stars on their own. But I love to dress them up. For a tea party, stack them in a little tower. They look so proper. For kids, serve them with a small cup of frosting for dipping. It’s a messy, wonderful time.
What to drink? On a cozy evening, a glass of cold milk is perfect. For the grown-ups, a sweet sherry or a creamy coffee liqueur pairs beautifully. It’s a lovely end to a meal.
Which would you choose tonight?
Keeping Your Checkerboard Cookies Perfect
These cookies keep beautifully. Let them cool completely first. Store them in a tin with parchment between layers. They stay fresh for a week.
You can freeze the dough logs for later. Wrap them tightly in plastic. They keep for three months. Slice and bake straight from the freezer.
I once baked all the logs at once. My grandkids ate them in two days! Batch cooking saves time for busy weeks. It means fresh cookies are always ready.
This matters because homemade treats should bring joy, not stress. A little planning spreads that joy further. Have you ever tried storing cookie dough in the freezer? Share below!
Cookie Troubles and Simple Fixes
First, dough can be too crumbly. This happens if it is too dry. Just knead it with your hands for a minute. The warmth helps it stick together.
Second, the checkerboard can lose its shape. I remember my first batch looked wobbly! Chill the dough logs very well before slicing. A sharp knife helps too.
Third, cookies might spread too much. Your butter was probably too soft. Make sure your dough is chilled before baking. This keeps the pattern sharp.
Fixing small issues builds your kitchen confidence. It also makes your food look and taste better. Which of these problems have you run into before?
Your Checkerboard Cookie Questions
Q: Can I make these gluten-free? A: Yes. Use a good gluten-free flour blend. The results are often great.
Q: How far ahead can I make the dough? A: You can make the logs three days ahead. Keep them wrapped in the fridge.
Q: What if I don’t have Dutch-process cocoa? A: Natural cocoa powder works fine. Your cookies will taste a bit more tangy.
Q: Can I double the recipe? A: Absolutely. Just mix the dough in separate batches. It is easier to manage.
Q: Any fun twist? A: Try adding a pinch of cinnamon to the vanilla dough. Fun fact: This was my husband’s favorite secret ingredient. Which tip will you try first?
From My Kitchen to Yours
I hope you love making these cookies. They always remind me of holiday afternoons. The kitchen was full of laughter and flour.
Sharing recipes is like sharing stories. It keeps our traditions alive. I would love to hear about your baking adventures.
Have you tried this recipe? Share your experience in the comments. Tell me about your kitchen. Happy cooking!
—Grace Ellington.
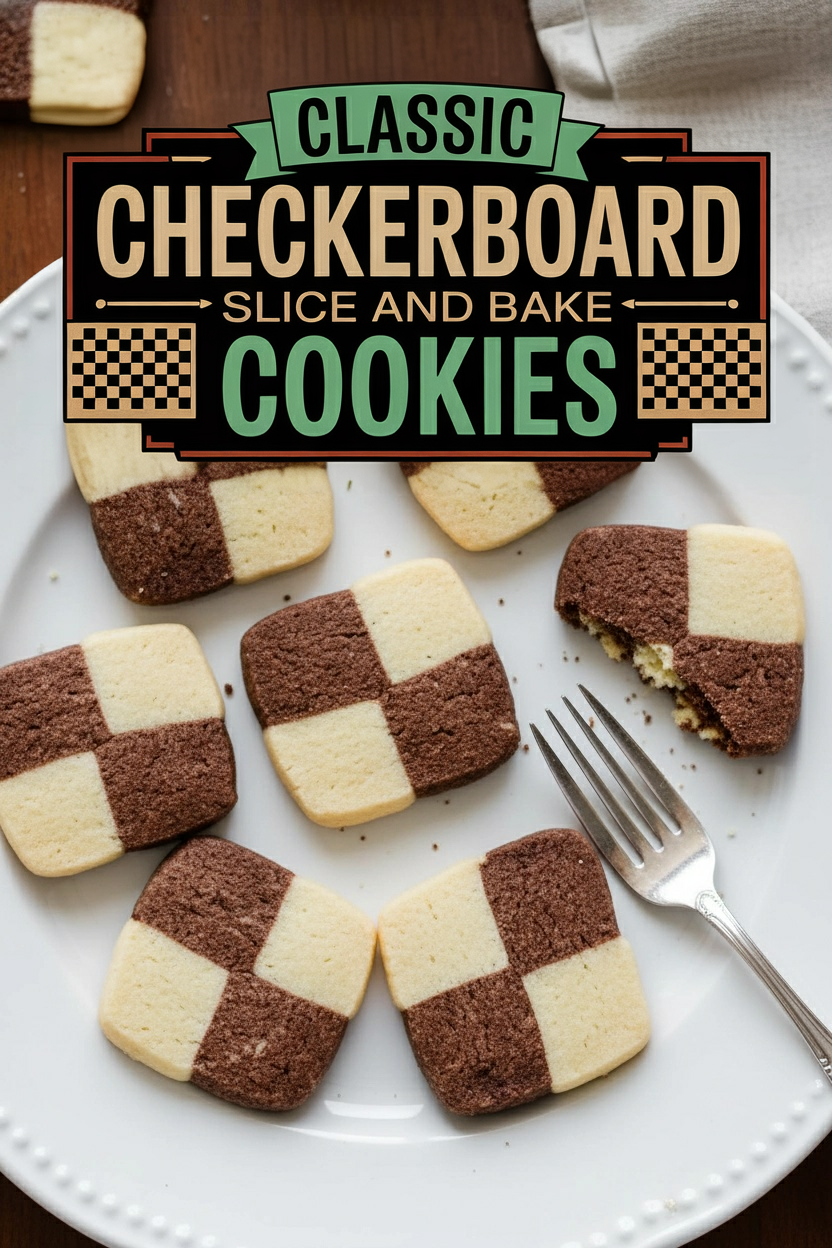

Classic Checkerboard Slice and Bake Cookies
Description
Create a classic, eye-catching treat with these slice-and-bake cookies featuring a perfect checkerboard pattern of vanilla and chocolate dough.
Ingredients
Vanilla Dough:
Chocolate Dough:
Instructions
- Place eggs in small saucepan, cover with 1 inch of water, and bring to boil over high heat. Remove pan from heat, cover, and let sit for 10 minutes. Meanwhile, fill small bowl with ice water. Using slotted spoon, transfer eggs to ice water bath and let stand 5 minutes. Separate yolks from whites; discard whites. Press 1 yolk through fine-mesh strainer into small bowl; set aside. Repeat with remaining yolk, pressing into separate small bowl (keep yolks separate).
- For vanilla dough: In bowl of stand mixer fitted with paddle attachment, beat butter, granulated sugar, salt, and 1 cooked egg yolk on medium speed until light and fluffy, about 4 minutes, scraping down sides of bowl and beater with rubber spatula as needed. Turn mixer to low, add vanilla, and mix until incorporated. Stop mixer; add flour and mix on low speed until just combined, about 30 seconds. Using rubber spatula, press dough into cohesive mass. Transfer dough to large plate and set aside while preparing chocolate dough.
- For chocolate dough: In now-empty bowl of stand mixer fitted with paddle attachment, beat butter, granulated sugar, salt, and remaining 1 cooked egg yolk on medium speed until light and fluffy, about 4 minutes, scraping down sides of bowl and beater with rubber spatula as needed. Turn mixer to low, add vanilla, and mix until incorporated. Stop mixer; add flour and cocoa; mix on low speed until just combined, about 30 seconds. Using rubber spatula, press dough into cohesive mass.
- To form checkerboards: Divide vanilla and chocolate doughs in half. Roll each portion (4 pieces total) into 3- by 5-inch rectangle. Place sheets of vanilla dough on top of sheets chocolate dough and gently press to seal. (You should have 2 sandwiched masses of dough.) Chill dough for 30 minutes.
- Slice each sandwiched dough lengthwise into 4 equal strips. Turn one strip onto its side, so vanilla and chocolate is side by side. Turn second strip over and place on top of first strip, creating a checkerboard pattern; press gently to adhere. Wrap gently in plastic wrap and chill for 1 hour. Repeat with remaining strips (you should have 4 logs total).
- Adjust oven racks to upper-middle and lower-middle positions and heat oven to 350 degrees. Line two rimmed baking sheets with parchment paper. Using sharp chef’s knife, cut 2 dough logs into ¼-inch thick slices, rotating dough so it won’t become misshapen from weight of knife. Place cookies 1 inch apart on baking sheets.
- Bake until center of cookies are pale golden brown, with edges slightly darker, about 15 minutes, rotating baking sheets front to back and top to bottom halfway through baking. Cool cookies on baking sheet 5 minutes; using wide metal spatula, transfer cookies to wire rack and cool to room temperature. Repeat steps 6 and 7 with remaining 2 logs of dough. Store cooled cookies between sheets of parchment or wax paper in airtight container for up to 1 week.
Notes
- For clean slices, use a sharp knife and wipe it clean between cuts. Dough can be made ahead and frozen for up to 3 months; thaw in refrigerator before slicing and baking.