
A Little Story About Oranges
My grandson once asked me why orange and chocolate are friends. I told him to close his eyes. Then I peeled an orange. The bright smell filled the kitchen. Next, I broke open a bar of dark chocolate. “Now breathe,” I said. His smile was my answer. They just belong together.
This cookie recipe is that happy meeting in your mouth. The orange zest wakes everything up. The chocolate feels cozy and deep. It is a party on a plate. Do you have a favorite food pairing like this? I would love to hear yours.
Why the Little Steps Matter
Let’s talk about the butter. It must be softened, not melted. This matters so much. Soft butter whips up light and fluffy with the sugar. Melted butter makes a greasy, flat cookie. Patience here makes all the difference.
And chilling the dough! I know, waiting is hard. But this step is your secret helper. It makes the dough easy to roll. It keeps your cookie shapes sharp in the oven. Good things come to those who wait. Do you get impatient waiting for dough to chill? I still do, sometimes!
The Magic of the Glaze
This glaze is like silk. You melt chocolate and butter together. Then you stir in a bit of corn syrup. *Fun fact: the corn syrup is not for sweetness. It gives the glaze a beautiful, shiny finish.* It makes the cookies look like they came from a fancy bakery.
The teaspoon of brandy is my special touch. It adds a warm, grown-up flavor. But you can use a tiny bit of orange juice instead. The smell of the warm chocolate is amazing. Doesn’t that smell amazing? This final coat turns a simple cookie into a treasure.
Shaping Your Cookies
You can roll and cut these into any shape. Hearts for Valentine’s Day. Stars for Christmas. Or, you can keep it simple. Shape the dough into a log, chill it, and just slice. That’s what I do most days. It feels so easy.
I once made these for a book club. I cut them into little book shapes. My friends still laugh at that. It made the treat feel personal. Baking is not just about food. It is about sharing a little piece of your heart. What shapes would you cut your cookies into?
A Cozy Treat to Share
These cookies are rich. One or two with a glass of cold milk is perfect. They are not too sweet. The orange and dark chocolate taste sophisticated. But a 12-year-old will love them just as much as a grandma.
That is the real magic of baking. It brings people together. It creates a quiet moment of joy. The process is a gift to yourself. The finished cookie is a gift for someone else. Who will you share your first batch with? I hope you make wonderful memories.
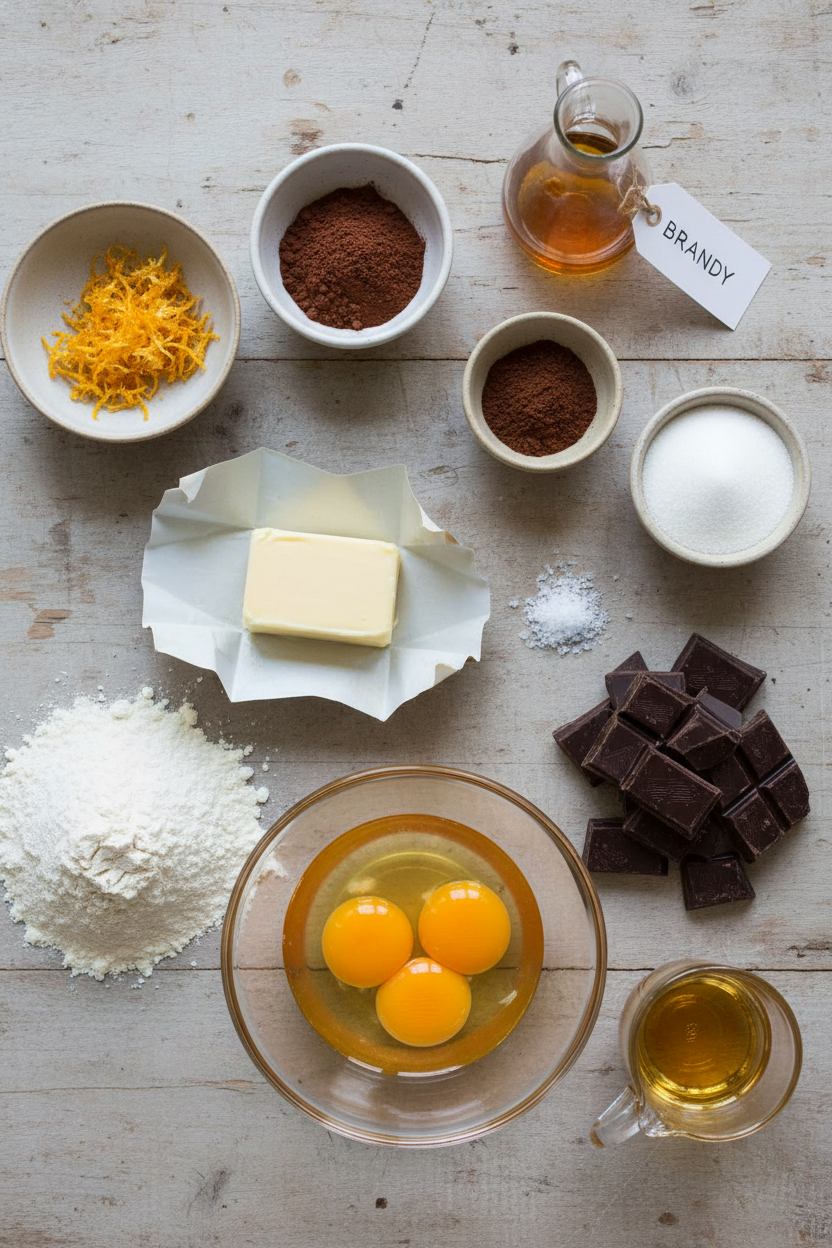
Ingredients:
| Ingredient | Amount | Notes |
|---|---|---|
| Unsalted butter | 20 tablespoons (2 ½ sticks) | softened to cool room temperature |
| Cocoa powder | ½ cup (about 2 ounces/57 grams) | |
| Espresso powder | 1 teaspoon | |
| Sugar | 1 cup (7 ounces/198 grams) | |
| Orange zest | 2 teaspoons | grated from 1 orange |
| Table salt | ¼ teaspoon | |
| Large egg yolks | 2 | |
| Brandy | 1 teaspoon | for dough |
| Unbleached all-purpose flour | 2 ¼ cups (11 ¼ ounces/319 grams) | |
| For Glaze: | ||
| Bittersweet chocolate | 4 ounces (113 grams) | |
| Unsalted butter | 4 tablespoons | |
| Corn syrup | 2 tablespoons | |
| Brandy | 1 teaspoon | for glaze |
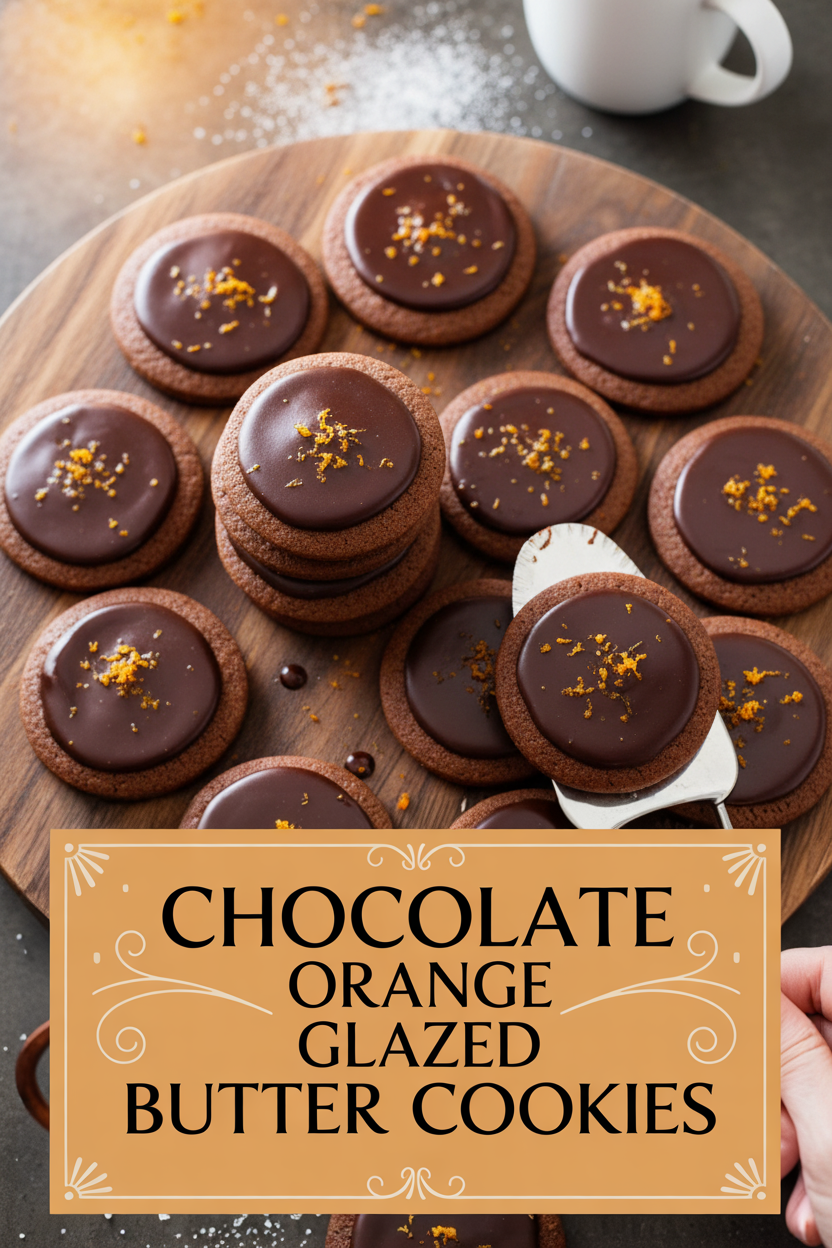
Chocolate Orange Glazed Butter Cookies: A Little Slice of Sunshine
Hello, my dear. Come sit at the counter. I want to tell you about these cookies. They taste like a happy afternoon. The chocolate is deep and cozy. The orange zest is like a little sparkle of sunshine. I first made them for my book club, years ago. They were gone before the first chapter was discussed! I still laugh at that. Baking them always makes my kitchen smell amazing. It’s a warm, sweet smell that hugs you. Let’s make some memories together, shall we?
Step 1: The Chocolate Base
First, we wake up the chocolate. Melt four tablespoons of butter gently. Stir in the cocoa and a tiny bit of espresso powder. This makes the chocolate flavor sing! Let this paste cool on the counter. Patience is important here. (My hard-learned tip: if the paste is too warm, it will melt your other butter. We want it just cool to the touch.)
Step 2: Making the Dough
Now, let’s make the dough. In your mixer, beat the rest of the butter with sugar. Add our cool chocolate paste, orange zest, and a pinch of salt. Beat it until it’s fluffy and light. See how the orange zest looks like confetti? Then mix in the egg yolks and a teaspoon of brandy. Finally, add the flour in three parts. The dough will come together in a soft ball.
Step 3: Shaping & Chilling
Divide the dough into three disks. Wrap them up and let them rest in the fridge. This chills the butter so our cookies keep their shape. You can also roll the dough into a log. Then you just slice and bake! Which shape do you prefer: cut-out shapes or simple slices? Share below!
Step 4: Rolling & Baking
Time to roll and bake. Roll one disk between two sheets of parchment paper. If it gets sticky, just chill it again. Use your favorite cutter to make shapes. Bake them until they just resist a gentle poke. They should not get dark on the edges. Let them cool completely on a rack. This waiting is the hardest part!
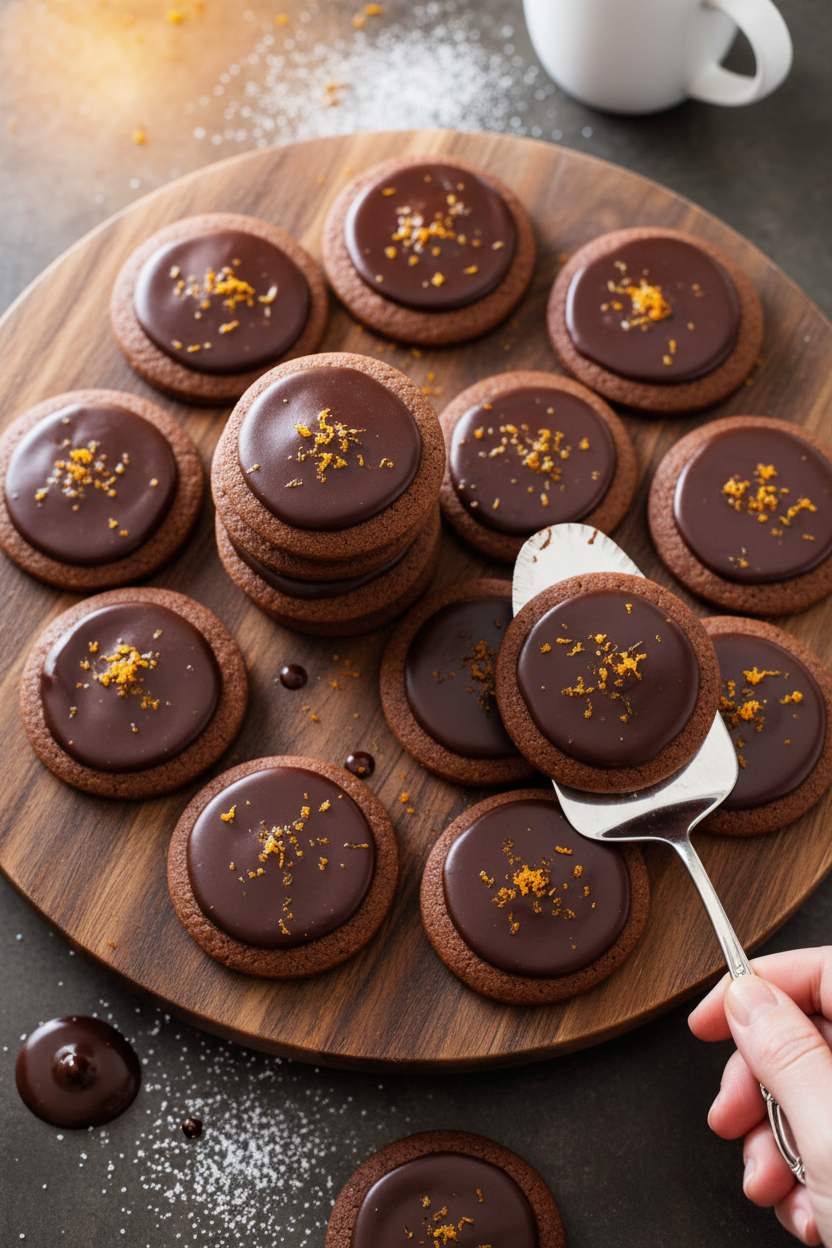
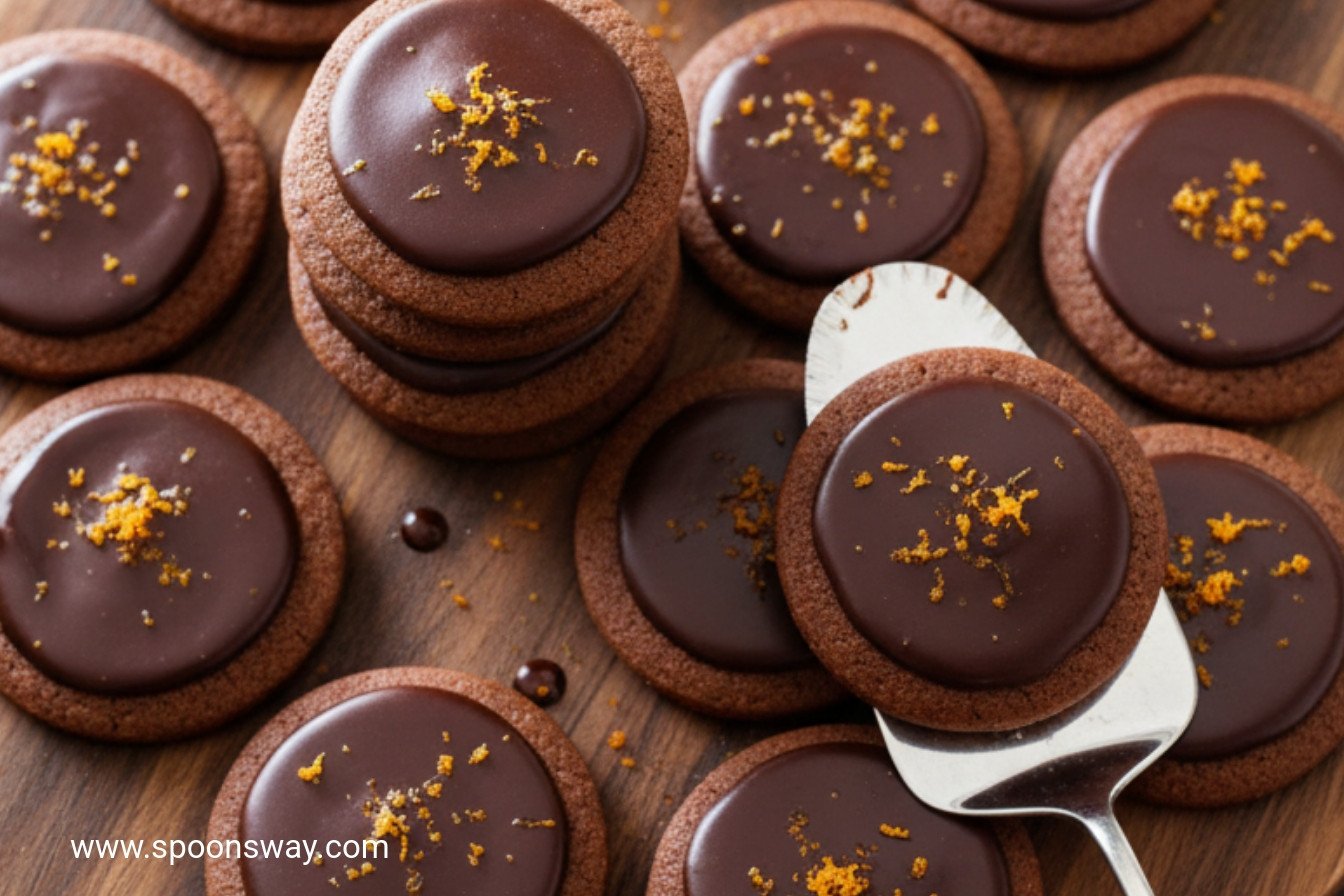
Step 5: The Glaze
The glaze is pure magic. Melt chocolate and butter together over simmering water. Stir until it’s silky smooth. Then mix in corn syrup and brandy. This makes it shiny. Spread a little glaze on each cool cookie. Let them dry. The shine is so pretty. It reminds me of a polished wood table.
| Cook Time | 12–15 minutes per batch |
| Total Time | About 2 hours (plus chilling) |
| Yield | About 3 dozen cookies |
| Category | Dessert, Cookies |
Three Sweet Twists to Try
These cookies are wonderful as they are. But sometimes, it’s fun to play. Here are three little twists I’ve tried over the years. Each one changes the song the cookie sings.
- Minty Fresh Swap: Use peppermint extract instead of brandy. Add a drop to the glaze too. It’s like a chocolate mint patty in cookie form.
- Citrus Sunshine: Try lemon or grapefruit zest instead of orange. The grapefruit is surprisingly lovely. It’s a little tart and very cheerful.
- Spiced Winter Version: Add a half teaspoon of cinnamon to the dough. A tiny pinch of cayenne pepper makes it quietly warm. Perfect for a snowy day.
Which one would you try first? Comment below!
Serving with a Smile
I love serving these on my grandmother’s china plate. They look so elegant. For a party, stack them in a little tower. You could also crumble one over a scoop of vanilla ice cream. Oh, that’s a treat! For a beverage, a small glass of sherry pairs beautifully. The nutty taste loves the orange. For a cozy, non-alcoholic match, try a steaming mug of Earl Grey tea. The bergamot in the tea is a friend to the citrus in the cookie. Which would you choose tonight?
Keeping Your Chocolate Orange Cookies Perfect
Let’s keep these cookies tasting fresh. Cool them completely first. Store them in a tin with wax paper between layers. They will last a week on your counter.
For longer storage, freeze the unglazed dough disks. Wrap them tightly in plastic. They keep for three months. I once forgot a disk in my freezer for months. It baked up perfectly when my grandkids visited!
You can also freeze the baked, glazed cookies. Just lay them flat on a tray until the glaze is solid. Then pack them into a container. This matters because a little planning means sweet treats are always ready.
Batch cooking the dough saves so much time. Make a double batch and freeze half. You will thank yourself later. Have you ever tried storing cookies this way? Share below!
Cookie Troubles and How to Fix Them
Sometimes dough gets too soft. This happens if your kitchen is warm. Just chill it again for ten minutes. I remember when my dough stuck to everything. A little more chilling fixed it right up.
Your cookies might spread too much. This is often from butter that is too warm. Make sure it is just cool and soft, not melty. Getting this right builds your baking confidence. It makes for a perfect, tender bite.
The glaze can get too thick. Simply set the bowl back over the warm water. Stir until it is smooth and shiny again. A good glaze makes the flavor pop. Which of these problems have you run into before?
Your Quick Cookie Questions Answered
Q: Can I make these gluten-free? A: Try a 1-to-1 gluten-free flour blend. The texture may be slightly more crumbly.
Q: How far ahead can I make them? A: The dough chills well for three days. Baked cookies are best eaten within a week.
Q: What if I don’t have brandy? A: Use orange juice. The flavor will be a little different but still lovely.
Q: Can I double the recipe? A: Yes! Just mix in a very large bowl. You might need to mix it in two parts.
Q: Any optional tips? A: A tiny sprinkle of sea salt on the wet glaze is wonderful. *Fun fact: The orange zest oils make your kitchen smell like sunshine.* Which tip will you try first?
A Final Word from My Kitchen
I hope you love making these cookies. Baking is about sharing joy and creating memories. My kitchen is always open for more stories.
I would love to hear about your baking adventure. Tell me all about it. Have you tried this recipe? Share your experience in the comments.
Happy cooking!
—Grace Ellington.
Chocolate Orange Glazed Butter Cookies
Description
Chocolate-Orange Butter Cookies with a rich Chocolate-Brandy Glaze. A sophisticated, melt-in-your-mouth treat perfect for the holidays or any special occasion.
Ingredients
Glaze:
Instructions
- Adjust oven rack to middle position; heat oven to 375 degrees. Melt 4 tablespoons butter in medium saucepan over medium heat (or in medium microwave-safe bowl, on medium power for about 30 seconds). Add cocoa powder and espresso powder; stir until mixture forms smooth paste. Set aside to cool, 15 to 20 minutes.
- In standing mixer fitted with paddle attachment, mix remaining 16 tablespoons butter, sugar, zest, salt, and cooled cocoa mixture on high speed until well combined and fluffy, about 1 minute, scraping sides of mixing bowl once or twice with rubber spatula. Add yolks and brandy and mix on medium speed until thoroughly combined, about 30 seconds. Scrape sides of bowl. With mixer running on low, add flour in three additions, waiting until each addition is incorporated before adding the next and scraping bowl after each addition. Continue to mix until dough forms cohesive ball, about 5 seconds. Turn dough onto counter; divide into three 4-inch disks. Wrap each disk in plastic wrap and refrigerate until the dough is firm yet malleable, 45 to 60 minutes. (Alternatively, shape dough into log 2 inches in diameter and about 12 inches long; use parchment paper or plastic wrap to roll into neat cylinder. Chill until very firm and cold, at least 1 hour.)
- Roll out 1 dough disk between 2 large sheets parchment paper to even thickness of 3/16 inch. (If dough becomes soft and sticky, slide rolled dough on parchment onto baking sheet and rechill until firm, about 10 minutes.) Peel parchment from one side of dough and cut into desired shapes using cookie cutter(s); using thin metal spatula, place shapes on parchment-lined baking sheet, spacing them about 1-inch apart. Gather dough scraps and chill. (For log-shaped dough, simply slice cookies 1/4 inch thick and place on parchment-lined baking sheets.)
- Bake until cookies show slight resistance to touch, 10 to 12 minutes, rotating baking sheet halfway through baking time; if cookies begin to darken on edges, they are overbaked. Repeat with second and third portions of rolled dough. Cool for 5 minutes, then, using spatula, transfer cookies to wire rack; allow to cool completely. Repeat steps 3 and 4 with remaining dough disks and scraps, rerolling scraps just once. Spread cooled cookies with Chocolate-Brandy Glaze, (see below).
- For Glaze: In bowl set over pot of simmering water, melt chocolate with butter and whisk until smooth. Remove bowl from pot, add corn syrup and brandy, and mix until smooth and shiny. Use back of spoon to spread scant 1 teaspoon glaze almost to edge of each cookie. (If necessary, reheat to increase fluidity of glaze.) Allow glazed cookies to dry at least 20 minutes.
Notes
- For clean cuts when using cookie cutters, dip the cutter in flour between each use. The glaze sets best at room temperature; do not refrigerate to set as it may cause condensation.