
A Sweet Little Story
Let me tell you about my grandson, Leo. He loves pie, but he never sits still. One day, I had a silly idea. I put a pie on a stick. He could eat it while running around. It worked perfectly. I still laugh at that.
That’s how these pie pops were born. They are fun and simple. You get all the joy of pie. But you can hold it in your hand. What was your favorite treat to eat as a kid? I’d love to hear.
Why This Matters
Food is more than just eating. It’s about making memories. These little pies are perfect for that. They turn baking into playtime. That matters a lot.
Also, working with dough teaches patience. Your hands learn the feel of it. That is a good lesson for all of us. Don’t worry if your first try isn’t perfect. Mine never are! The fun is in the trying.
Let’s Make the Filling
First, we warm the cherry jam. This makes it nice and runny. Then we push it through a strainer. You keep the thick fruit bits. The shiny liquid gets saved for later.
Now, the chocolate chips. They are a happy surprise inside. Fun fact: Cherries and chocolate are old friends. They have been paired together for over 300 years! Doesn’t that smell amazing? Sweet and rich all at once.
The Magic of the Dough
Roll your dough into a big circle. Use a cup to cut out little rounds. This part is my favorite. It feels like making clay shapes. Do you prefer using a round cutter or a fun shape like a heart?
Here’s the trick. Lay the stick on one round. Press it in. Then add the cherries and chocolate. The stick becomes part of the pie. It’s like magic. Then you top it with another dough round. Press the edges together with a fork. It makes such a pretty pattern.
Baking and Glazing
They go into a hot oven. Soon, your kitchen will smell like a bakery. Watch them turn a golden brown. That color tells you they are done. Let them cool completely. This is hard, I know. But it makes the crust just right.
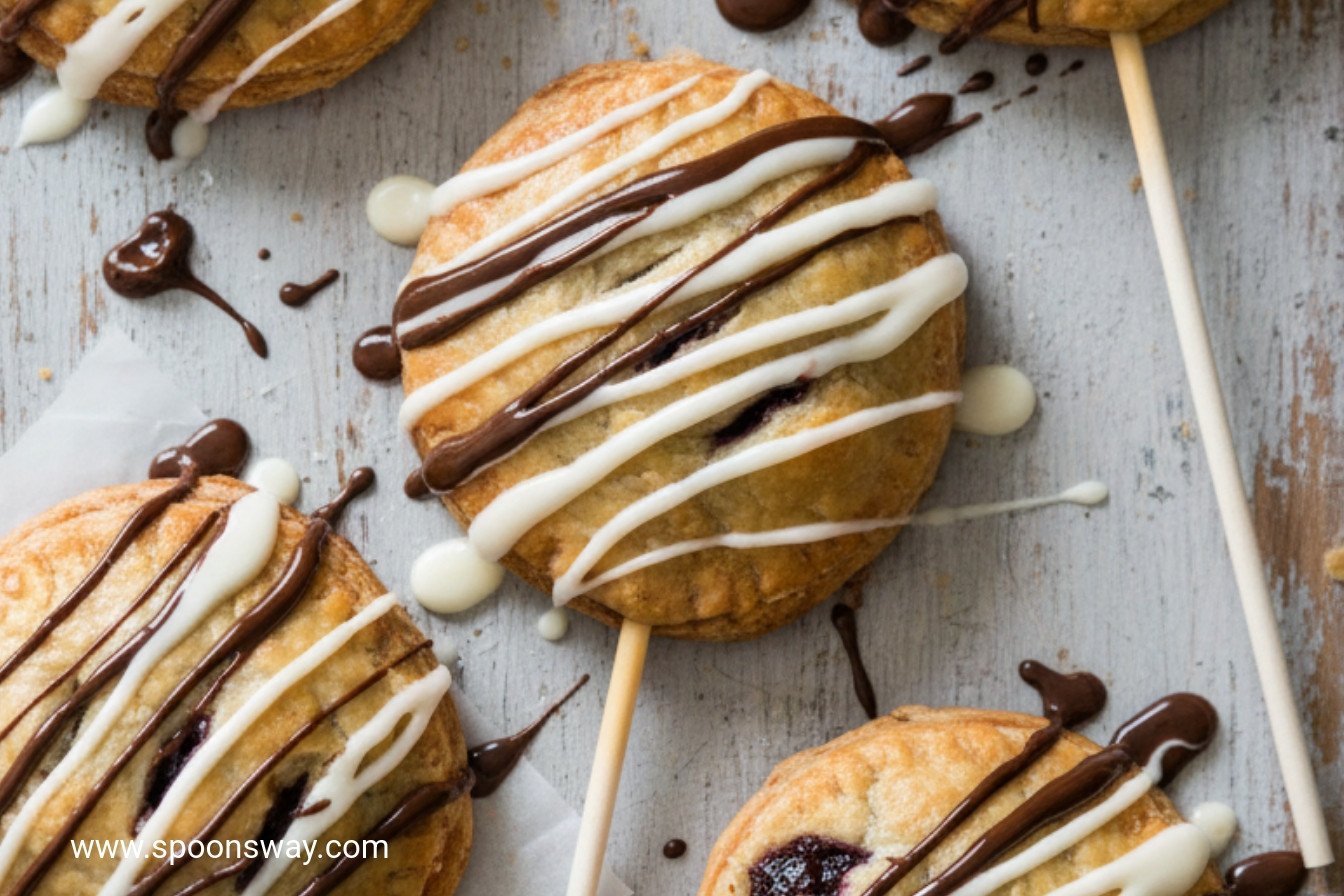
Remember that shiny cherry liquid? Mix it with powdered sugar. Now you have a pink glaze. Drizzle it over your cool pies. It makes them look so special. What color glaze would you make? Strawberry or blueberry could be lovely too.
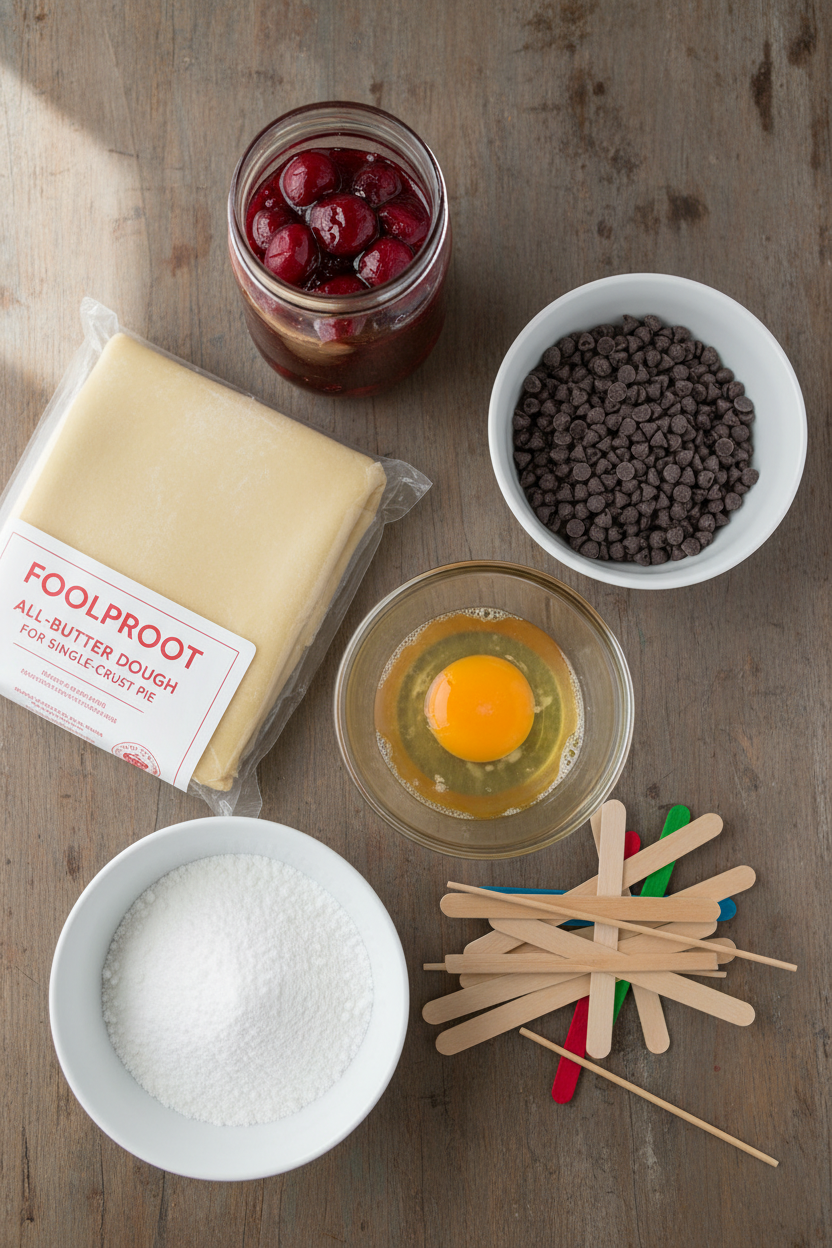
Ingredients:
| Ingredient | Amount | Notes |
|---|---|---|
| cherry preserves | 1 cup | Strained; solids and liquid used separately |
| Foolproof All-Butter Dough | 1 recipe | For a single-crust pie |
| chocolate chips | 2 tablespoons plus 2 teaspoons | |
| lollipop or popsicle sticks | 8 | 4- to 6-inch size |
| large egg | 1 | Lightly beaten with 1 tbsp water for egg wash |
| confectioners’ sugar | 1/2 cup (2 oz / 57g) | For the glaze |
Chocolate Cherry Hand Pie Pops: A Sweet Little Secret
Hello, my dear. Come sit at the table. Let’s make something special. I’m thinking of my grandson’s birthday party. He wanted a treat he could hold. So we invented these pie pops! They are like a pie you can carry. The chocolate and cherry just belong together. Doesn’t that smell amazing? It reminds me of summer. Let’s make some memories, you and I.
Step 1: Prepare the Cherry Filling
First, we wake up the cherry jam. Warm it in the microwave until it runs like syrup. Then we push it through a strainer. This gives us a smooth liquid and lovely jammy bits. Save both parts in separate bowls. Let them cool a little. (Hard-learned tip: Press hard on those solids! You want every bit of that cherry flavor.)
Step 2: Cut and Chill the Dough
Now, roll your dough into a big circle. Use a cup or a cutter to make little rounds. You’ll need sixteen. Place them on a baking sheet. Pop them in the fridge for ten minutes. This keeps the butter cold. Cold butter makes a flaky crust. I still laugh at that. The secret to great pie is a little patience.
Step 3: Assemble the Pops
Move eight rounds to a new sheet. Lay a popsicle stick on one. Press it down gently. Now, the fun part! Add a small mound of cherry bits. Then sprinkle on the chocolate chips. It’s a tiny treasure. Put this sheet in the freezer for ten minutes. This keeps the filling from leaking. Sweet or tart cherries? Share below!
Step 4: Seal and Bake
Heat your oven. Take the cold pies from the freezer. Brush the edges with egg wash. Place another dough round on top like a hat. Press the edges with a fork to seal. Make little slits on top so steam can escape. Bake until they are golden and perfect. Your kitchen will smell like a dream.
Step 5: Glaze and Serve
Let the pies cool completely. They need a rest. Then, mix the cherry liquid with powdered sugar. This makes a pretty pink glaze. Drizzle it over each pop. Let it set for a few minutes. Then, they are ready. Hand one to a friend. See them smile.
Cook Time: 22–26 minutes
Total Time: About 2 hours (includes chilling and cooling)
Yield: 8 pie pops
Category: Dessert, Snack
Three Tasty Twists to Try
Once you know the basics, you can play. Here are some of my favorite changes. They are all so simple. Which one would you try first? Comment below!
- Apple Cinnamon: Use thick apple butter instead of cherry. Add a pinch of cinnamon sugar. It tastes like autumn in your hand.
- Peanut Butter Cup: Swap the cherry for a dab of peanut butter. Use peanut butter chips with the chocolate. It’s a lunchbox favorite.
- Raspberry Lemon: Try raspberry jam. Add a few fresh raspberries and a tiny bit of lemon zest. It’s bright and sunny.
Serving Your Sweet Creations
These pops are a party on a stick. For a real treat, place them in a cup of vanilla ice cream. The warm pie and cold cream is magic. Or, wrap them in pretty cellophane for a homemade gift. Tie them with a ribbon.
What to drink? A cold glass of milk is always right. For the grown-ups, a little glass of ruby port wine pairs beautifully. It echoes the cherry notes. Which would you choose tonight?

Keeping Your Pie Pops Perfect
Let’s talk about keeping these treats happy. Cool them completely first. Then store them in a single layer. Use a container with a tight lid. They will last two days on the counter.
For longer storage, freeze them. I wrap each one in a little parchment paper. Then I tuck them into a freezer bag. They keep for a month! I once forgot a batch in my freezer. Finding them weeks later was a sweet surprise.
To reheat, use your oven. Warm them at 300 degrees for ten minutes. This brings back the crispy crust. Batch cooking saves you time later. Making a double batch is smart. You can have a treat ready anytime. Have you ever tried storing it this way? Share below!
Simple Fixes for Common Hiccups
Sometimes the dough gets too soft. This makes it hard to handle. Just pop it back in the fridge. Let it chill for ten more minutes. I remember when my dough stuck to everything. A little more flour on the counter fixed it.
The filling might try to escape. Seal the edges very well. Press with a fork all the way around. If the glaze is too thick, add more cherry liquid. Just a few drops will thin it. Getting the seal right matters. It keeps all the sweet jam inside where it belongs.
Your pies might not turn golden. Move your oven rack up higher. This helps the bottom cook fully. Rotating the sheet pan also helps. It gives every pie an even tan. This step builds your cooking confidence. A golden crust means a perfectly baked treat. Which of these problems have you run into before?
Your Pie Pop Questions, Answered
Q: Can I make these gluten-free? A: Yes! Use your favorite gluten-free pie dough. The method stays exactly the same.
Q: Can I make parts ahead? A: You can make the dough a day early. Keep it wrapped in the fridge until you need it.
Q: I don’t have cherry preserves. A: Any thick jam or preserves will work. Raspberry or strawberry are lovely swaps.
Q: Can I make a bigger batch? A: Absolutely. Just double all the ingredients. You may need to bake them in two batches.
Q: Any fun optional tips? A: Sprinkle coarse sugar on top before baking. It adds a lovely sweet crunch. *Fun fact: The first “pop” recipes were often just fruit on a stick!* Which tip will you try first?
From My Kitchen to Yours
I hope you love making these little pies. They always make my kitchen smell wonderful. Sharing food is one of life’s great joys. I would love to hear about your baking adventure.
Tell me about your kitchen triumphs. Did you try a different jam? Did your family gobble them up? Your stories make my day. Have you tried this recipe? give experience on Comment
Happy cooking!
—Grace Ellington.

Chocolate Cherry Hand Pie Pops
Description
Delightful handheld pie pops with a sweet cherry and chocolate filling, drizzled with a cherry glaze.
Ingredients
Instructions
- Microwave cherry preserves in bowl until fluid, 45 to 60 seconds, stirring halfway through microwaving. Strain preserves through fine-mesh strainer set over bowl, pressing on solids to extract as much liquid as possible; reserve solids (you should have about ⅓ cup) and liquid separately. Set aside to cool.
- Roll dough into 15-inch circle on floured counter. Using 3-inch round biscuit or cookie cutter, cut 16 rounds from dough circle and transfer to parchment paper–lined rimmed baking sheet. Reserve dough scraps for another use. Cover rounds loosely with plastic wrap and refrigerate until firm but still pliable, about 10 minutes.
- Line second rimmed baking sheet with parchment. Transfer 8 dough rounds to second prepared sheet, spaced evenly apart. Working with 1 dough round at a time, lay lollipop stick flat on top of dough with 1 end in center of dough round. Press stick firmly into dough. Mound 2 teaspoons cherry solids and 1 teaspoon chocolate chips in center of each dough on top of stick. Transfer sheet with filled rounds to freezer and chill for 10 minutes.
- Adjust oven rack to upper-middle position and heat oven to 375 degrees. Brush edges of filled dough rounds with egg wash, then top with remaining chilled dough rounds, pressing edges firmly to seal. Crimp edges of each pie with fork. Cut three ½-inch slits in top of each pie and brush with remaining egg wash. Bake until crusts are golden brown, 22 to 26 minutes, rotating sheet halfway through baking. Transfer sheet to wire rack and let pies cool for 10 minutes. Using spatula, carefully transfer pies to wire rack and let cool completely, about 1 hour.
- Whisk 2 tablespoons reserved cherry preserve liquid and confectioners’ sugar together in small bowl until smooth. Let glaze sit until slightly thickened but still able to be drizzled, about 10 minutes. Adjust thickness with up to 1 teaspoon extra cherry liquid as needed. Drizzle pies with glaze and let sit for 10 minutes. Serve.
Notes
- Ensure the dough is well chilled before assembling to make handling easier and prevent the butter from melting too quickly.