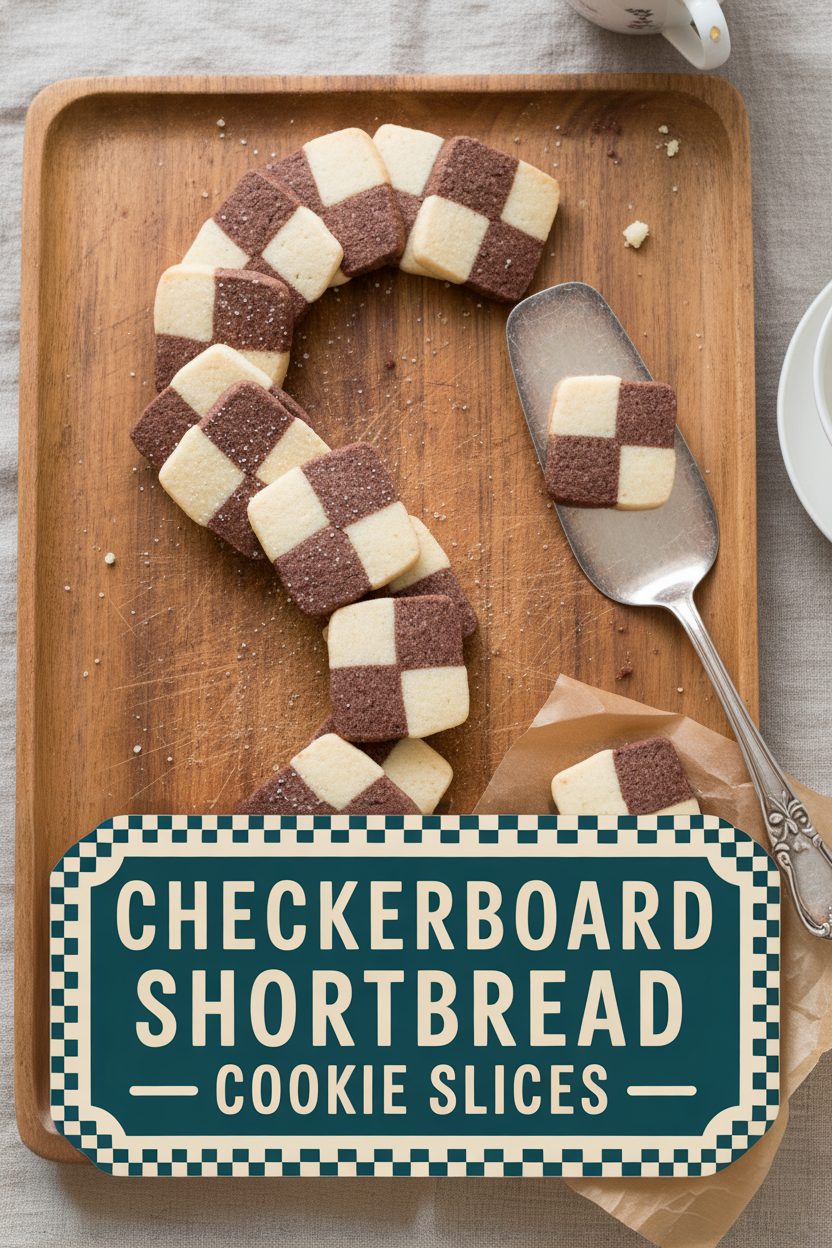
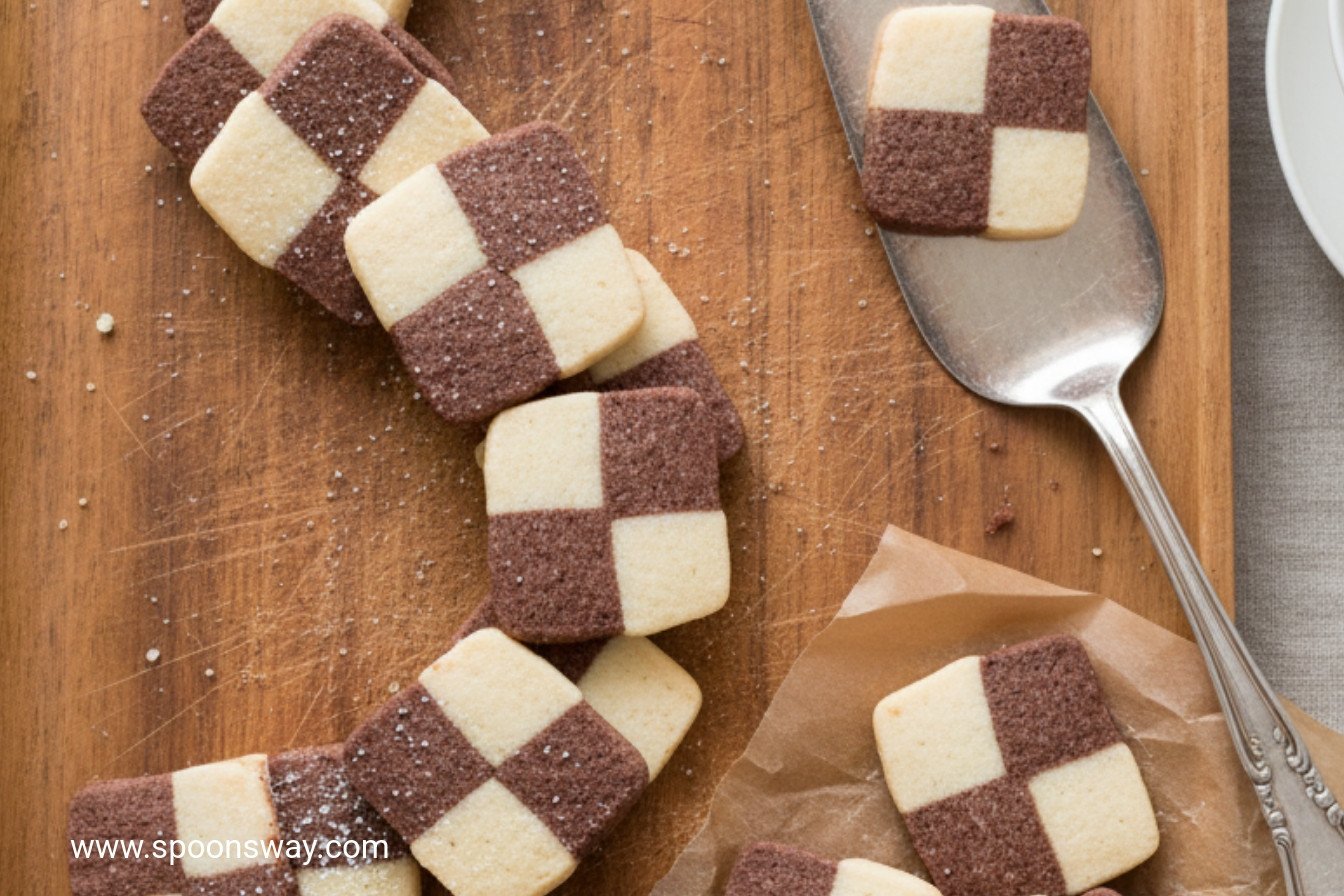
A Cookie That Looks Like a Game
These cookies are a little magic. You make two doughs, one plain and one chocolate. Then you stack them up. When you slice them, a perfect checkerboard appears! It always makes me smile. It’s like a tasty puzzle.
My grandson calls them “game board cookies.” He loves to find the pattern in each one. I still laugh at that. Making them look special shows someone you care. That’s why this matters. Food can be fun and full of love.
My Kitchen Helper Story
I first made these with my sister, June. We were kids. Our job was to press the dough logs together. We thought it was silly play-dough. But when our mom sliced them, we gasped! The pattern was a wonderful surprise.
That memory is why I still bake them. Sharing a kitchen creates the best stories. Do you have a favorite baking memory? I would love to hear about it.
Why Chilling the Dough Matters
This recipe asks you to chill the dough. You must wait two whole hours! I know, it’s hard. But this step is so important. It makes the dough firm.
Firm dough gives you clean, sharp slices. Your checkerboards will be neat and pretty. If you skip the chill, the shapes get messy. Patience makes a better cookie. That’s a good lesson for baking and for life.
The Secret to That Rich Chocolate
For the chocolate dough, we use two things. Melted chocolate and cocoa powder. Doesn’t that smell amazing? The cocoa powder is called “Dutch-processed.”
Fun fact: Dutch-processed cocoa is treated to make it less bitter. It gives a smoother, darker chocolate flavor. It makes the color pop against the vanilla dough. Which do you like more, vanilla or chocolate cookies?
Your Turn at the Counter
When you slice the log, you must rotate one half. This creates the checkerboard. Press the halves together gently. Then slice carefully. Seeing that first perfect square is the best part.
Space them out on the baking sheet. They need room to breathe. Watch them turn light gold at the edges. Let them cool completely. They get that perfect shortbread crunch.
A Treat to Share and Compare
These cookies are made for sharing. Put them on a plate at tea time. People will be so impressed. They might think you bought them from a fancy shop!
Making something beautiful is a joy. It reminds us to add small beauty to our days. What’s your favorite cookie to share with friends? Tell me in the comments. I’m always looking for new ideas.
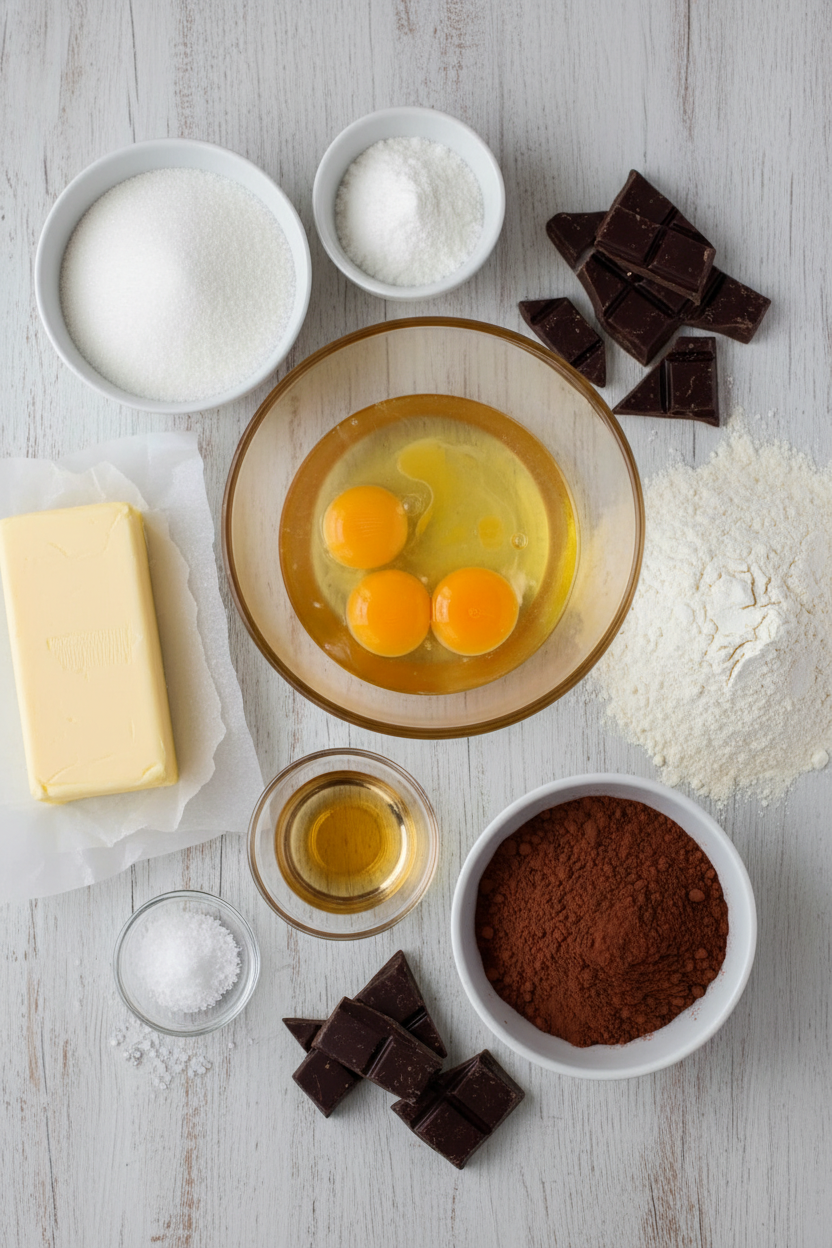
Ingredients:
| Ingredient | Amount | Notes |
|---|---|---|
| Unsalted butter, softened | 16 tablespoons | |
| Granulated sugar | ¾ cup (5 ¼ ounces/149 grams) | |
| Confectioners’ sugar | ½ cup (2 ounces/57 grams) | |
| Salt | ½ teaspoon | |
| Large egg yolks | 2 | |
| Vanilla extract | 2 teaspoons | |
| All-purpose flour | 2 ¼ cups (11 ¼ ounces/319 grams) | |
| Semisweet chocolate, melted | 1 ounce (28 grams) | For the chocolate dough |
| Dutch-processed cocoa powder | 2 tablespoons | For the chocolate dough |
My Checkerboard Cookie Magic
Hello, my dear. Let’s make some magic today. We are baking checkerboard shortbread. These cookies look fancy, don’t they? But they are just clever little slices. I learned this from my Aunt Louise. She called them “icebox cookies.” That’s because the dough chills in the fridge. Doesn’t that smell amazing? The vanilla and chocolate together is pure happiness. I still laugh at that. My first try was a wobbly mess. But we learn. Your hands will get it right. Let’s begin our cozy kitchen project.
Step 1: Make the Dough
First, let’s make our dough. Beat the soft butter with both sugars. Do this until it’s pale and fluffy. It takes about three minutes. Then, mix in the egg yolks and vanilla. Now, gently add the flour. The dough will be soft and lovely. Take half of it out of the bowl. To the other half, add the melted chocolate and cocoa. Mix it until it’s a beautiful brown. (My hard-learned tip: Make sure your butter is truly soft. Cold butter won’t cream right. It makes all the difference!)
Step 2: Shape and Chill
Now for the fun part. Shape each color into a rectangle. They should be about nine inches long. Stack the vanilla rectangle on the chocolate one. You’ll have a tall, two-colored block. Wrap it tightly in plastic. This goes into the fridge. It needs to chill for at least two hours. This lets the flavors get friendly. It also makes slicing so much easier. You can even leave it for a few days. Baking is more fun when you’re not rushed.
Step 3: Slice and Pattern
Time to heat the oven to 325 degrees. Get out two baking sheets. Line them with parchment paper. Now, take out your chilled dough log. Here’s the checkerboard trick. Slice the log right down the middle. Turn one half so the colors switch places. Press them together gently. See the pattern? Now slice into thin cookies. What do you think the pattern looks like? A game board, or maybe a quilt? Share below! Place them on your sheets. They need a little space to breathe.
Step 4: Bake and Cool
Bake those pretty cookies. Put one sheet on a high rack, one low. Bake for about 12 to 15 minutes. Halfway through, switch their positions. This helps them bake evenly. You’ll know they’re done when the edges are light gold. Let them cool on the sheet for five minutes. Then move them to a rack. They must cool completely. I know, waiting is hard. But a warm cookie is a fragile cookie. Trust me on this. The wait makes that first bite perfect.
Cook Time: 15 minutes
Total Time: 2 hours 30 minutes (plus chilling)
Yield: About 4 dozen cookies
Category: Dessert, Cookies
Three Fun Twists to Try
Once you master the classic, try a little twist. It makes baking feel like play. Here are three ideas I love.
- Citrus Sunshine: Add a teaspoon of lemon or orange zest to the vanilla dough. It’s so bright and cheerful.
- Peppermint Party: Mix a drop of peppermint extract into the chocolate dough. It tastes like a holiday in your mouth.
- Confetti Fun: Fold colorful sprinkles into the vanilla dough. It makes the checkers look like they’re celebrating.
Which one would you try first? Comment below!
Serving with a Smile
These cookies are stars on their own. But a little presentation is nice. Arrange them on a vintage plate. They look so pretty that way. You could also serve them with a small bowl of berries. The fresh fruit is a nice contrast. For a real treat, sandwich two cookies with vanilla ice cream. It’s divine.
What to drink? A cold glass of milk is the classic choice. It always is. For the grown-ups, a small glass of sherry or a creamy coffee liqueur is lovely. It sips so nicely with the buttery shortbread. Which would you choose tonight?

Keeping Your Checkerboard Shortbread Fresh
These cookies keep beautifully. Store cooled cookies in a tin at room temperature. They will stay crisp for a week. You can also freeze the dough log for up to a month. Just slice and bake when you want fresh cookies.
I love making a double batch of dough. I bake one log now and freeze the other. It is a gift to your future self. Having cookie dough ready is a small joy. It makes a busy day feel special.
I once forgot a log in the back of the fridge. I found it two weeks later! It baked up perfectly. This dough is very forgiving. Have you ever tried storing cookie dough this way? Share below!
Cookie Troubles and Simple Fixes
Is your dough too crumbly? The butter might be too cold. Let it soften on the counter first. This helps everything mix smoothly. Your dough should come together like playdough.
Are your checkerboards sliding apart? Chill the dough log thoroughly. I remember rushing this step once. My squares became lopsided! Chilling firms the butter. This keeps your pattern sharp when you slice.
Do the cookies spread too much? Your oven might be too hot. An oven thermometer helps. Getting the temperature right matters. It gives you a crisp, neat cookie. This builds your baking confidence. Which of these problems have you run into before?
Your Checkerboard Cookie Questions
Q: Can I make these gluten-free? A: Try a 1-to-1 gluten-free flour blend. The texture may be slightly more sandy.
Q: How far ahead can I make the dough? A: The dough log chills for up to 3 days. You can also freeze it for a month.
Q: What if I don’t have Dutch-process cocoa? A: Use natural cocoa powder. The color will be a lighter brown.
Q: Can I double the recipe? A: Yes! Just mix in two separate batches for best results.
Q: Any fun optional tips? A: Sprinkle the slices with sanding sugar before baking. Fun fact: This is called “sparkling” the cookies! Which tip will you try first?
Bake a Little Joy
I hope you love making these cookies. Sharing them is the best part. Wrap a few in a napkin for a friend. It is a small, sweet hello.
Thank you for baking with me today. I would love to hear from your kitchen. Have you tried this recipe? Share your experience in the comments. Tell me all about it.
Happy cooking!
—Grace Ellington.
Checkerboard Shortbread Cookie Slices
Description
Classic, buttery shortbread dough is divided and half is flavored with chocolate and cocoa, then formed into a stunning checkerboard pattern.
Ingredients
Instructions
- Using stand mixer fitted with paddle, beat butter, granulated sugar, confectioners’ sugar, and salt on medium-high speed until pale and fluffy, about 3 minutes. Add egg yolks and vanilla and beat until combined. Reduce speed to low, slowly add flour, and mix until combined. Set aside half of dough; add chocolate and cocoa to remaining dough in mixer bowl and mix on low until fully combined.
- Transfer dough to counter and form each piece into 9 by 2-inch rectangle, about 1 inch thick. Stack rectangles to create 2-inch-square log. Wrap log tightly in plastic wrap and refrigerate for at least 2 hours or up to 3 days.
- Adjust oven racks to upper-middle and lower-middle positions and heat oven to 325 degrees. Line 2 baking sheets with parchment paper.
- Slice chilled dough in half lengthwise, rotating 1 half to create checkerboard pattern, then press gently to re-adhere halves. Slice dough into ¼-inch-thick squares and space them ¾ inch apart on prepared sheets. Bake until edges are light golden brown, 12 to 15 minutes, switching and rotating sheets halfway through baking. Let cookies cool on sheets for 5 minutes, then transfer to wire rack. Let cookies cool completely before serving.
Notes
- View Nutritional Information