
My First Kitchen Disaster
I once tried to make caramel with no cream. It was a sticky, hard mess. I still laugh at that. It taught me to follow the recipe first. Then you can play later.
That’s why this recipe matters. It gives you the right steps. You will make something wonderful on your first try. Have you ever had a funny kitchen mistake? I would love to hear about it.
Why These Little Tarts Are Special
These tartlets are tiny bites of joy. The crust is nutty and sweet. The filling is soft, salty caramel. Doesn’t that sound amazing?
They are perfect for sharing. You can make them for a party. Or just for a quiet afternoon. This matters because food made with care tastes better. It is a little gift you make with your hands.
A Secret for the Crust
Do not skip the chilling time. I know you want to rush. But wait those twenty minutes. It keeps the little shells from shrinking.
Pressing the dough into the cups is fun. Use your fingers. Make a little nest for the caramel. Fun fact: the word “tassie” is just a cute name for a tiny tart! Do you like using your hands to cook, or do you prefer mixing?
The Magic of Warm Caramel
Melting the caramels is my favorite part. Stir them slowly with the cream. Watch them turn into a smooth, glossy river. Doesn’t that smell amazing?
Then you stir in the chopped cashews. The salty nuts cut the sweet caramel. It is the perfect balance. This step makes all the difference. Trust me.
Your Turn to Make Memories
Let the filled tarts set. The waiting is hard. But it makes them neat to eat. Then take your first bite. You made that!
Food is a way to make memories. These little tarts can be part of your story. What is your favorite treat to make with someone you love? Tell me about it. I read every note.
Ingredients:
| Ingredient | Amount | Notes |
|---|---|---|
| Cashews, toasted | 1 cup | Divided; ½ cup for crust, ½ cup for filling |
| Confectioners’ sugar | ⅓ cup (1 ⅓ oz / 38g) | |
| Light brown sugar, packed | 2 tablespoons | |
| All-purpose flour | 1 cup (5 oz / 142g) | |
| Salt | ¼ tsp + ⅛ tsp | Divided; for crust and filling |
| Unsalted butter | 7 tablespoons | Cut into ½-inch pieces and chilled |
| Large egg yolk | 1 | |
| Soft caramels | 3 ¾ oz (106g) | |
| Heavy cream | 2 ½ tablespoons |

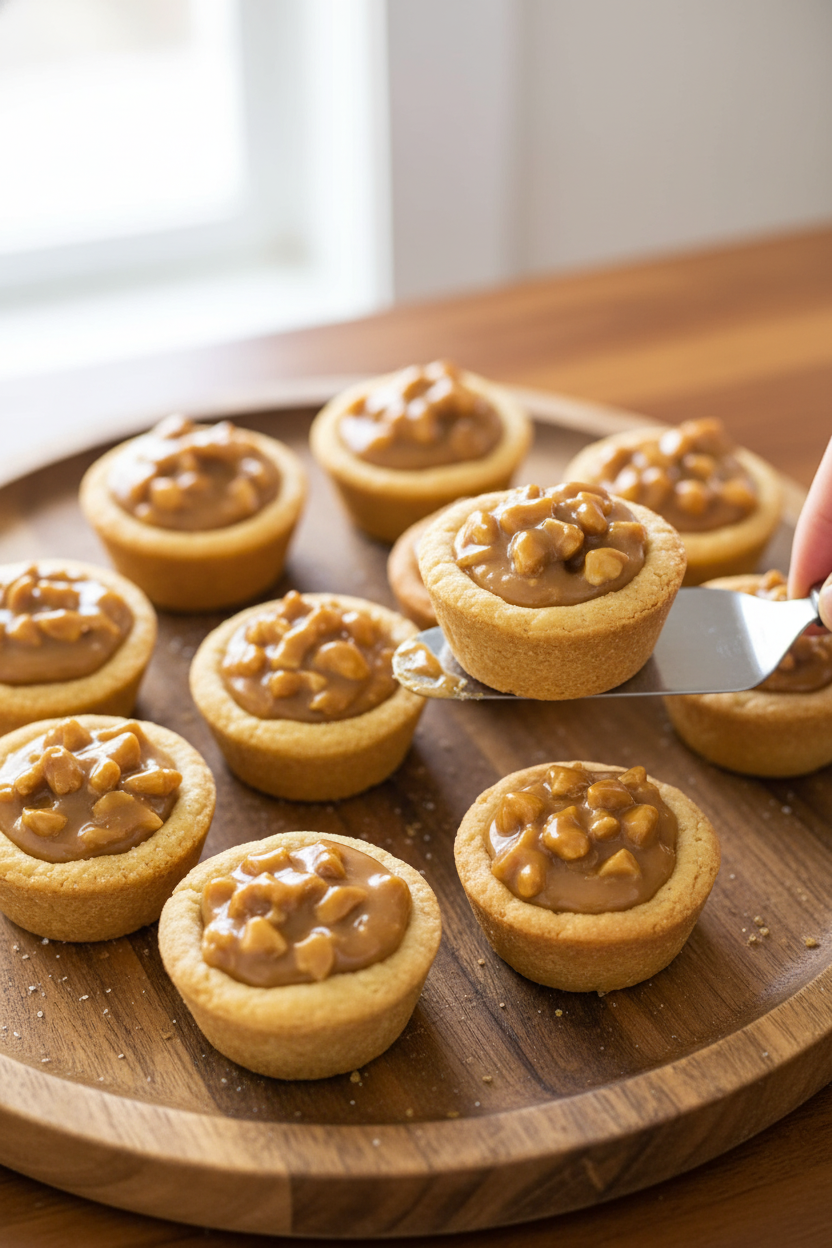
My Little Caramel Cashew Tartlets
Hello, my dear. Come sit at the counter. I’m making my little caramel cashew tartlets. They are tiny bites of joy. I call them my “happy handfuls.” The kitchen smells like toasted nuts and sweet butter. Doesn’t that smell amazing? I first made these for my book club years ago. The whole plate vanished in minutes. I still laugh at that. Let’s make some magic together. It’s easier than you think.
Step 1: The Nutty Crust
First, we get our dough ready. It has a secret. We use ground-up cashews right in the crust! Grab your food processor. Put in half the cashews and both sugars. Let it whir until it’s like fine sand. Add your flour and a pinch of salt. Give it another quick pulse. Now, scatter those cold butter pieces over the top. Process it until it looks like wet beach sand. Finally, add the egg yolk. Watch it come together into a lovely ball. (A hard-learned tip: Keep your butter cold. It makes the shells beautifully flaky.)
Step 2: Shape the Nests
Now, we shape our little nests. Take a tablespoon of dough. Press it into a mini muffin cup. Use your fingers to push it up the sides. It’s like making a tiny pie for a mouse! Do this for all the cups. Then, the fridge is our friend. Let the dough rest there for about 20 minutes. This keeps them from shrinking in the oven. While they chill, you can wash a bowl or two. What’s your favorite kitchen task? Share below!
Step 3: Bake the Shells
Time to bake. Heat your oven to 350 degrees. Bake those little shells until they are golden. Remember to turn the pan halfway through. This helps them bake evenly. Let them cool in the pan for a bit. Then, gently twist them out. Let them cool completely on a rack. Patience is a virtue here. A warm shell will melt our next step!
Step 4: The Caramel Filling
Here comes the fun part—the caramel! Chop the rest of your cashews. Now, in a small pot, melt the caramels with heavy cream. Stir, stir, stir over low heat. It will become a smooth, glorious river. Stir in your chopped cashews. Spoon a little bit into each cool shell. Now, we wait one last time. Let them set for about 30 minutes. Then, the reward. A perfect, sweet, crunchy bite.
| Cook Time | 17 minutes |
| Total Time | 1 hour 30 minutes (plus cooling) |
| Yield | 24 mini tartlets |
| Category | Dessert, Cookies |
Three Tasty Twists to Try
These tartlets are wonderful as they are. But you can play with them, too! Here are three fun ideas. The Salty Sweet: Sprinkle a tiny bit of flaky sea salt on the caramel before it sets. The Chocolate Drizzle: Melt a little dark chocolate. Drizzle it over the finished tartlets for a fancy look. The Berry Surprise: Place one dried cranberry or cherry in the bottom of each shell before adding caramel. Which one would you try first? Comment below!
Serving Them Up With Style
I love serving these on a pretty plate. A white plate makes their golden color pop. You could also line a little basket with a cloth napkin. They are perfect for a tea party or a picnic. For a drink, a cup of strong coffee is lovely with the caramel. A cold glass of milk is always a classic choice. Or, for the grown-ups, a little sip of sherry pairs beautifully. Which would you choose tonight?
Keeping Your Tartlets Tasty
These little tarts are best the day you make them. But I always bake a double batch. You can store them in a sealed container for two days. The caramel stays nice and soft.
For longer storage, freeze them without the filling. Just bake and cool the shells. Pop them in a freezer bag for a month. Thaw at room temperature when you need a treat.
I once tried to freeze the filled tarts. The caramel got a little weepy. So now I freeze the shells and make fresh filling. It is so easy to whip up. Have you ever tried storing it this way? Share below!
Batch cooking matters. It turns a project into a gift for future-you. A ready-made shell is a little promise of joy. It makes a busy day feel special.
Little Hiccups and Easy Fixes
First, the dough can be crumbly. If it won’t press into the cup, just pinch it. Use your fingers to press and smooth it. I remember when my first batch looked messy. They still tasted wonderful.
Second, the caramel can seize up. Keep the heat low and stir constantly. If it gets too thick, add a splash more cream. This patience matters for a smooth, silky filling. No one likes lumpy caramel.
Third, removing the shells can be tricky. Let them cool fully in the pan first. Then gently twist them out. Using a small spoon can help. Which of these problems have you run into before?
Fixing small issues builds kitchen confidence. You learn that most mistakes have a simple solution. This knowledge makes every recipe less scary. And it always makes the flavor better.
Your Questions, My Answers
Q: Can I make these gluten-free? A: Yes! Use a good gluten-free flour blend. The nutty crust works perfectly with it.
Q: Can I make them ahead? A: Absolutely. Make the shells up to two days early. Fill them the day you want to serve.
Q: What if I don’t have caramels? A: You can use store-bought caramel sauce. Just warm it and stir in the nuts.
Q: Can I double the recipe? A: You sure can. It’s a great one for big batches. Just use two muffin tins.
Q: Any optional tips? A: A tiny sprinkle of sea salt on top is lovely. Fun fact: Salt makes sweet flavors taste even sweeter! Which tip will you try first?
From My Kitchen to Yours
I hope you love making these little bites. They are perfect for sharing with someone you love. Or just for a quiet afternoon with a cup of tea.
My kitchen table has heard many stories over treats like these. I would love to hear yours. Have you tried this recipe? Share your experience in the comments.
Happy cooking!
—Grace Ellington


Caramel Cashew Mini Tartlets
Description
These delightful mini tartlets combine a buttery cashew shortbread shell with a rich, chewy caramel-cashew filling for a perfect bite-sized treat.
Ingredients
Instructions
- Adjust oven rack to middle position and heat oven to 350 degrees. Grease one 24-cup, or two 12-cup, mini muffin tin(s).
- Process ½ cup cashews, confectioners’ sugar, and brown sugar in food processor until cashews are finely ground, about 20 seconds. Add flour and ¼ teaspoon salt and process until combined, about 10 seconds. Scatter butter over top and process until mixture resembles damp sand, about 20 seconds. Add egg yolk and process until dough forms ball, about 25 seconds. Working with 1 tablespoon dough at a time, press dough into bottom and sides of each prepared muffin cup. Refrigerate muffin tin(s) until dough is firm, about 20 minutes.
- Bake shells until golden, 13 to 17 minutes, rotating muffin tin(s) halfway through baking. Let shells cool in muffin tin(s) on wire rack for 20 minutes. Gently remove shells from muffin tin(s) and let cool completely.
- Coarsely chop remaining ½ cup cashews. Heat caramels, cream, and ⅛ teaspoon salt in small saucepan over medium-low heat, stirring constantly, until melted and smooth. Stir in chopped cashews. Fill each cookie shell with scant 1 teaspoon caramel mixture. Let filling cool until set, about 30 minutes, before serving.
Notes
- For easier removal, run a small knife around the edges of the warm shells after the initial 20-minute cool. Store in an airtight container at room temperature for up to 3 days.