
The Magic of the Bag
Let me tell you about turkey in a bag. It sounds silly, doesn’t it? But it is pure kitchen magic. That simple bag keeps all the steam and flavor right around the bird. It makes the turkey so tender and juicy.
I was so nervous the first time I tried it. I worried the bag would melt! But it didn’t. It just made the best turkey I’d ever cooked. I still laugh at that worry. Have you ever cooked a turkey in a bag before?
A Little Story Before We Start
My grandson once called this my “secret sauce” turkey. He saw me brushing on the soy paste. It’s dark and glossy. He thought it was chocolate! We all had a good giggle about that.
That paste is the key to a beautiful, golden skin. You simmer soy sauce until it gets thick. Then you mix in butter and flour. It makes a sticky paste. Rubbing it on is the fun, messy part. This matters because it gives the skin amazing flavor and color.
Getting Your Bird Ready
First, pat your turkey very dry. This helps the skin get crispy later. Tuck the legs and wings under. It makes a tidy-looking bird. Now, rub that soy paste everywhere. Doesn’t that smell amazing?
You’ll put the turkey in the bag with some broth and veggies. The bag does the hard work. The veggies and broth underneath will become your gravy later. That’s why this step matters. Everything in the pan builds flavor for your meal.
The Two-Part Roast
Here’s the trick. You cook it in the bag first. This steams the turkey and keeps it moist. Then, you take it out of the bag. You let the turkey finish roasting without it.
This second roast makes the skin crispy and perfect. Fun fact: letting the turkey rest after cooking is very important. The juices settle back into the meat. This makes every slice juicy. Do you like crispy skin or juicy meat best?
Making the Pan Gravy
Do not throw away those pan juices! They are liquid gold. You strain out the veggies. Then you separate the fat from the good juice. You cook flour with a little fat to make a roux.
Then you whisk in the pan juices. It thickens into the most delicious gravy. It tastes like the whole holiday in a spoon. This matters because gravy made from scratch has so much more love in it. What’s your favorite thing to put gravy on?
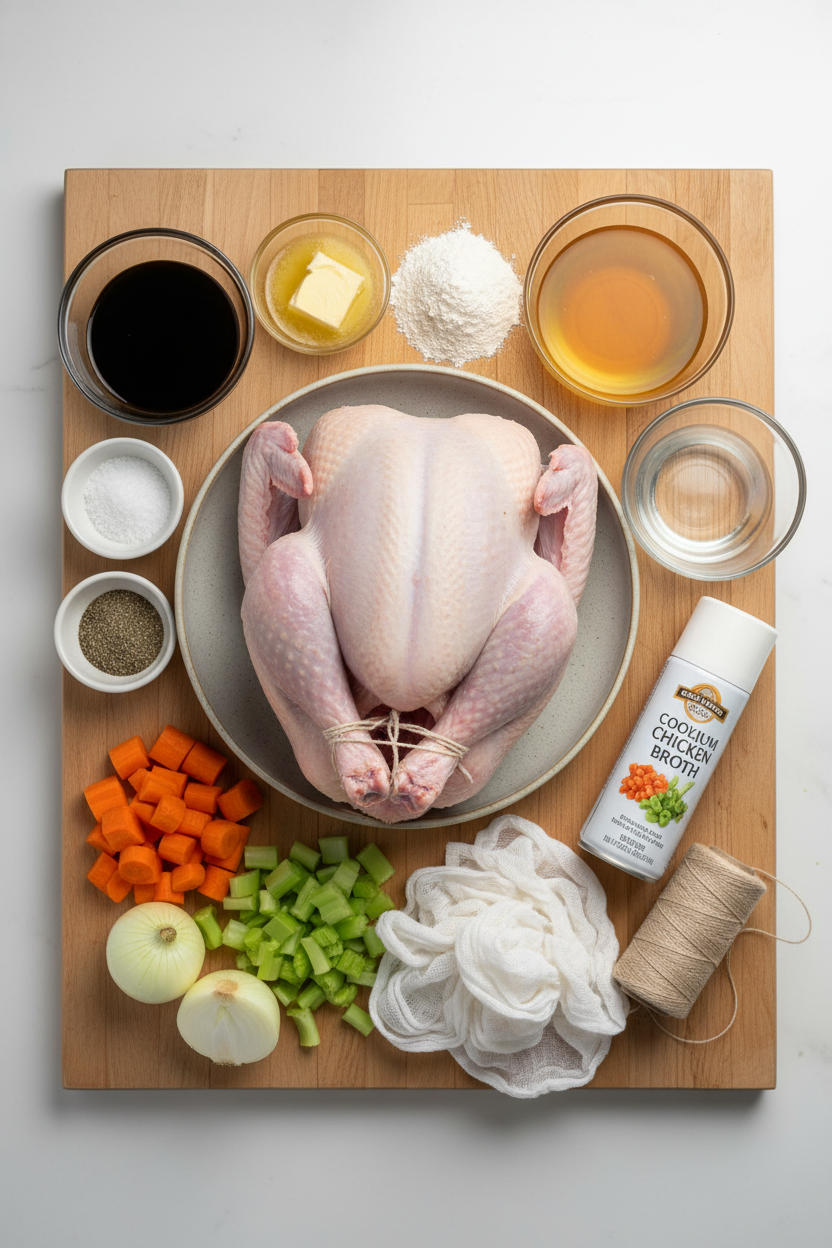
Ingredients:
| Ingredient | Amount | Notes |
|---|---|---|
| Soy sauce | ½ cup | |
| Unsalted butter | 2 tablespoons | softened |
| All-purpose flour | 7 tablespoons | divided |
| Salt and pepper | To taste | |
| Turkey | 1 (12- to 14-pound) | fully thawed if frozen |
| Low-sodium chicken broth | 3 cups | |
| Water | 2 cups | |
| Carrots | 3 | peeled and cut into 2-inch pieces |
| Onion | 1 | peeled and quartered |
| Celery rib | 1 | cut into 2-inch pieces |
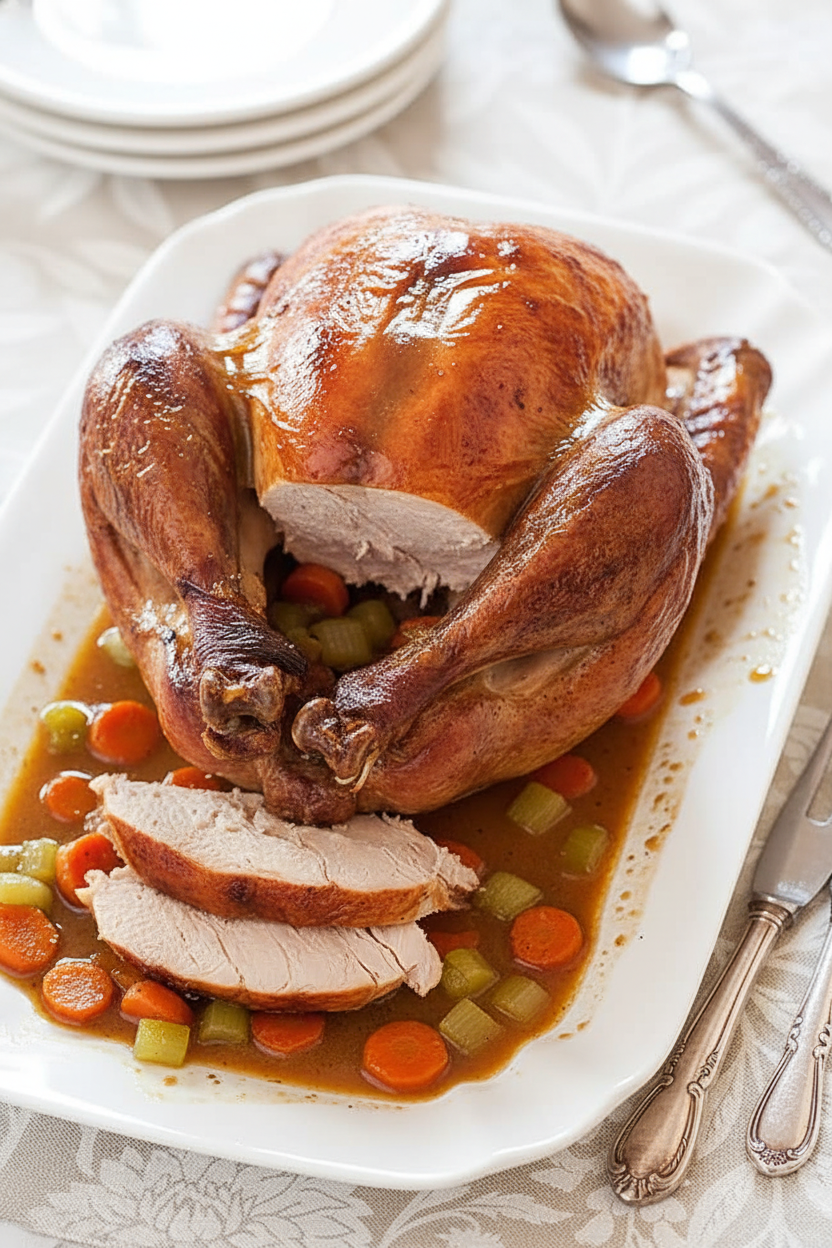
Bag Roasted Turkey with Pan Juices
Hello, my dear. Come sit at the table. Let’s talk turkey. This recipe is my secret for a juicy, golden bird. It uses a simple oven bag. The bag keeps all the steam and flavor inside. Doesn’t that sound clever? I learned it from my friend Mabel years ago. I still laugh at that. She swore by it, and she was right. The best part is the gravy made from the pan juices. It’s pure, savory magic. Let’s get started, step-by-step.
- Step 1: First, make your special soy paste. Boil the soy sauce until it gets thick. It will smell salty and rich. Then whisk in the soft butter, a little flour, and pepper. This paste is your flavor paint. (Hard-learned tip: watch the soy sauce closely! It can burn if you walk away).
- Step 2: Now, prepare your turkey. Put broth, water, and chopped veggies in the pan. Dry your turkey with paper towels. Rub that soy paste all over the skin. It will be messy and fun. Then, tuck its legs and wings. We put it in a sprayed oven bag with a little cheesecloth. Why do we use an oven bag? Share below!
- Step 3: Time to cook. Roast the bagged turkey for a few hours. Your kitchen will smell amazing. Then, take it out and turn the heat way up. Carefully cut open the bag. Let all the wonderful juices drip into the pan. Roast the turkey again, just to make the skin crispy and golden.
- Step 4: Let the turkey rest. This is very important. It keeps the juices inside. Meanwhile, make the gravy. Strain the pan juices. You’ll cook a little fat and flour together. Then whisk in those precious juices. It will bubble and thicken. Season it with a little salt and pepper. Taste it. Isn’t that wonderful?
Cook Time: 3–4 hours
Total Time: 4 hours 15 minutes
Yield: 8-10 servings
Category: Dinner, Holiday
Three Fun Twists on the Classic
This recipe is like a favorite sweater. It’s cozy and reliable. But sometimes, you want to add a new brooch. Here are three simple ideas. They make the meal feel fresh and special.
- Herb Garden Glaze: Mix chopped rosemary and thyme into the soy paste. It smells like a summer garden.
- Maple-Orange Dream: Add two tablespoons of maple syrup and some orange zest to the paste. Sweet and tangy!
- Cozy Spice Rub: Use smoked paprika and a pinch of garlic powder instead of pepper. It gives a warm, smoky flavor.
Which one would you try first? Comment below!
Serving Your Masterpiece
Now, for the grand presentation. Carve your turkey at the table. Let everyone see your beautiful work. Pour the hot gravy into my little ceramic pitcher. It makes everyone smile.
For sides, I love creamy mashed potatoes. They are perfect for that gravy. Buttered green beans with almonds are nice, too. Or a simple cranberry sauce for a bright, tart bite.
What to drink? A glass of chilled apple cider is lovely. For the grown-ups, a light Pinot Noir wine pairs beautifully. Which would you choose tonight?
Keeping Your Turkey Tasty Later
Let’s talk about leftovers. They are the best part. First, let the turkey cool completely. Then carve the meat off the bones. Store the meat in a sealed container. It will keep for three days in the fridge.
You can freeze it for longer. Use airtight bags or containers. It will be good for two months. To reheat, add a splash of broth to a baking dish. Cover it with foil and warm it in a 325-degree oven.
I once reheated turkey without broth. It was too dry. A little liquid makes all the difference. Batch cooking matters because it gives you easy meals. You deserve a break after all that work.
Have you ever tried storing it this way? Share below!
Simple Fixes for Common Turkey Troubles
Sometimes the skin isn’t crispy. The fix is easy. Take off the bag and foil at the end. Let the turkey roast in the hot oven. This makes the skin golden and perfect.
Gravy can be too thin. Just cook it a bit longer. Keep stirring over medium-low heat. It will thicken up nicely. I remember when my first gravy was like soup. I learned patience is key.
The breast meat might cook faster than the legs. Tucking the wings under helps. So does using the cheesecloth and foil. This protects the breast from getting dry. Fixing small problems builds your cooking confidence. It also makes your food taste so much better.
Which of these problems have you run into before?
Your Turkey Questions, Answered
Q: Can I make this gluten-free?
A: Yes. Use tamari instead of soy sauce. Use a gluten-free flour blend for the paste and gravy.
Q: Can I prep anything ahead?
A: You can make the soy paste a day early. Chop your vegetables then, too. Keep them in the fridge.
Q: What if I don’t have an onion?
A: A leek or a shallot works fine. The goal is to add flavor to the broth.
Q: Can I make a smaller turkey?
A: Absolutely. Just reduce the roasting time. Check the temperature early and often.
Q: Is the cheesecloth necessary?
A: It helps keep the breast moist. If you don’t have it, just use the foil. Fun fact: Cheesecloth got its name from making cheese, not turkey!
Which tip will you try first?
From My Kitchen to Yours
I hope you try this cozy recipe. The bag does the hard work for you. Your kitchen will smell wonderful. I love hearing your stories.
Tell me about your own cooking adventures. Did your family love the gravy? What did you do with the leftovers? Your tips help everyone here.
Have you tried this recipe? Share your experience in the comments. Happy cooking!
—Grace Ellington.

Bag Roasted Turkey with Pan Juices
Description
A perfectly roasted, juicy turkey made easy with an oven bag, served with rich pan gravy.
Ingredients
Instructions
- MAKE SOY PASTE: Adjust oven rack to lowest position and heat oven to 350 degrees. Bring soy sauce to boil over medium-high heat in small saucepan. Reduce heat to medium-low and simmer until thick and reduced to 2 tablespoons, 5 to 7 minutes. Off heat, whisk in butter, 1 tablespoon flour, and 1 teaspoon pepper; set aside.
- PREPARE TURKEY: Remove neck and giblets from cavity; discard liver. Add broth, water, carrots, onion, celery, neck, and giblets to large roasting pan. Set V-rack inside pan. Lightly spray inside of oven bag with cooking spray. Fold cheesecloth into 10 by 7-inch rectangle. Pat turkey dry with paper towels. Tuck legs into pocket of skin at tail end (alternatively, tie legs with kitchen twine) and tuck wings under bird. Transfer turkey to prepared oven bag and rub soy paste evenly all over outside of turkey. Top breast with cheesecloth and cover with heavy-duty aluminum foil. Tie oven bag closed, trim end to 1 inch, and cut four ½-inch slits in top of bag. Arrange bagged turkey, breast side up, in V-rack.
- COOK TURKEY: Roast turkey until breast meat registers 155 degrees, 2½ to 3 hours. Remove pan from oven and increase oven temperature to 475 degrees. Cut open oven bag. Discard cheesecloth, foil, and bag, letting juices fall into pan. Return turkey to oven and roast until breast meat registers 160 degrees and thigh meat registers 175 degrees, 35 to 45 minutes. Transfer to carving board and let rest, uncovered, for 30 minutes.
- MAKE GRAVY: Meanwhile, strain contents of roasting pan through fine-mesh strainer into fat separator; discard vegetables, neck, and giblets. Let liquid settle and reserve 4 cups defatted pan juices. Transfer ¼ cup fat from separator to large saucepan and heat over medium heat until shimmering. Stir in remaining flour and cook, stirring constantly, until golden, about 4 minutes. Slowly whisk in pan juices and bring to boil. Reduce heat to medium-low and simmer until gravy is slightly thickened, about 5 minutes. Season with salt and pepper. Carve turkey and serve with gravy.
Notes
- Ensure your turkey is fully thawed before cooking. Letting the turkey rest after roasting is crucial for juicy meat. The gravy can be made ahead and reheated.