My Chocolate Orange Surprise
Let me tell you about my kitchen mistake. I once ran out of butter for cookies. I had olive oil instead. I was nervous, but I tried it. The cookies were so soft and rich. I still laugh at that happy accident.
That’s why this recipe uses olive oil. It makes the cookie chewy inside. It also lets the chocolate and orange flavors shine. This matters because good food is about trying new things. What’s your favorite “happy accident” in the kitchen?
Why These Flavors Dance
Chocolate and orange are old friends. They love to play together. The orange zest is bright and sunny. The dark chocolate is deep and cozy. Doesn’t that sound like a perfect pair?
The olive oil is the quiet helper. It doesn’t taste like pizza! It just makes everything smooth. Fun fact: Olive oil in sweets is very old. Bakers did it centuries ago in Italy. This matters because food has a long, lovely history. We are part of that story when we bake.
Getting Your Hands Happy
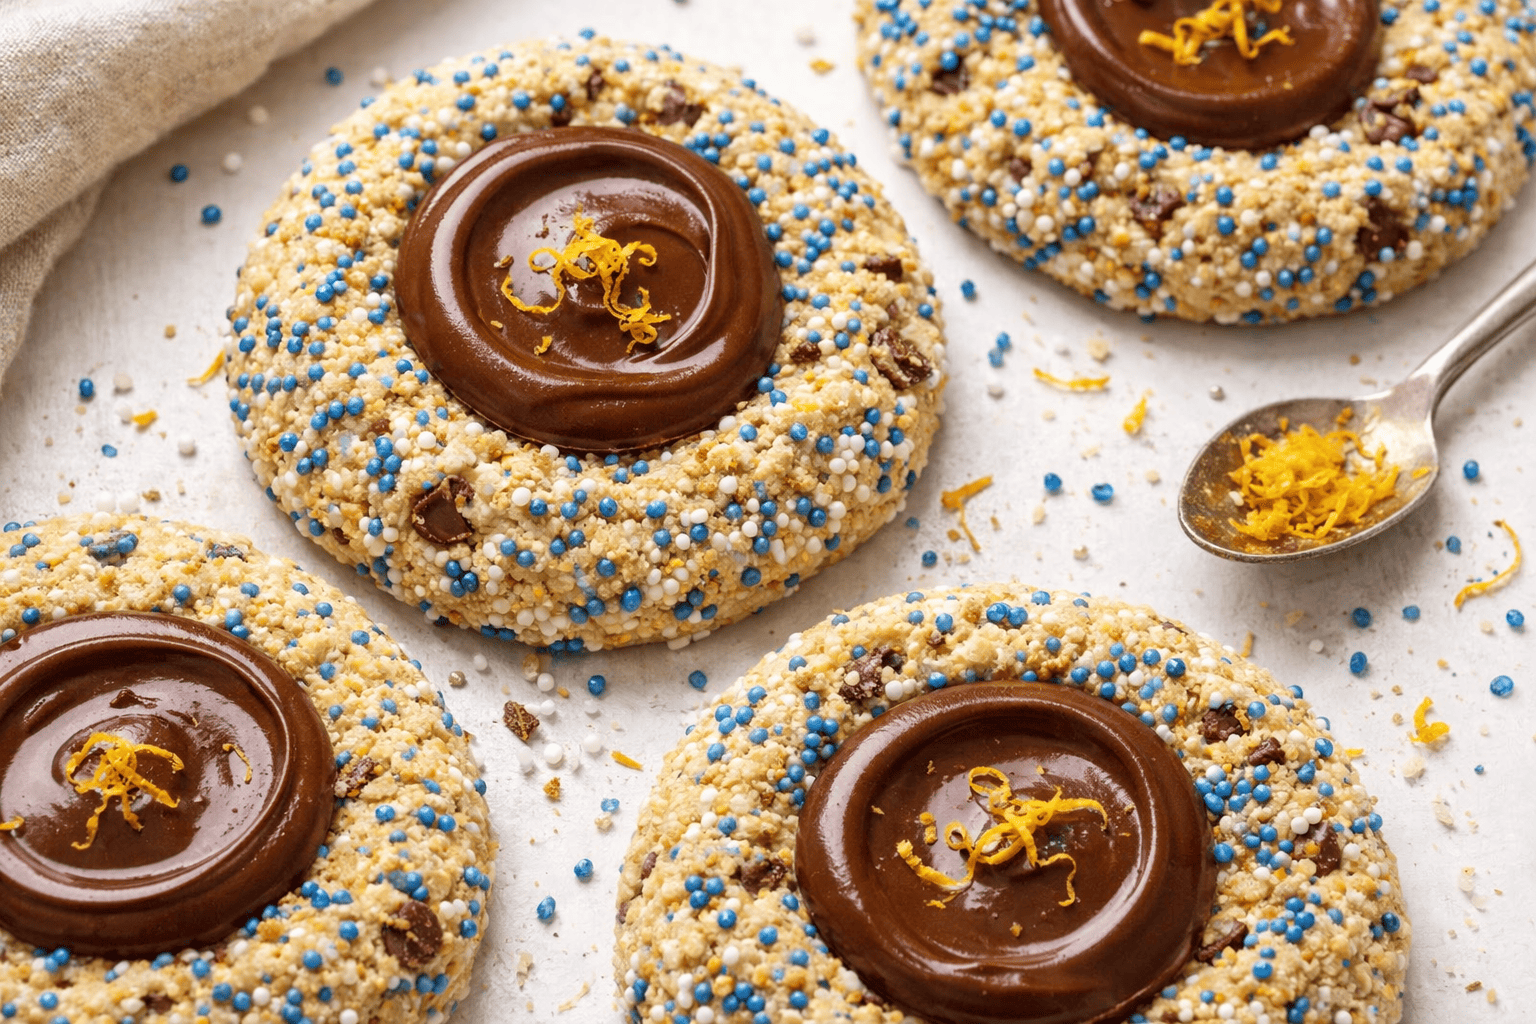
Rolling the dough balls is the best part. Feel the dough in your hands. It will be a little shiny from the oil. Then, roll them in the blue and white sprinkles. It’s like making little planets.
Press your thumb, or a glass, to make a home for the gelt. This little pocket holds the chocolate surprise. Do you like getting your hands dirty when you cook, or do you like to stay clean?
The Magic in the Oven
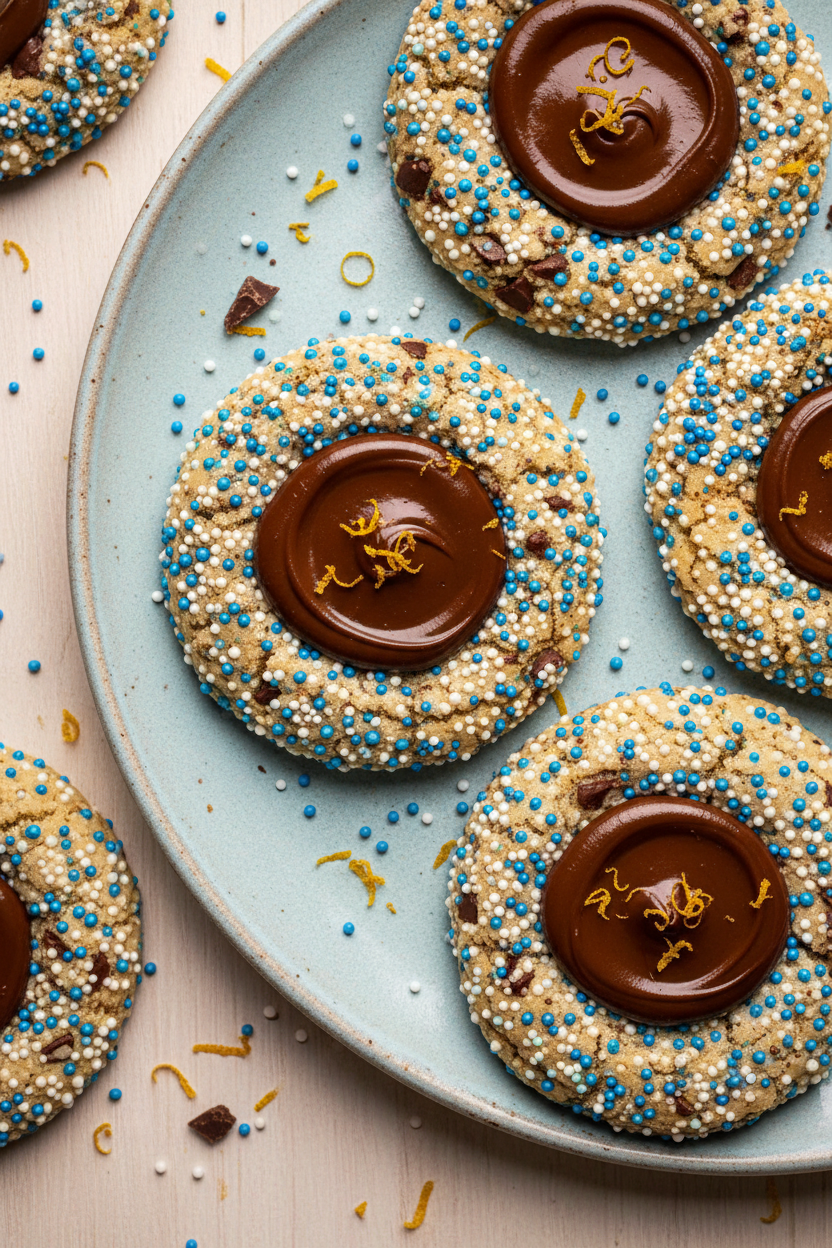
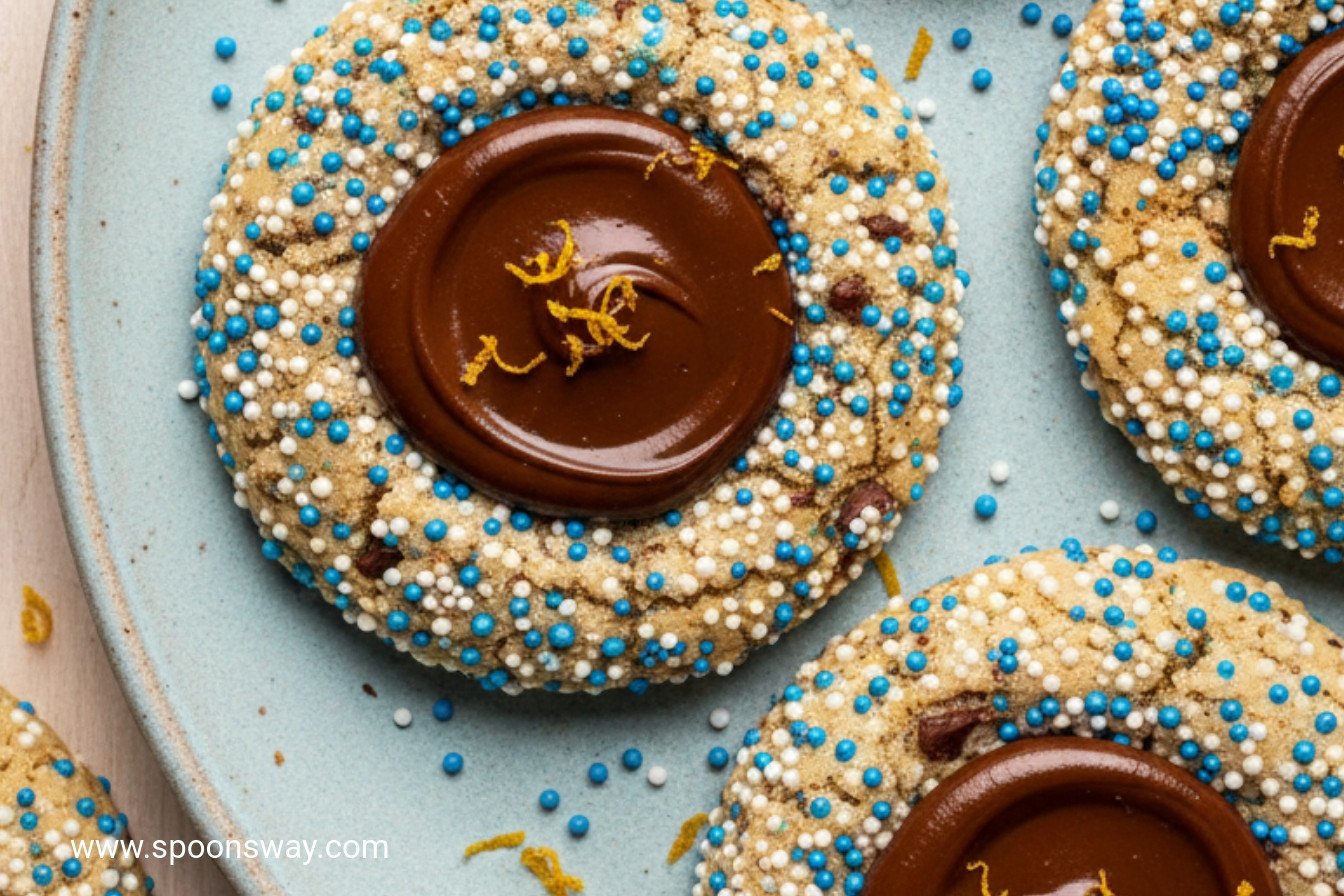
Watch them bake. They will puff up like little clouds. The edges will turn golden. The centers will look soft. That is perfect. They keep cooking on the pan.
Now, work fast. Press a gelt piece into each warm cookie. The heat will make it melt just enough. It becomes a shiny chocolate pool. It smells amazing. This step makes the cookie special.
A Cookie with Patience
Here is the hard part. Let them cool. The gelt needs time to set. It takes about two hours. I know, waiting is tough! But it’s worth it.
When you bite, you get crunch, then chew, then melt. All the flavors sing together. Share them with someone you love. Tell me, who will you share your first batch with?
Ingredients:
| Ingredient | Amount | Notes |
|---|---|---|
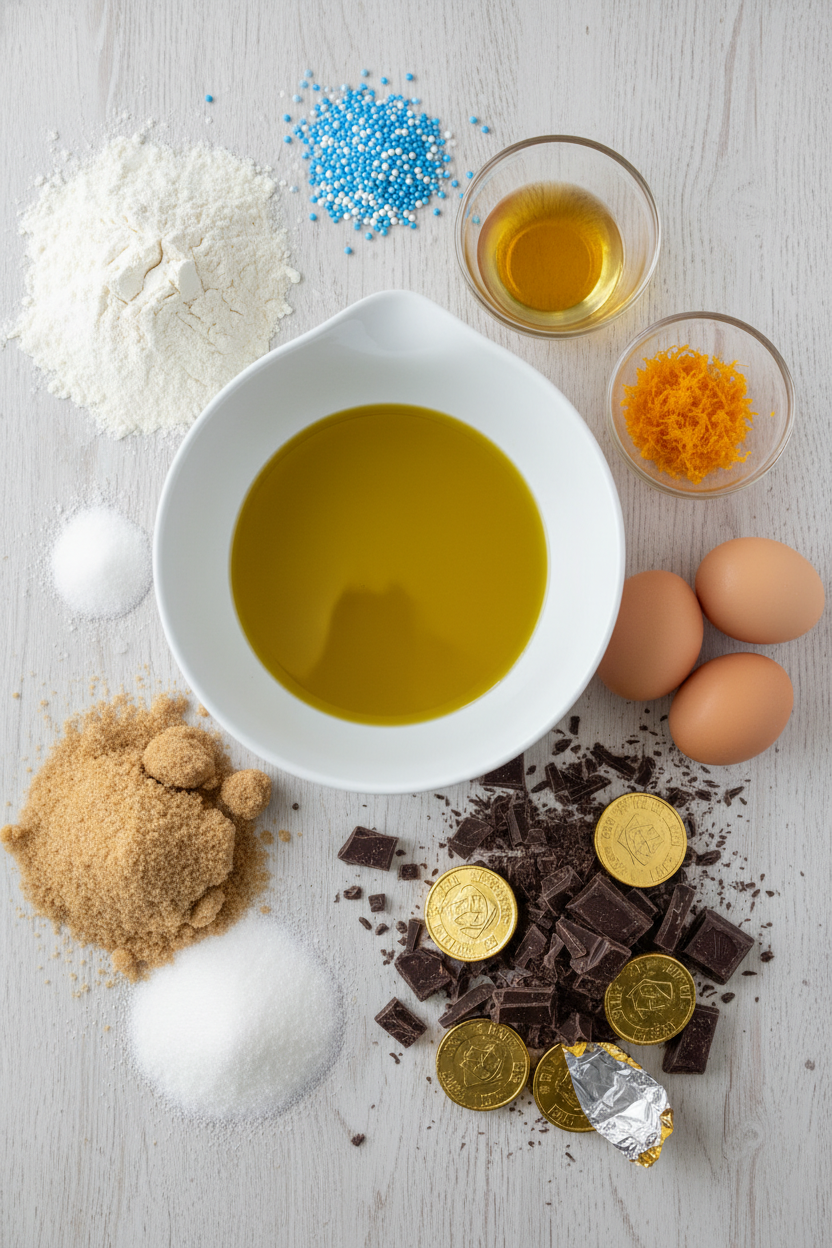
| Blue and white nonpareils | ⅔ cup | For rolling |
| All-purpose flour | 2¼ cups (11¼ ounces/319 grams) | |
| Table salt | 1 teaspoon | |
| Baking soda | ¾ teaspoon | |
| Extra-virgin olive oil | ¾ cup | |
| Light brown sugar | 1 cup packed (7 ounces/198 grams) | |
| Granulated sugar | ½ cup (3½ ounces/99 grams) | |
| Large eggs | 2 | |
| Vanilla extract | 2 teaspoons | |
| Orange zest | 1 teaspoon grated | |
| Bittersweet chocolate | 8 ounces | Chopped fine |
| Gelt pieces | 30 (1½-inch) | Unwrapped, for topping |
A Cookie Story from My Kitchen
Hello, my dear. Come sit with me. I want to tell you about these special cookies. They remind me of my grandson, Leo. He loves chocolate and oranges together. One day, we were baking and decided to be brave. We swapped butter for olive oil. Doesn’t that sound strange? But it works! The oil makes them so tender. And the orange zest makes the whole kitchen smell like sunshine. I still laugh at that messy first batch. But these? These are perfect. Let’s make them together.
Step 1: Prepare
First, get your oven ready. Move the rack to the middle. Heat it to 425 degrees. Line your baking sheets with parchment paper. Now, pour those pretty blue and white sprinkles into a shallow dish. Set them aside for later. They look like little bits of sky. (A hard-learned tip: always line your sheets. It saves so much scrubbing later!).
Step 2: Mix
Let’s mix the dry things. Whisk the flour, salt, and baking soda in a bowl. In another bowl, whisk the olive oil and both sugars. It will look glossy. Then whisk in the eggs, vanilla, and that wonderful orange zest. Doesn’t that smell amazing? Now, stir in half the flour. Then add all the finely chopped dark chocolate. Stir in the rest of the flour. The dough will be thick and chunky.
Step 3: Shape
Time for fun! Scoop the dough into little balls. Roll them gently in your hands. Now, roll each ball in the sprinkles. Press so they stick. Place them on your baking sheets. Use a glass to flatten each ball just a bit. Why do we flatten them? Share below!
Step 4: Bake & Finish
Bake one sheet at a time. They only need 6 to 7 minutes. Watch them closely. The edges will be set, but the centers will look soft. That’s good! They keep cooking on the sheet. As soon as they come out, press a piece of gelt into each warm center. Let them cool completely. The chocolate will take time to set. Be patient, my dear. It’s worth the wait.
Cook Time: About 20 minutes (plus cooling)
Total Time: About 1 hour
Yield: 30 cookies
Category: Dessert, Cookies
Your Creative Cookie Twist
Recipes are just a starting point. I love to play with flavors. You can too! Here are three fun ideas for next time. Change it up and make them your own.
- Lemon & Rosemary: Use lemon zest instead of orange. Add a tiny pinch of finely chopped rosemary. It’s so fresh and surprising.
- Peppermint Party: Swap the orange zest for a teaspoon of peppermint extract. Use red and white sprinkles. Top with a peppermint patty piece.
- Salty Peanut: Replace the chopped chocolate with chopped salted peanuts. Roll the dough balls in crushed pretzel bits instead of sprinkles.
Which one would you try first? Comment below!
Serving with a Smile
These cookies are stars on their own. But I think food tastes better with friends. For a real treat, place a few on a pretty plate. Add some orange slices or a few fresh berries on the side. The colors make everyone smile. They are lovely with a cup of tea after school.
For a grown-up gathering, pair them with a small glass of orange liqueur or a rich port. The flavors dance together. For a cozy family night, I love serving them with cold glasses of creamy oat milk. It’s so comforting. Which would you choose tonight?
Keeping Your Cookies Happy
These cookies keep well at room temperature. Just tuck them in a tin for up to four days. The gelt might get a little shiny, but that’s okay. It’s just the cocoa butter saying hello.
You can freeze the dough balls before baking. Roll them in the sprinkles and flatten them. Then lay them on a tray to freeze solid. Once frozen, pop them into a bag. I once forgot I had a bag in my freezer. It was a lovely surprise a month later!
Batch cooking like this saves so much time. It means fresh cookies are always just minutes away. That matters for surprise visits or a sudden sweet tooth. Have you ever tried storing cookie dough this way? Share below!
Cookie Troubles? Easy Fixes!
First, if your cookies spread too much, your dough is too warm. Chill it for 20 minutes before baking. I remember when my first batch turned into one giant cookie! Chilling the dough fixes this every time.
Second, if the gelt won’t stick, you must press it in fast. Do it the second the cookies come out of the oven. The warm, soft center will hold the chocolate perfectly. This step ensures every bite has that special chocolate surprise.
Finally, if the cookies seem too soft after baking, don’t worry. They firm up as they cool on the rack. Trust the recipe. Letting them set gives you the perfect chewy texture. Which of these problems have you run into before?
Your Quick Questions, Answered
Q: Can I make these gluten-free? A: Yes! Use a good gluten-free flour blend. Make sure it has xanthan gum in it.
Q: Can I make the dough ahead? A: Absolutely. You can refrigerate it for up to two days. Let it soften a bit before rolling.
Q: What if I don’t have orange zest? A: Use a teaspoon of orange extract instead. Or just use extra vanilla for a classic chocolate cookie.
Q: Can I double the recipe? A: You can, but bake one sheet at a time. The middle rack position is key for even baking.
Q: Any optional tips? A: A pinch of cinnamon in the dough is lovely. Fun fact: Chocolate and orange have been a favorite pair for centuries! Which tip will you try first?
Bake with Love
I hope you love making these as much as I do. The kitchen is my favorite place for making memories. I would love to hear about your baking adventure.
Tell me all about it in the comments. Did your family gobble them up? Have you tried this recipe? Share your experience in the comments. Your stories are my favorite thing to read with my morning tea.
Happy cooking!
—Grace Ellington.

Chocolate Orange Olive Oil Thumbprint Cookies
Description
Gelt Thumbprints with Dark Chocolate, Olive Oil, and Orange.
Ingredients
Instructions
- Adjust oven rack to middle position and heat oven to 425 degrees. Line 2 baking sheets with parchment paper. Spread ⅔ cup blue and white nonpareils in shallow dish; set aside.
- Whisk 2¼ cups flour, 1 teaspoon salt, and ¾ teaspoon baking soda together in bowl. Whisk ¾ cup oil, 1 cup packed brown sugar, and ½ cup granulated sugar in second bowl until well combined, about 30 seconds. Whisk 2 large eggs, 2 teaspoons vanilla, and 1 teaspoon orange zest into sugar mixture until creamy and smooth, about 30 seconds. Stir in half of flour mixture with silicone spatula or wooden spoon. Stir in 8 ounces finely chopped bittersweet chocolate and remaining flour mixture until no dry flour remains.
- Using #40 scoop, scoop dough into 30 portions, about 1½ tablespoons each; divide any remaining dough among portions. Using your hands, roll portions into balls. Drop balls into nonpareils and roll to coat, pressing to adhere. Evenly space balls on prepared sheets (15 per sheet). Using bottom of drinking glass, flatten dough balls to ¾-inch thickness.
- Bake cookies, 1 sheet at a time, until edges are just set and centers are puffed but still soft, 6 to 7 minutes. (Cookies will seem underdone but will continue to set as they cool.) Transfer sheets to wire rack and, working quickly, firmly press 1 gelt piece onto center of each cookie. Let cookies cool on sheets for 5 minutes. Transfer cookies to wire rack and let cool completely. Serve. (Cookies will be cool enough to eat after about 30 minutes, but gelt will take about 2 hours to set completely. Cookies can be stored at room temperature for up to 4 days; gelt pieces may develop harmless waxy sheen over time.)
Notes
- Calories are an estimate per cookie.

