The Secret in My Cookie Jar
I have a little secret. My famous chocolate cookies have a special friend in them. It’s a tiny bit of espresso powder. You can’t taste coffee, I promise. It just makes the chocolate taste deeper and richer. Doesn’t that smell amazing? It’s my favorite kitchen trick.
This matters because good flavor is about friends helping friends. The cocoa and the espresso are best buddies. They make each other better. What’s your favorite flavor friendship? Is it peanut butter and jelly? Tell me in the comments!
Why We Chill the Dough
Now, the recipe says to chill the dough for a long time. This might seem boring. But it is so important! Chilled dough is much easier to roll out. It won’t stick to your rolling pin. Your cookie shapes will be sharp and pretty.
I learned this the hard way. One year, I was in a rush. I skipped the chilling. My snowman cookies looked like lumpy potatoes! I still laugh at that. Patience in the kitchen gives you better cookies. That’s a good lesson for life too, don’t you think?
A Sweet Little Science Trick
We use both baking powder and baking soda here. That might seem like a lot. But each one does a different job. The baking soda helps the cookies rise. The baking powder makes them tender. Together, they create the perfect little cookie.
Fun fact: Dutch-processed cocoa is treated with alkali. This makes it less bitter and helps it mix smoothly into dough. It’s my go-to for baking. Do you usually have cocoa powder in your pantry? I’m always curious what basics people keep on hand!
The Icing That Holds Everything Together
The royal icing is like magic glue. It dries hard and shiny. This lets you stack the cookies for gifts. It also makes them so beautiful. The secret is whipping the egg whites and sugar for a few minutes. You want soft, glossy peaks.
This matters because presentation is a gift of love. Taking that extra time to ice them says, “I made this just for you.” Do you like to decorate cookies with simple icing, or do you go all out with colors and sprinkles?
Your Turn in the Kitchen
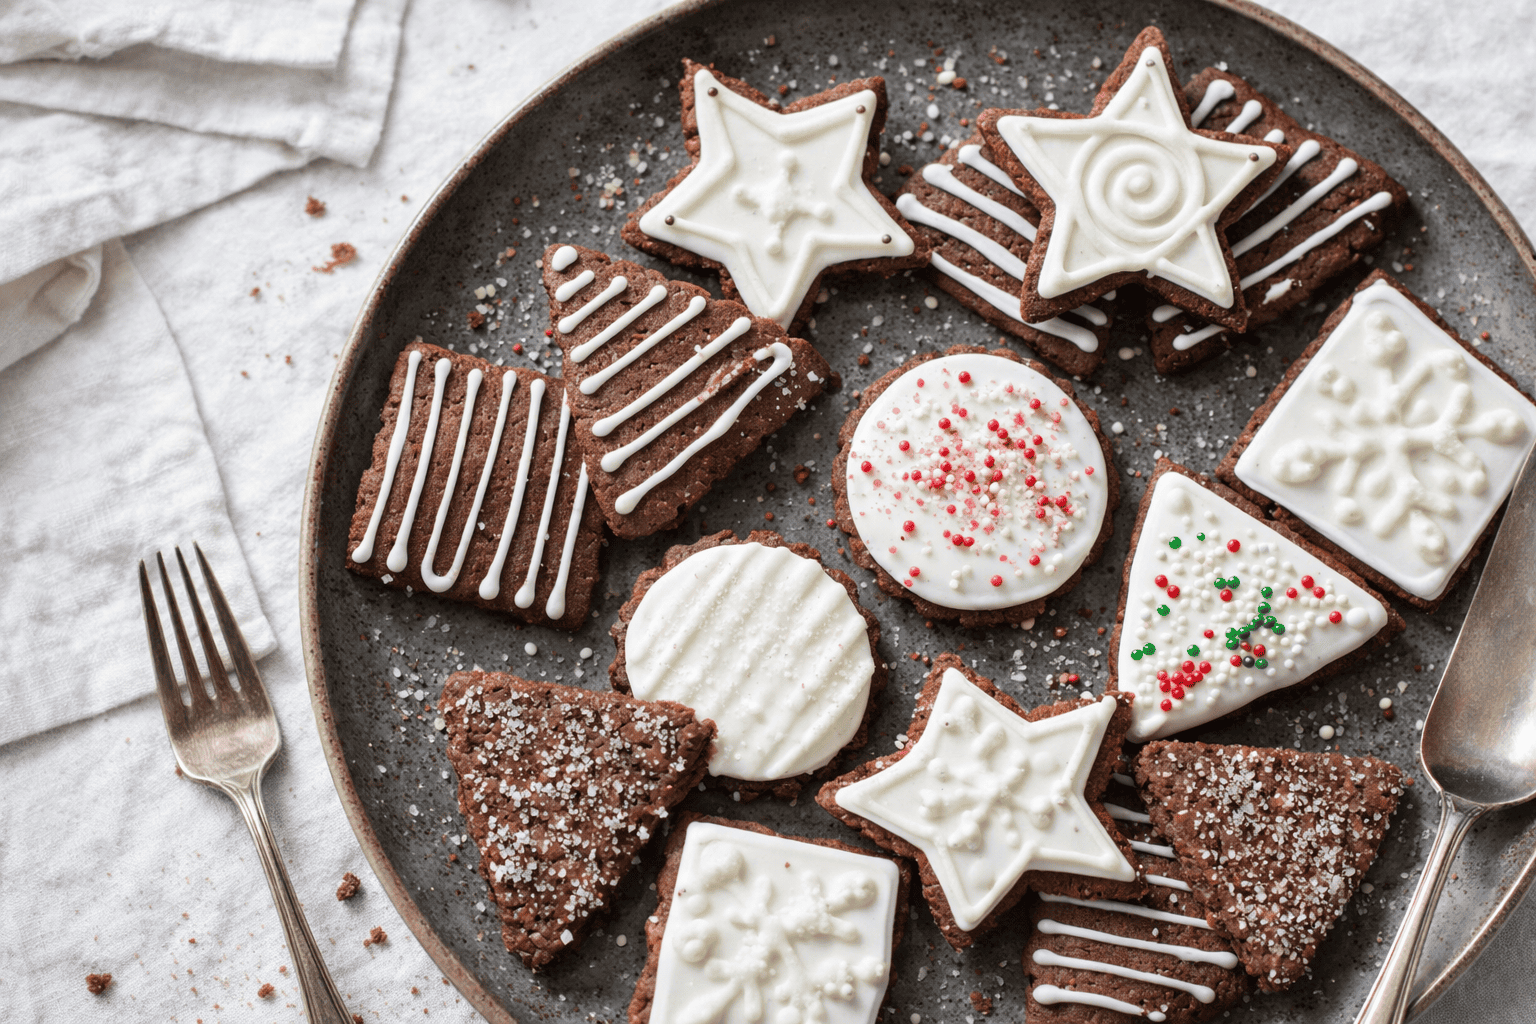
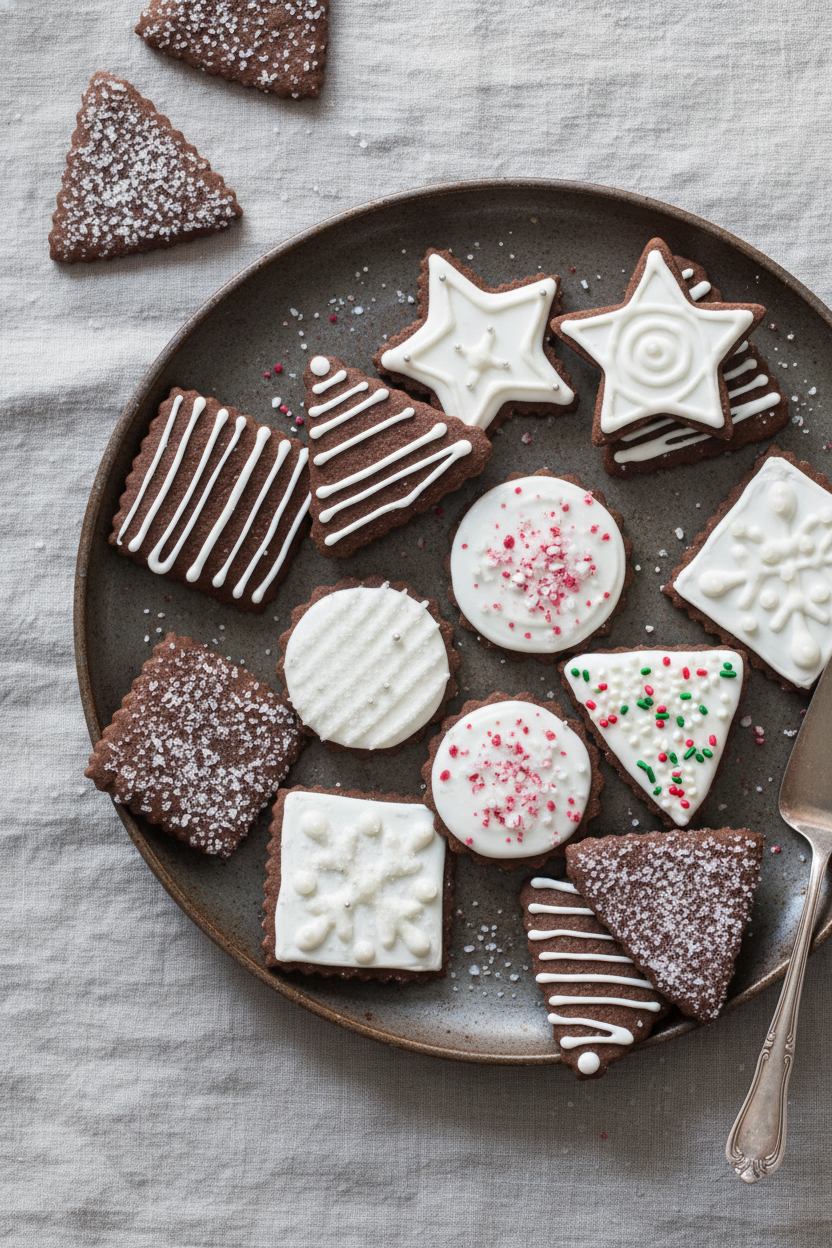
These cookies are your blank canvas. You can cut them into any shape you like. Stars for winter, trees for Christmas, hearts for Valentine’s Day. The dough is very forgiving. You can roll the scraps together once and cut more.
My grandkids love to pick the shapes. It starts a whole conversation. Baking is about more than food. It’s about making memories together. What holiday or season would you bake these cookies for? I’d love to hear your ideas.
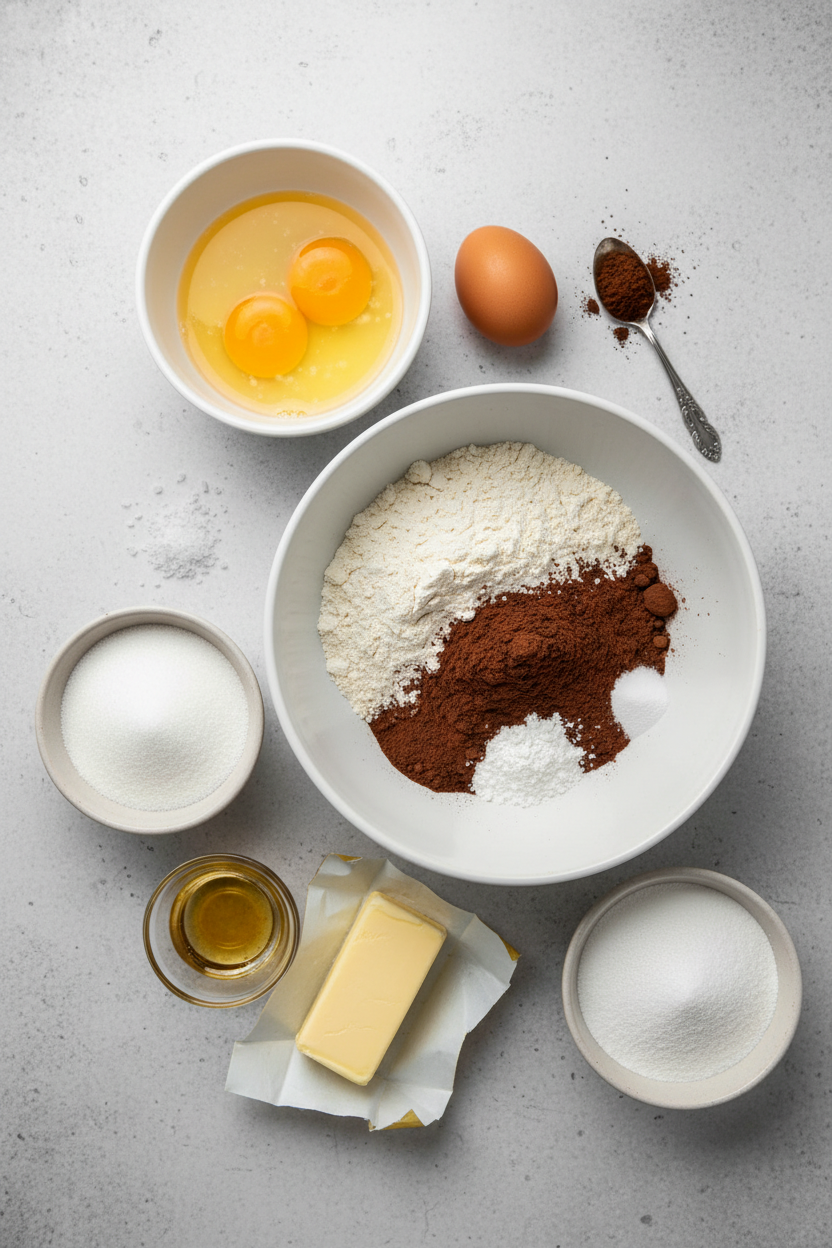
Ingredients:
| Ingredient | Amount | Notes |
|---|---|---|
| All-purpose flour | 2 ½ cups (12 ½ ounces/354 grams) | For the cookie dough |
| Granulated sugar | 1 cup (7 ounces/198 grams) | Process in food processor until finely ground |
| Unsalted butter | 16 tablespoons | Cut into ½-inch pieces and chilled |
| Dutch-processed cocoa powder | ⅓ cup (1 ounce/28 grams) | |
| Large egg | 1 | For the cookie dough |
| Espresso powder | 1 ½ teaspoons | |
| Salt | ¾ teaspoon | For the cookie dough |
| Vanilla extract | ½ teaspoon | For the cookie dough |
| Baking powder | ¼ teaspoon | |
| Baking soda | ¼ teaspoon | |
| Confectioners’ sugar | 2 ⅔ cups (10 ⅔ ounces/302 grams) | For the royal icing |
| Large egg whites | 2 | For the royal icing |
| Vanilla extract | ½ teaspoon | For the royal icing |
| Salt | ⅛ teaspoon | For the royal icing |
Easy Holiday Chocolate Sugar Cookies
Hello, my dear. Come sit at the table. I want to share my favorite holiday cookie recipe. These are rich, chocolatey sugar cookies. They are perfect for cutting into shapes. The secret is a little espresso powder. It makes the chocolate taste even deeper. Doesn’t that smell amazing? Let’s begin.
Ingredients
- 1 large egg
- 1 teaspoon espresso powder
- 1/2 teaspoon salt
- 1 teaspoon vanilla extract
- 2 1/4 cups all-purpose flour
- 3/4 cup unsweetened cocoa powder
- 1/2 teaspoon baking powder
- 1/4 teaspoon baking soda
- 1 1/2 cups granulated sugar
- 1 cup (2 sticks) cold unsalted butter, cubed
For the Royal Icing
- 2 cups powdered sugar
- 2 large egg whites
- 1/2 teaspoon vanilla extract
- Pinch of salt
Instructions
Step 1: First, get two small bowls. In one, whisk the egg with espresso powder, salt, and vanilla. In the other, whisk the flour, cocoa, baking powder, and soda. This keeps everything tidy. I still laugh at the time I mixed wet into dry too soon. What a mess!
Step 2: Now, use your food processor. Grind the sugar first to make it super fine. Add the cold butter pieces. Process until it looks like a smooth paste. Then add the egg mixture. Finally, add the flour mix. It will look crumbly, like dark sand. That’s just right. (Hard-learned tip: Make sure your butter is very cold. It makes the dough easier to roll later.)
Step 3: Turn the crumbs onto your counter. Gently knead them into a smooth dough. Divide it in half. Now, here’s the easy rolling trick. Press a dough piece between two big sheets of parchment paper. Roll it out thin. No extra flour needed! Stack the rolled sheets on a pan. Chill them for at least an hour and a half. Patience makes pretty cookies.
Step 4: Time to bake! Peel and replace the top parchment paper first. This little trick stops the dough from sticking. Flip it over and remove the bottom paper. Cut your shapes close together. Bake low and slow at 300 degrees. They are done when they just resist a gentle touch. Let them cool completely. What’s your favorite holiday cookie shape? Share below!
Step 5: For the icing, a stand mixer is best. Whisk the sugar, egg whites, vanilla, and salt. Start slow, then go faster. Whip until it’s glossy and forms soft peaks. This takes a few minutes. My arm used to get so tired doing this by hand!
Step 6: Spread the icing on your cooled cookies. Let it dry completely. It forms a lovely, smooth finish. This is the perfect time to sit with a cup of tea. Watch the icing set. It’s so peaceful.
Cook Time: 17 minutes per batch
Total Time: About 3 hours (includes chilling & icing)
Yield: About 24 cookies
Category: Dessert, Cookies
Three Fun Twists on a Classic
This dough is a wonderful canvas. You can dress it up so many ways. Here are three ideas I love. They make the cookies feel new again.
- Peppermint Sparkle: Add 1/4 teaspoon peppermint extract to the icing. Crush candy canes. Sprinkle them on top before the icing dries.
- Orange Zest Surprise: Add the zest of one orange to the dough. It pairs beautifully with the dark chocolate. So bright and cheerful!
- Cookie Sandwich: Spread a little raspberry jam between two cookies. No icing needed. It’s like a little chocolate thumbprint cookie.
Which one would you try first? Comment below!
Serving Them Up with Style
These cookies are stars on their own. But a little presentation makes them special. Arrange them on a vintage platter. Mix the shapes for a fun look. You could also sprinkle them with edible gold dust. It looks like fairy magic.
For a drink, I love a cold glass of milk. It’s the classic partner. For the grown-ups, a small glass of ruby port is lovely. Its sweetness matches the chocolate. Or try a hot peppermint tea. It’s so cozy.
Which would you choose tonight?
Keeping Your Chocolate Sugar Cookies Happy
These cookies keep their shape best when cold. Chill the dough for at least ninety minutes. You can also freeze the rolled dough for thirty minutes. This step matters because it prevents spreading. Your snowmen will look like snowmen, not puddles.
I once skipped the chill time. My reindeer cookies became reindeer blobs. Learn from my mistake. Let the dough get firm. You can make the dough up to five days ahead. Just wrap it well in the fridge.
Baked cookies stay fresh in a tin for a week. Layer them with parchment paper. You can also freeze them for a month. This makes holiday prep so much easier. Have you ever tried storing cookie dough this way? Share below!
Cookie Troubles? Let’s Fix Them Together
First, dough too crumbly? Knead it gently with your hands. The warmth from your palms helps it come together. I remember when my dough looked like dark sand. Ten seconds of kneading made it smooth.
Second, cookies sticking to the cutter? Dip the cutter in flour. Tap off the extra. This gives you clean edges every time. Clean cuts mean prettier cookies for your friends.
Third, icing too runny? Add a little more powdered sugar. Too thick? Add a tiny drop of water. Getting the icing right builds your kitchen confidence. It also makes your cookies taste just sweet enough. Which of these problems have you run into before?
Your Cookie Questions, Answered
Q: Can I make these gluten-free? A: Yes. Use a good gluten-free flour blend. Add a teaspoon of xanthan gum.
Q: How far ahead can I make them? A: Dough keeps for five days. Baked cookies freeze for a month.
Q: No espresso powder? A: Use instant coffee. Or just leave it out. It deepens the chocolate flavor.
Q: Can I double the batch? A: Absolutely. It is perfect for a big cookie swap.
Q: Any fun decorating tip? A: Sprinkle colored sugar before baking. Fun fact: The sugar sticks without any icing! Which tip will you try first?
From My Kitchen to Yours
I hope you love making these cookies. The kitchen is my favorite place for making memories. I would love to hear about your baking adventures. Tell me about the shapes you cut.
Did your family enjoy them? Sharing stories is the best part. Have you tried this recipe? Give your experience in the comments. Your stories always make my day. Now, go make something delicious.
Happy cooking! —Grace Ellington.


Easy Holiday Chocolate Sugar Cookies
Description
Rich, chocolatey sugar cookies perfect for holiday decorating.
Ingredients
Royal Icing
Instructions
- Whisk egg, espresso powder, salt, and vanilla together in small bowl. Whisk flour, cocoa, baking powder, and baking soda together in second bowl.
- Process sugar in food processor until finely ground, about 30 seconds. Add butter and process until uniform mass forms and no large pieces of butter are visible, about 30 seconds, scraping down sides of bowl as needed. Add egg mixture and process until smooth and paste-like, about 10 seconds. Add flour mixture and process until no dry flour remains but mixture remains crumbly, about 30 seconds, scraping down sides of bowl as needed.
- Turn out dough onto counter; knead gently by hand until smooth, about 10 seconds. Divide dough in half. Place 1 piece of dough in center of large sheet of parchment paper and press into 7 by 9-inch oval. Place second large sheet of parchment over dough and roll dough into 10 by 14-inch oval of even ⅛-inch thickness. Transfer dough with parchment to rimmed baking sheet. Repeat pressing and rolling with second piece of dough, then stack on top of first piece on sheet. Refrigerate until dough is firm, at least 1 1/2 hours (or freeze for 30 minutes). (Rolled dough can be wrapped in plastic wrap and refrigerated for up to 5 days.)
- Adjust oven rack to lower-middle position and heat oven to 300 degrees. Line rimless cookie sheet with parchment. Working with 1 piece of rolled dough, gently peel off top layer of parchment. Replace parchment, loosely covering dough. (Peeling off parchment and then returning it will make cutting and removing cookies easier.) Turn over dough and parchment and gently peel off and discard second piece of parchment. Using cookie cutter, cut dough into shapes. Transfer shapes to prepared cookie sheet, spacing them about 1/2 inch apart. Bake until cookies show slight resistance to touch, 14 to 17 minutes, rotating sheet halfway through baking. Let cookies cool on sheet for 5 minutes. Using wide metal spatula, transfer cookies to wire rack and let cool completely. Repeat cutting and baking with remaining dough. (Dough scraps can be patted together, rerolled, and chilled once before baking.)
- Using stand mixer fitted with whisk attachment, whip all icing ingredients on medium-low speed until combined, about 1 minute. Increase speed to medium-high and whip until glossy, soft peaks form, 3 to 4 minutes, scraping down bowl as needed.
- Spread icing onto cooled cookies. Let icing dry completely, about 1½ hours, before serving.
Notes
- For the best results, ensure your butter is properly chilled. The dough needs to be firm before cutting to maintain clean shapes.

