A Cake That Tells a Story
My grandson calls this my “magic trick” cake. It starts as a flat sheet. Then you roll it up with creamy filling. It feels like a little kitchen miracle every time.
I love recipes that feel special but are kind to us. This one uses maple syrup instead of so much sugar. It tastes rich but feels lighter. That matters to me. I want treats we can enjoy without worry.
The Heart of the Matter: The Filling
Let’s talk about the filling first. It’s mascarpone cheese, whipped cream, and a hint of coffee. You whisk maple syrup with espresso powder. Doesn’t that smell amazing? It’s like a cozy coffee shop in a bowl.
Folding the whipped cream into the cheese is key. Be gentle. You want it fluffy and light. I still laugh at the time I rushed this step. My filling was as flat as a pancake! A little patience makes it perfect.
The Magic of the Roll
This cake bakes very fast. Just about 15 minutes. You must roll it while it’s warm. That keeps it flexible so it doesn’t crack. It feels scary the first time. But trust me, you can do it.
Here’s a fun fact for you: *This rolling method is called a “jelly roll,” even when there’s no jelly!* It’s an old baker’s trick. Rolling it warm with the parchment paper is the secret. What’s the bravest baking trick you’ve ever tried?
Why This Recipe Matters
Using maple syrup is a small change with a big feel. It adds a deep, warm sweetness. It’s not just about less sugar. It’s about better flavor. That matters. Food should taste real and good.
Also, you make almost everything ahead. The fillings can wait for two days. The finished cake chills beautifully. This means no last-minute rush. You can enjoy your own party. That’s a good lesson for life and baking.
Your Turn in the Kitchen
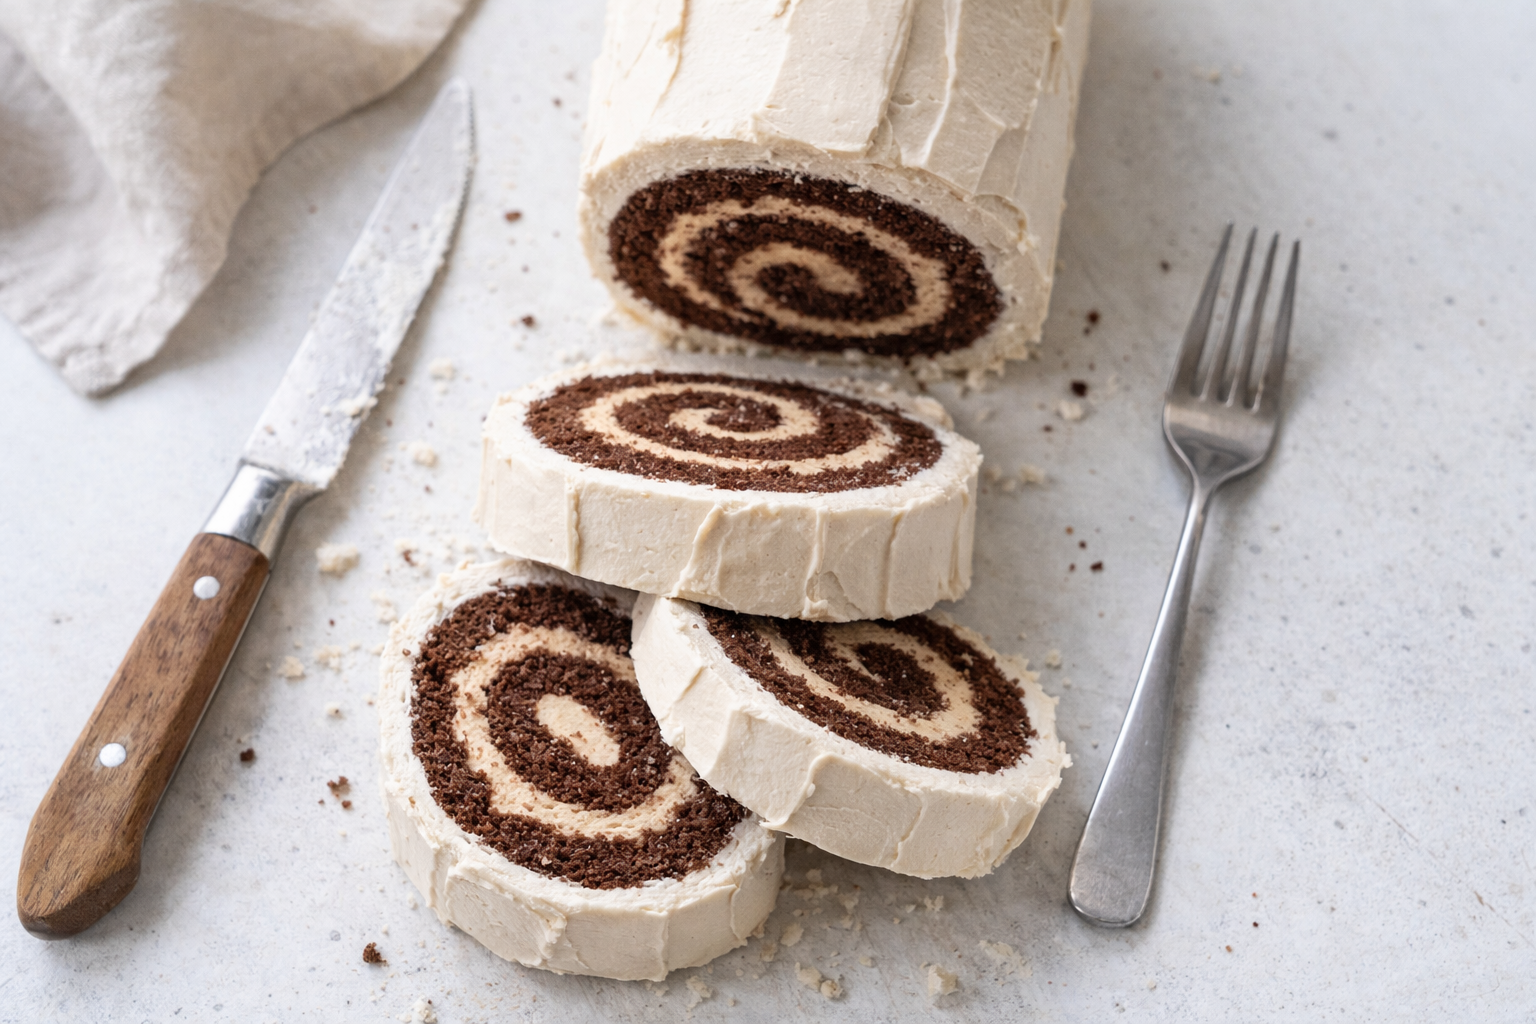
When you spread the filling, leave a small border at the bottom. This keeps it from squishing out when you roll. See the little details? They make all the difference.
Finally, you frost the whole log with the creamy topping. It looks so fancy. But you know the simple truth. It’s just a rolled-up cake filled with love. Do you prefer cakes that look fancy or cakes that taste like home?
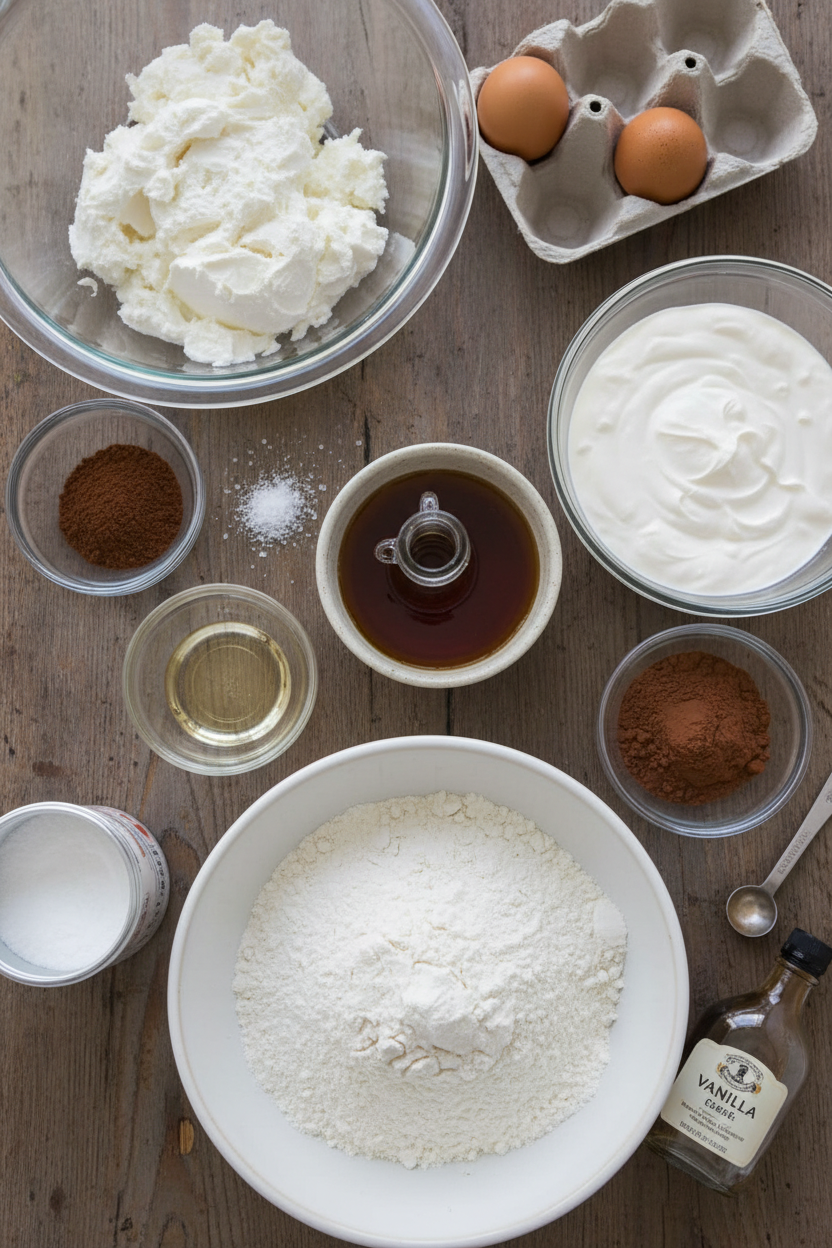
Ingredients:
| Ingredient | Amount | Notes |
|---|---|---|
| Maple Syrup | ½ cup + ½ cup | Divided use: ½ cup for filling, ½ cup for cake |
| Instant Espresso Powder | 2 teaspoons | |
| Almond Extract | 1 teaspoon | |
| Salt | ⅛ tsp + ¼ tsp | Divided use: ⅛ tsp for filling, ¼ tsp for cake |
| Mascarpone Cheese | 1 pound (454g / 2 cups) | |
| Heavy Cream | 1 cup | |
| All-Purpose Flour | ¾ cup (3¾ oz / 106g) | |
| Unsweetened Cocoa Powder | ⅓ cup (1 oz / 28g) | |
| Baking Powder | 1 teaspoon | |
| Large Eggs | 5 | |
| Vanilla Extract | 1 teaspoon |
My Light Mocha Mascarpone Jelly Roll
Hello, my dear. Come sit at the counter. I want to tell you about a special cake. It’s my Light Mocha Mascarpone Jelly Roll. It feels fancy but is secretly simple. We use maple syrup instead of lots of sugar. Doesn’t that smell amazing? The cake is soft like a cloud. The filling is creamy with a hint of coffee. I first made this for my book club. They still ask for it every autumn. Let’s make it together.
Step 1: First, we make the filling’s flavor. Whisk maple syrup, espresso powder, almond extract, and salt. That tiny bit of salt makes the flavors sing. Now, stir the mascarpone cheese in a big bowl. Make it nice and smooth. Then whisk your maple mixture right into it. This part is so silky. Set aside half a cup for later. We’ll use it on the cake itself.
Step 2: Time for the whipped cream. Pour the heavy cream into your mixer bowl. Start on a slow speed until it’s foamy. Then turn it up high. Watch for soft peaks. They should flop over gently at the tip. Now, fold in that half cup of mascarpone mix. Be gentle so it stays fluffy. Refrigerate both bowls. (A hard-learned tip: Chill your bowl and whisk first. The cream whips up much faster!).
Step 3: Let’s bake the cake. Heat your oven to 325 degrees. Grease a big baking sheet and line it with parchment. Whisk the flour, cocoa, baking powder, and salt. This is our chocolatey dust. Now, whip the eggs on medium-low until foamy. Slowly pour in the maple syrup. Then whip on high. It will turn pale yellow and get very thick. This takes about five minutes. It should fall off the whisk in a ribbon. What does “ribbon stage” mean? Share below!
Step 4: Take the bowl off the mixer. Sift your flour mixture over the fluffy eggs. Fold it in gently. You want no white streaks. Pour the batter onto your prepared pan. Spread it into an even layer. Bake for about 15 minutes. It’s done when it springs back at your touch. I still laugh at how thin it looks. But it puffs up so nicely.
Step 5: This is the fun part. You need another baking sheet. Line it with parchment. When the cake comes out, run a knife around the edges. Quickly flip it onto the new sheet. Peel off the top parchment. Now, roll the warm cake up with the new parchment inside. Let it cool like a little log. This helps it remember its shape later. Cool for 15 minutes, seam side down.
Step 6: Gently unroll your cake. It will be flexible. Stir the plain mascarpone-maple mixture. Spread it evenly over the cake. Leave a small border at one end. Now, roll it back up. Leave the parchment behind as you go. Place it on a pretty plate. Frost the outside with the whipped cream mixture. Refrigerate for at least 30 minutes. This waiting is the hardest part, I think.
Cook Time: About 15 minutes
Total Time: 1 hour 30 minutes (plus chilling)
Yield: 10 servings
Category: Dessert, Cake
Three Fun Twists to Try
This cake is a wonderful friend. It loves to dress up in new ways. Here are three ideas I adore. Berry Swirl: Add a layer of mashed raspberries over the filling before rolling. Peppermint Patty: Use peppermint extract instead of almond. Add crushed candy canes on top. Orange Chocolate: Swap almond extract for orange. Add orange zest to the filling. So bright and cheerful. Which one would you try first? Comment below!
Serving It Up With Style
This cake is a star all on its own. But a little extra love makes it shine. Slice it with a warm, clean knife for neat pieces. Serve on a plate with a dusting of cocoa powder. A few fresh raspberries on the side look lovely. For drinks, a cup of hot coffee is perfect. For a special night, a small glass of amaretto is nice. The almond notes sing together. Which would you choose tonight? I think I’d have the coffee. Then I could have a second slice.

Keeping Your Jelly Roll Happy
This cake likes a cool, cozy fridge. Cover it well with plastic wrap. It will stay fresh for two days. You can freeze it for one month. Wrap it tightly in two layers of plastic first.
Thaw it overnight in your refrigerator. I once froze a slice for my grandson’s visit. He said it tasted just-baked! Batch cooking is simple here. Make the fillings up to two days ahead.
This prep work matters. It turns a big project into easy steps. You get to enjoy the fun of assembly later. Have you ever tried storing a cake this way? Share below!
Common Hiccups and Simple Fixes
First, a cracked cake. This happens if it cools too long before rolling. Roll it up while it is still warm and flexible. I remember my first crack. I was so disappointed!
Second, a runny filling. Your cream or mascarpone might be too warm. Always start with cold ingredients from the fridge. This matters for a fluffy, stable frosting. Third, the cake sticks to the parchment.
Grease the parchment paper well. Do not skip this simple step. Fixing small issues builds your kitchen confidence. It also makes your food taste just right. Which of these problems have you run into before?
Your Quick Questions, Answered
Q: Can I make this gluten-free? A: Yes. Use a gluten-free flour blend. Make sure it has xanthan gum.
Q: How far ahead can I make it? A: Fully assemble it two days before serving. It gets more flavorful.
Q: What if I don’t have espresso powder? A: Use one tablespoon of strong brewed coffee. Cool it first.
Q: Can I make a smaller one? A: Halve the recipe. Use a quarter sheet pan. Bake for 12 minutes.
Q: Any optional tip? A: Dust the top with cocoa powder. It looks pretty and tastes great. Which tip will you try first?
From My Kitchen to Yours
I hope you love making this special cake. It is a treat for quiet afternoons. It is also perfect for sharing with loved ones. *Fun fact: The jelly roll cake became popular in the United States in the 1800s.*
I always think of my own grandmother when I bake it. Now I am sharing it with you. Your stories make my kitchen feel bigger. Have you tried this recipe? Tell me about your experience in the comments.
Happy cooking!
—Grace Ellington.


Light Mocha Mascarpone Jelly Roll
Description
A decadent yet lighter dessert featuring a delicate cocoa sponge rolled with a rich mocha-mascarpone filling and frosting, all sweetened with maple syrup.
Ingredients
Filling and Frosting
Cake
Instructions
- For the filling and frosting: Whisk maple syrup, espresso powder, almond extract, and salt together in bowl. In large bowl, stir mascarpone with rubber spatula until softened and smooth, then whisk in maple mixture. Measure out ½ cup and set aside.
- Using stand mixer fitted with whisk attachment, whip cream on medium-low speed until foamy, about 1 minute. Increase speed to high and whip until soft peaks form, 1 to 2 minutes. Using rubber spatula, fold in ½ cup reserved mascarpone mixture until combined. Refrigerate mascarpone-maple mixture and whipped cream–mascarpone mixture separately until needed or for up to 2 days.
- For the cake: Adjust oven rack to lower-middle position and heat oven to 325 degrees. Grease 18 by 13-inch rimmed baking sheet, line with parchment paper, and grease parchment. Whisk flour, cocoa, baking powder, and salt together in bowl.
- Using stand mixer fitted with whisk attachment, whip eggs on medium-low speed until foamy, about 1 minute. Gradually add maple syrup in steady stream. Increase speed to high and whip until mixture has tripled in volume, is pale yellow color, and ribbons fall from whisk, 5 to 7 minutes. Beat in vanilla.
- Remove bowl from stand mixer. Sift flour mixture over top of whipped eggs. Using rubber spatula, fold flour mixture into eggs until incorporated and no traces of flour remain.
- Scrape batter into prepared sheet and spread into even layer. Bake until cake is firm to touch and springs back when pressed lightly, about 15 minutes, rotating sheet halfway through baking.
- Invert second baking sheet, grease bottom lightly, and line with parchment. Remove cake from oven and run knife around edge of cake to loosen. Working quickly while cake is warm, place second baking sheet on top, parchment side down, and gently flip pans over. Remove sheet and parchment now on top. Starting from short side, roll cake and bottom parchment into log. Let cake cool, seam side down, for 15 minutes.
- Gently unroll cake. Stir mascarpone-maple mixture to loosen, then spread evenly over cake, leaving 1-inch border along bottom edge. Re-roll cake around filling, leaving parchment behind as you roll. Transfer cake to serving platter. Spread whipped cream–mascarpone mixture over top and sides of cake and refrigerate for at least 30 minutes or up to 2 days. Serve.
Notes
- Nutrition per serving: Sugar: 17g (down from 37g in traditional recipes). For best results, ensure all ingredients are at room temperature before starting. The cake can be stored, covered, in the refrigerator for up to 2 days.

