Why We Spatchcock
Let’s talk about flattening that turkey. It looks funny, I know. But it’s called spatchcocking. You just remove the backbone. Then you press it flat. This is my favorite trick.
It helps the whole bird cook evenly. No more dry breast and raw legs! Everything gets crispy and juicy together. That matters because no one wants to fight over the only good piece. I still laugh at the first time I did it. My grandson said it looked like a turkey pancake.
The Magic of the Mop
Now, the mop sauce is not for cleaning. It’s for basting. You simmer vinegar, lemon, sugar, and pepper. Doesn’t that smell amazing? It’s tangy and spicy and a little sweet.
You brush it on while the turkey smokes. This keeps the meat incredibly moist. The steam from the mop helps the smoke flavor stick, too. Fun fact: Pitmasters have been using vinegar mops like this for over a hundred years. What’s your favorite smell in the kitchen? Is it garlic, or maybe baking bread?
Building the Smoke Snake
The charcoal snake is a clever idea. You make a ring of briquettes around the grill. You light just one end. It burns slowly, like a fuse. This gives you hours of steady, low heat.
You put wood chunks on top for smoke. The water pan in the middle creates steam. This steady heat matters. It means you can relax. You don’t have to babysit the fire. Have you ever tried a low-and-slow cooking method like this?
Patience Makes Perfect
Once that bird is on, you walk away. For two whole hours. I know, it’s hard. But trust the process. The smoke is doing its quiet work. It’s wrapping that turkey in a cozy, flavorful blanket.
Then you mop it and flip it. The skin will start to look glorious. Finally, you check the temperature. That’s the only way to know it’s done. Letting it rest after is so important. The juices settle back into the meat. This matters because it makes every single bite better.
Your Holiday Table
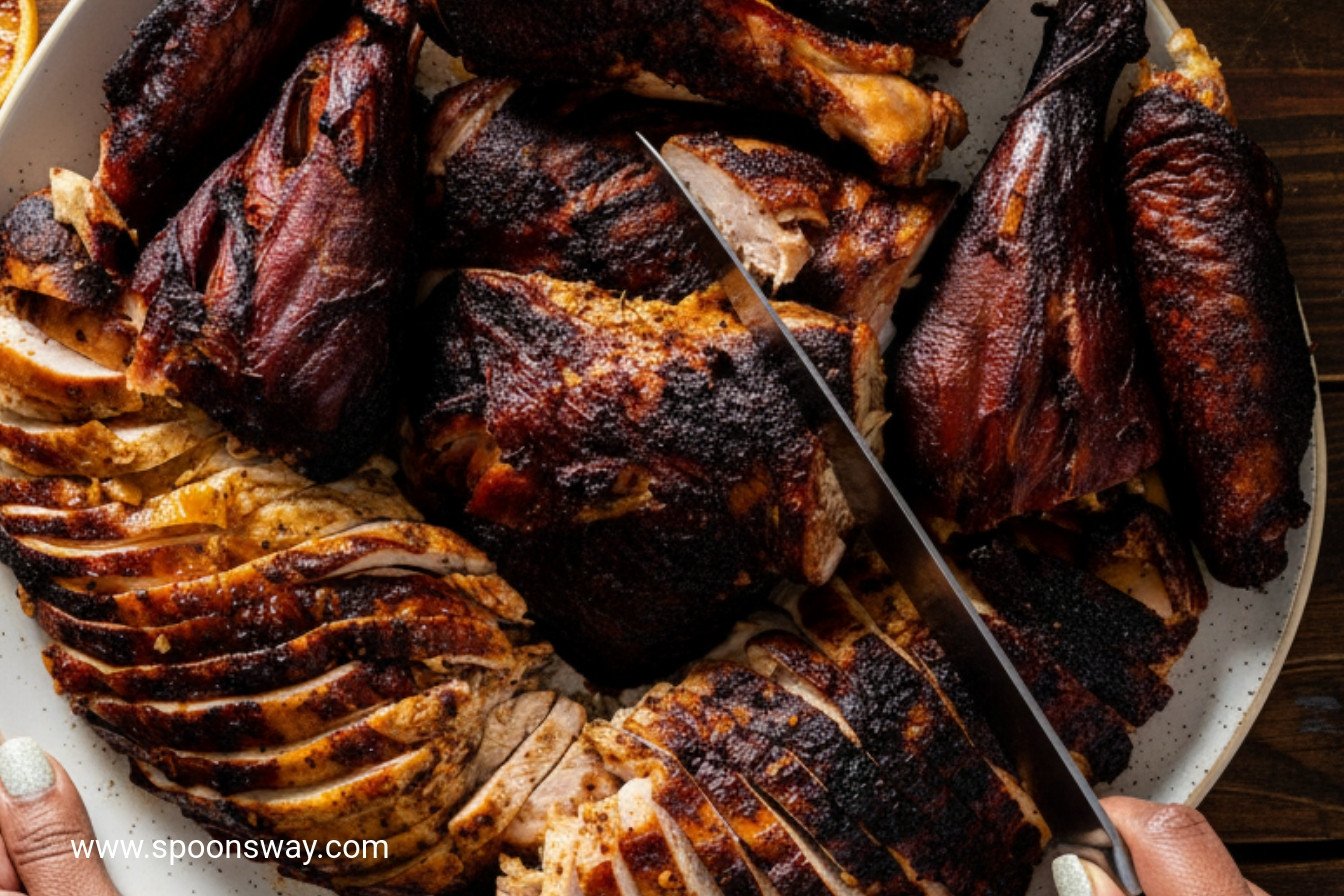
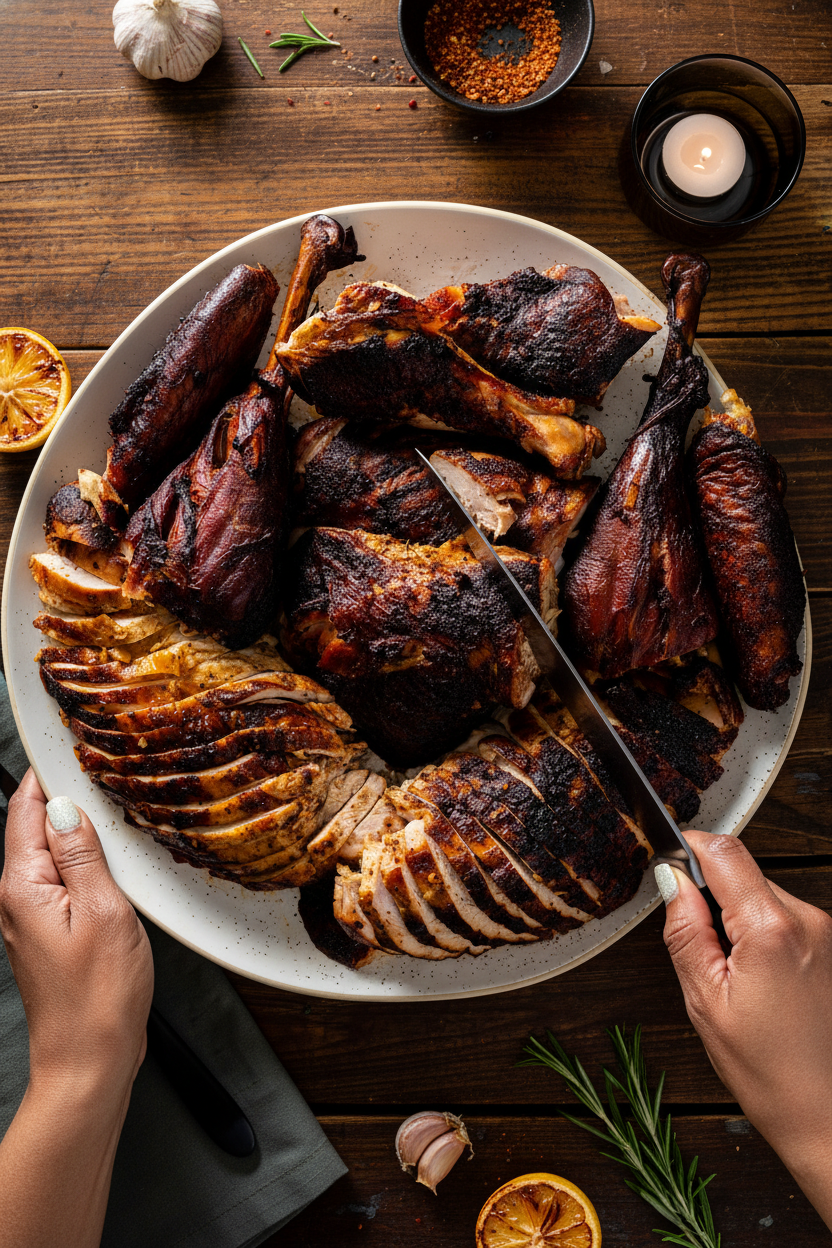
Carving a spatchcocked turkey is easy. No wrestling with a big, round bird. You just slice the breast and separate the legs. The flavor is something special. You get a gentle heat, sweet smoke, and juicy meat all at once.
It feels like a celebration. This recipe is a gift of time and care. It tells your family they are worth the effort. Will this be your first smoked turkey? Tell me what you’re most excited to try.
Ingredients:
| Ingredient | Amount | Notes |
|---|---|---|
| Mop: | ||
| Distilled white vinegar | 2 cups | |
| Lemon slices | 2 thin slices | Discarded after simmering |
| Granulated sugar | ¼ cup | |
| Pepper | 1 tablespoon | |
| Cayenne pepper | 2 teaspoons | |
| Red pepper flakes | ½ teaspoon | |
| Rub: | ||
| Kosher salt | 2 tablespoons | |
| Monosodium glutamate (MSG) | 1 tablespoon | |
| Pepper | 1 tablespoon | |
| Paprika | 1 tablespoon | |
| Chili powder | 1 tablespoon | |
| Light brown sugar | 1 tablespoon | Packed |
| Garlic powder | 1½ teaspoons | |
| Onion powder | 1½ teaspoons | |
| Cayenne pepper | ¼ teaspoon | |
| Turkey: | ||
| Turkey | 12- to 14-pound | Neck and giblets discarded, spatchcocked |
| Wood chunks | 4 | 3-inch pieces |
| Disposable aluminum pan | 1 | 13 by 9-inch |
| Water | 6 cups | For the water pan in the grill |
| Charcoal briquettes | 120 total | For the charcoal snake |

Rodney Scott’s Holiday Smoked Turkey
Hello, dear. Pull up a chair. Let’s talk turkey. Not just any turkey. This one is smoky, juicy, and full of flavor. It reminds me of big family gatherings. The kind where everyone hangs around the grill. Doesn’t that smell amazing?
This recipe comes from a great pitmaster, Rodney Scott. I’ve adapted it for a backyard grill. It might seem like a project. But we’ll take it step-by-step. I’ll share my little stories along the way. You’ll have a beautiful bird for the table. I promise.
- Step 1: First, we make the “mop.” This is a tangy basting sauce. Combine vinegar, lemon, sugar, and peppers in a pot. Let it simmer until the sugar melts. Then let it cool completely. (A hard-learned tip: always discard the lemon slices after. They get bitter if left in.)
- Step 2: Now, the magic rub. Mix all those spices and salt in a bowl. I love the smell of paprika and brown sugar together. It’s the secret to that beautiful, flavorful skin. Sprinkle it all over your turkey. Get it into every nook.
- Step 3: Your turkey needs to be flat. This is called spatchcocking. Use strong kitchen shears. Cut out the backbone. Press down on the breast to flatten it. I still laugh at the sound. It’s a satisfying little *crack*.
- Step 4: Time for the charcoal “snake.” Arrange briquettes around the grill’s edge. Make two layers. Place wood chunks on top. Add a pan of water in the middle. This keeps everything moist. Quick quiz: what does the water pan help prevent? Share below!
- Step 5: Light some coals. Place them at each end of the snake. This starts a slow, steady burn. Put the grate on and oil it. Lay the turkey skin-side down over the water pan. Cover the grill. Now, let it be for two hours.
- Step 6: After two hours, peek inside. Baste that turkey with your mop. Use a brush or a mop. Carefully flip it skin-side up. Baste the skin too. It will look glorious already. The smell is just incredible.
- Step 7: Cover it again. Cook until a thermometer says 160° in the breast. Let the turkey rest on a pan for 30 minutes. This lets the juices settle. Then, carve and serve your masterpiece. You did it!
Cook Time: About 3 hours on the grill
Total Time: 4¾ hours, plus resting
Yield: Serves 10 to 12
Category: Holiday, Main Course
Three Tasty Twists to Try
This recipe is wonderful as-is. But sometimes, it’s fun to play. Here are three simple twists for next time. They each bring a different kind of joy to the table.
- Herb Garden Glaze: Swap the mop for melted butter with fresh rosemary and thyme. Brush it on during the last hour. It tastes like a cozy fall day.
- Sweet & Smoky: Add two tablespoons of maple syrup to the mop. Use apple wood chunks instead. The turkey gets a gentle, sweet kiss of smoke.
- Citrus Zing: Replace the lemon in the mop with a sliced orange. Add a teaspoon of orange zest to the rub. It’s bright and sunny, even in winter.
Which one would you try first? Comment below!
Serving Your Smoked Masterpiece
That turkey deserves a grand entrance. Let it be the star. I serve it on my biggest wooden board. Scatter fresh herbs like rosemary around it. It looks so festive.
For sides, keep things simple. Creamy mashed potatoes are perfect. They love that smoky gravy. A crisp, tart cranberry sauce cuts through the richness. Some roasted carrots or green beans complete the plate.
What to drink? For the grown-ups, a chilled glass of apple cider bourbon smash is lovely. For everyone, sparkling apple cider with a cinnamon stick. It feels so special. Which would you choose tonight?
Keeping Your Smiled Turkey Tasty Later
Let’s talk about leftovers. They are a holiday gift to yourself. First, let the turkey cool completely. Then, pack the meat in airtight containers. You can keep it in the fridge for about four days.
For longer storage, the freezer is your friend. I pack slices in meal-sized bags. This way, I can pull out just what I need. My first time, I froze a whole half. It was too much for just me!
To reheat, be gentle. Place slices in a pan with a little broth. Cover and warm it on low heat. This keeps the meat juicy and tender. Batch cooking like this saves time and reduces waste.
It means a delicious meal is always close by. Have you ever tried storing it this way? Share below!
Simple Fixes for Common Turkey Troubles
Even grandmas have kitchen hiccups. Here are three common ones. First, the skin isn’t crispy. This often means your grill was too humid. Make sure your water pan isn’t boiling over.
Second, the turkey cooks unevenly. I remember when one side was perfect, the other pale. Flattening the bird completely fixes this. A flat turkey cooks at the same rate all over.
Third, the flavor is too mild or too spicy. The mop and rub are your friends. Taste your mop before using it. You can always adjust the cayenne to your liking. Getting these right builds your cooking confidence.
It also makes sure every bite is full of flavor. Which of these problems have you run into before?
Your Quick Questions, Answered
Q: Is this recipe gluten-free? A: Yes, all the listed ingredients are naturally gluten-free. Just check your spice labels to be safe.
Q: Can I make anything ahead? A: Absolutely! Make the mop and rub up to two months early. Store them in your fridge.
Q: What if I don’t have chili powder? A: You can use a bit more paprika. It will still be wonderfully smoky and good.
Q: Can I make a smaller turkey? A: You can. Just reduce the cook time. Use a meat thermometer to know when it’s done.
Q: Any optional tips? A: Letting the turkey rest is not optional! It lets the juices settle back in. Fun fact: This resting step makes the meat much juicier.
Which tip will you try first?
From My Kitchen to Yours
I hope you feel ready to try this beautiful turkey. It brings people together. The smell of smoke is a memory maker. My table always feels warmer with a dish like this.
I would love to hear about your cooking adventure. Tell me about your family’s smiles. Or tell me about your clever fixes. Have you tried this recipe? Share your experience in the comments.
Your stories are my favorite ingredient. Happy cooking!
—Grace Ellington.

Rodney Scotts Smoked Holiday Turkey
Description
Rodney Scott’s Holiday Smoked Turkey
Ingredients
Mop:
Rub:
Turkey:
Instructions
- For the mop: Combine all ingredients in medium saucepan and bring to simmer over medium-high heat. Cook until sugar is dissolved, about 2 minutes. Remove from heat and let cool completely. Discard lemon slices. (Mop can be refrigerated in airtight container for up to 2 months.)
- For the rub: Combine all ingredients in bowl.
- Place turkey breast side down on cutting board with cavity facing counter edge. Using kitchen shears, cut through bones on either side of backbone, staying as close as possible to backbone. Discard backbone. Flip turkey and press down firmly on breast with heels of your hands to flatten breastbone.
- Sprinkle rub all over both sides of turkey. Open bottom vent of charcoal grill completely. To make charcoal snake, arrange 50 charcoal briquettes, 2 briquettes wide, around perimeter of grill, overlapping slightly so briquettes are touching and leaving 9-inch gap between ends of snake. Place second layer of 50 briquettes, also 2 briquettes wide, on top of first. (Completed arrangement should be 2 briquettes wide by 2 briquettes high.)
- Starting 2 inches from each end of charcoal snake, place wood chunks on top of charcoal about 2 inches apart. Slide disposable pan into charcoal gap, running lengthwise into arc of snake and touching grill wall on opposite side of snake. Pour 6 cups water into pan.
- Light chimney starter filled with 20 briquettes (pile briquettes on 1 side of chimney so they catch). When coals are partially covered with ash, use tongs to pile 10 coals on each end of charcoal snake, where briquettes meet water pan, so both ends of snake ignite.
- Set cooking grate in place, then clean and oil grate. Position turkey, skin side down, over water pan, with drumsticks pointing toward arc in charcoal snake. Cover grill, position lid vent over turkey, and open lid vent completely. Cook, undisturbed, for 2 hours.
- Using small barbecue mop or basting brush, baste turkey liberally with mop. Using oven mitts or grill mitts, flip turkey skin side up, again positioning it over water pan with drumsticks pointing toward arc in charcoal snake. Baste skin side liberally with more mop (you may not need all of it; discard any extra).
- Insert temperature probe into thickest part of breast. Cover grill and cook until breast registers 160 degrees (check temperature of both sides of breast) and thighs register 175 degrees, about 1 hour.
- Transfer turkey to rimmed baking sheet. Let rest for 30 to 40 minutes. Carve turkey and transfer to serving platter. Serve.
Notes
- Calories are an estimate based on a 12-pound turkey, serving 12 people. Actual calories may vary based on specific ingredients and portion sizes.

