A Sweet Little Secret
I have a secret. This fancy-looking dessert? It’s mostly cookies and cream. I still laugh at that. It feels like a magic trick. You start with simple things. Then you end up with a beautiful peppermint log.
It’s an icebox cake. That means no oven is needed. The magic happens in your freezer. The cookies get soft from the cream. They turn cake-like and wonderful. Isn’t that clever?
The Story of a Stubborn Candy
Let me tell you about the peppermints. You must crush them in a food processor. But don’t grind them to dust. You want little crunchy bits. My grandson tried to use a hammer once. What a mess we had! Tiny red and white pieces everywhere.
Those bits matter. They give you sweet surprises. You get a creamy bite, then a little crunch. It makes the whole thing fun to eat. Texture is just as important as taste. Remember that.
Building Your Log
Now for the fun part. You stack the cookies with cream. You make six little towers. Doesn’t that smell amazing? Like a peppermint patty. Then you roll them on their sides. You press the stacks together into a log.
It might look messy. That’s okay. The freezer is your friend. It holds everything together. Wrap it tight and walk away. Patience is a key ingredient here. What’s your favorite part of assembling a dessert? I love licking the spoon.
Why We Make the Bump
After freezing, you cut a piece off. You attach it to the top. This makes a bump. It turns a plain log into a real yule log. A log in the forest has branches. Our cake needs a bump.
This step matters. It’s about making food with love. It’s about taking that extra minute. It shows you cared enough to make it pretty. Food made with care always tastes better. Don’t you think?
The Final Touches
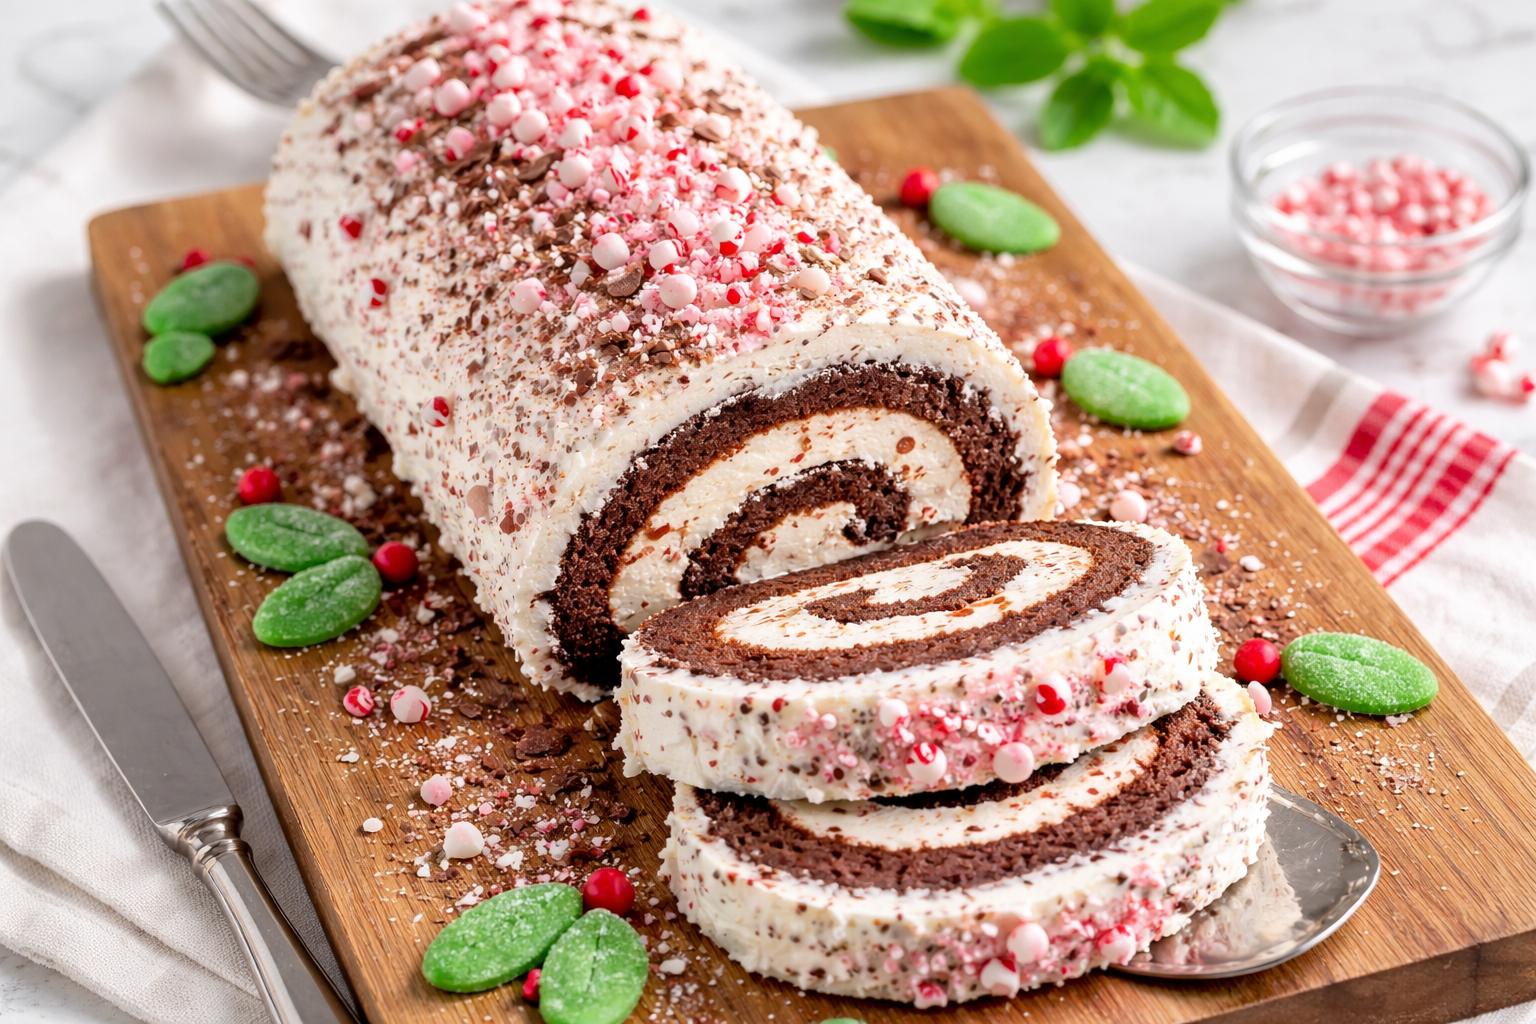
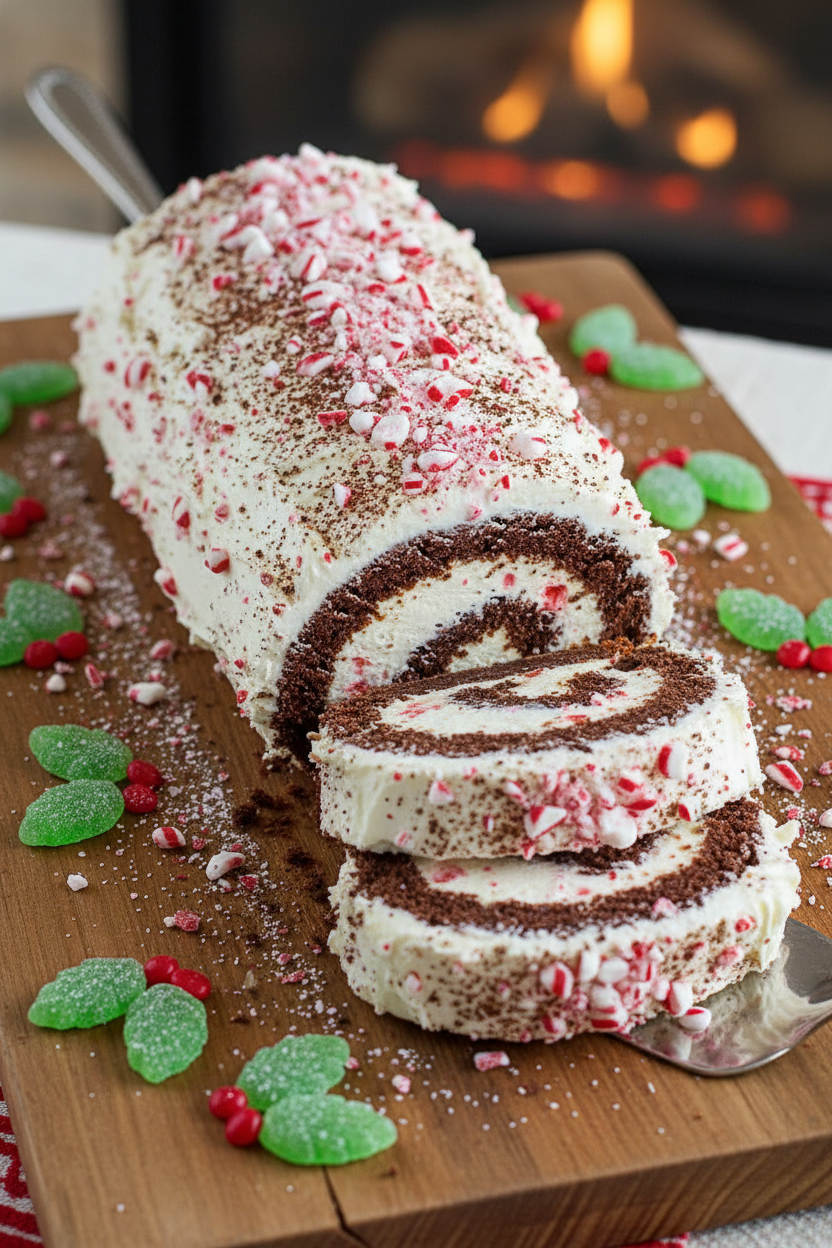
Next, you cover it in chocolate cream. Use a fork to make lines. This looks like tree bark. *Fun fact: This fork trick is older than I am!* My mother taught me. Now I’m teaching you.
Garnish with candy leaves and red hots. It becomes a winter scene. Let it freeze firm. Before serving, let it sit out for 20 minutes. This softens it just right. Do you prefer your frozen desserts a little soft or very firm?
A Dessert for Sharing
This isn’t a fancy, difficult recipe. It’s a project. It’s about creating something together. The best kitchens are full of stories and laughter. This cake holds both.
It waits in your freezer for days. Perfect for surprise guests. Or for a quiet night with family. What’s a dessert that always makes you think of someone you love? For me, it’s this one. It reminds me of snowy days and my grandkids’ smiles.
Ingredients:
| Ingredient | Amount | Notes |
|---|---|---|
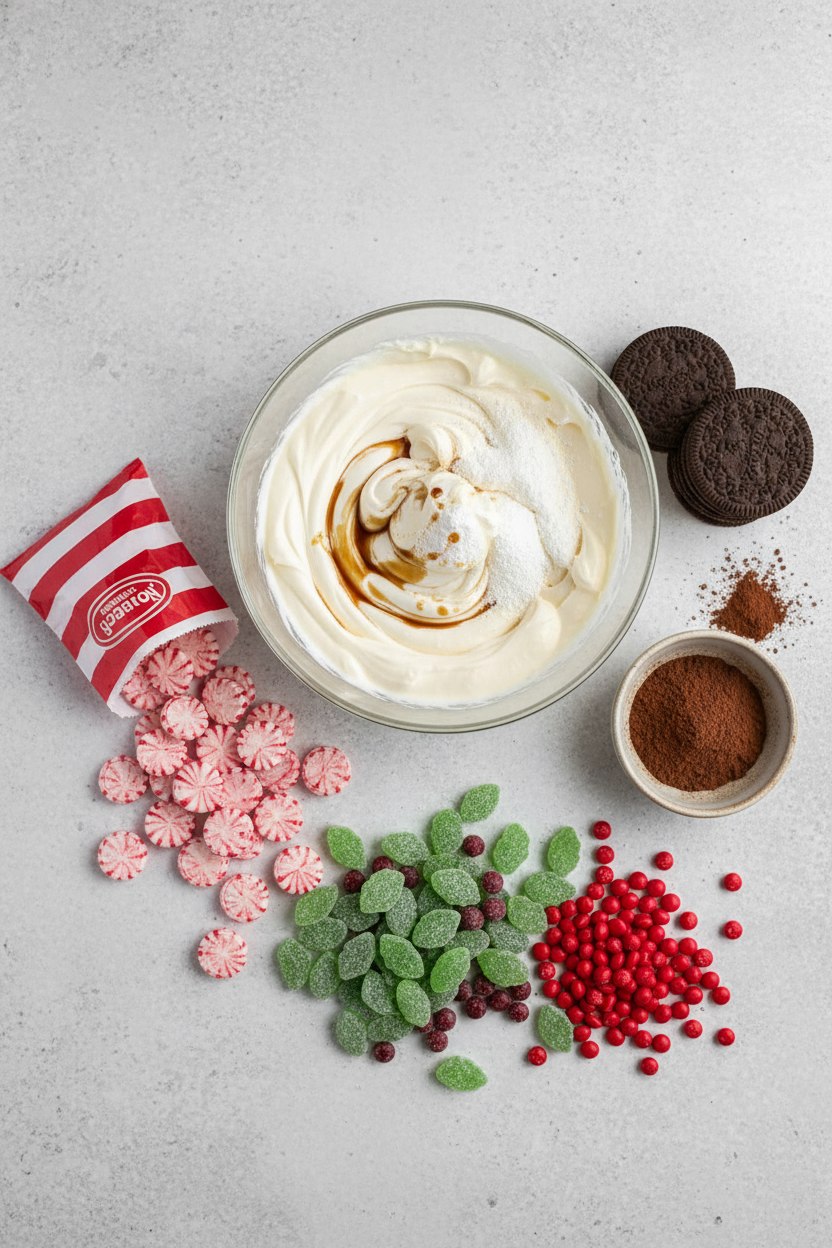
| Round red- and white-striped hard peppermint candies | 20 candies | Crushed but not ground |
| Heavy cream | 2 ¾ cups | Divided for peppermint cream and cocoa cream |
| Confectioners’ sugar | ½ cup (2 ounces/57 grams) | Divided |
| Vanilla extract | ½ teaspoon | |
| Peppermint extract | ¼ teaspoon | |
| Nabisco Famous Chocolate Wafers | 36 wafers | |
| Cocoa powder | ¼ cup (¾ ounce/21 grams) | Sifted |
| Candy spearmint leaves and Red Hots | For garnish | Used for decoration |
My Frozen Peppermint Chocolate Roll
Hello, my dear! Come sit at the counter. Let’s make a magical winter treat. This is my Frozen Peppermint Chocolate Roll. It looks fancy, but it’s so easy. We just stack cookies and cream. Then we freeze it into a beautiful yule log. The best part? No oven is needed. Doesn’t that sound perfect for a busy week?
I first made this for my grandchildren years ago. Their eyes got so wide! Now, it’s our tradition every December. The peppermint smells like Christmas morning. The chocolate wafers get wonderfully soft in the freezer. I still laugh at how clever it is. It’s like a little kitchen secret. Are you ready to learn?
Step 1: First, we make the peppermint cream. Crush those striped candies in a food processor. You want little crunchy bits, not dust. Then, beat the heavy cream, sugar, and extracts together. Stop when you have soft, fluffy peaks. Gently fold the candy pieces in. (Hard-learned tip: Don’t overbeat the cream, or it will turn into butter! Just until it holds its shape.)
Step 2: Now, let’s build our cookie stacks. Take a chocolate wafer. Spread a spoonful of peppermint cream on it. Add another wafer on top. Keep going until you have six cookies in a stack. Make six of these tall stacks. Spread a little more cream on top of five stacks. Leave one stack plain on top. This will be the end of our log.
Step 3: Time to make our log! Lay each stack on its side. Press them together, end to end. The plain stack goes at one end. You’ll have a long, bumpy cookie snake. Wrap it tightly in plastic wrap. Tuck it into the freezer for at least five hours. This lets the cookies soften and the log get firm. What’s your favorite part of waiting for a frozen dessert? Share below!
Step 4: The log is frozen solid. Let’s make the chocolate coating. Beat the rest of the cream with sugar and cocoa powder. This gets thick and chocolaty. Now, take the log out. Cut a thin slice off one end at an angle. Toss it. Then, cut a bigger two-inch piece from the other end. Save this little piece. We’ll use it to make a “branch” bump on our log.
Step 5: Move your frozen cake to a pretty plate. Spread the chocolate cream all over it. Cover every side. Now, take that saved two-inch piece. Press it onto the top of the log. Place it a few inches from one end. This looks like a cut-off branch. Cover this bump with the last bit of chocolate cream. Use a fork to drag lines through the cream. This makes it look like real tree bark. Back into the freezer it goes!
Step 6: Final freeze! Let it get firm again, about three hours. Before serving, let it sit on the counter for twenty minutes. This makes slicing easier. Now for the fun part. Decorate the platter with candy spearmint leaves and Red Hots. They look like little holly berries. Doesn’t that look amazing? Slice it up and watch everyone smile.
Cook Time: 20 minutes active
Total Time: 8 hours (includes freezing)
Yield: Serves 4 to 6
Category: Dessert, No-Bake
Three Fun Twists to Try
This recipe is like a blank canvas. You can paint it with so many flavors. Here are three of my favorite twists. They are all simple and delicious.
Cookie Swap: Use ginger snap cookies instead of chocolate wafers. The spicy ginger with peppermint is so cozy.
Fruit Filling: Add a layer of crushed raspberries to the peppermint cream. It gives a lovely pink color and a tart surprise.
Candy Cane Crunch: Skip the striped candies. Use crushed candy canes instead. The pure peppermint flavor is extra festive.
Which one would you try first? Comment below!
Serving It Up Just Right
This dessert is a star all on its own. But a few little touches make it a real event. I love to dust the platter with a little more powdered sugar. It looks like fresh snow. A few real mint leaves add a lovely green touch. For a side, a small bowl of vanilla ice cream is perfect. The cold creaminess pairs so well.
What to drink? For the grown-ups, a small glass of peppermint schnapps or a rich coffee is lovely. For everyone, a big mug of hot chocolate is the best choice. The double chocolate is just heavenly. Which would you choose tonight?
Keeping Your Yule Log Fresh and Festive
This dessert lives in the freezer. That is its happy home. Wrap the finished log tightly in plastic wrap. This keeps it fresh for up to two days. You can also freeze it for a whole week. That is the magic of icebox cakes.
Let it sit out for twenty minutes before slicing. This softens the cream just right. I once served it straight from the freezer. Our spoons could not get through it. We all had a good laugh while we waited.
Batch cooking is a gift to your future self. Making two logs takes little extra time. You will have a treat ready for surprise guests. It matters because it makes life sweeter and easier. Have you ever tried storing it this way? Share below!
Simple Fixes for Common Hiccups
First, your cream might not whip. Make sure your bowl and beaters are very cold. I chill mine in the freezer for ten minutes. This helps the cream get fluffy and hold its shape. It matters because fluffy cream makes a light, dreamy cake.
Second, the cookie stacks might slide. Press them together gently but firmly. Wrap the log tightly before freezing. I remember my first log looked a little wobbly. It still tasted wonderful. Do not worry about perfect looks.
Third, the cocoa cream can be too thick. Sift your cocoa powder first. This prevents little lumps. Adding it slowly helps, too. Getting this right builds your kitchen confidence. Which of these problems have you run into before?
Your Quick Questions, Answered
Q: Can I make this gluten-free? A: Yes. Use your favorite gluten-free chocolate cookies. Check the wafer size is similar.
Q: How far ahead can I make it? A: You can assemble the whole log two days ahead. The freezer does all the work.
Q: What if I do not have peppermint extract? A: Use a bit more vanilla. The crushed candies will still give minty flavor.
Q: Can I make a smaller version? A: Absolutely. Just make fewer cookie stacks. Use a smaller platter for serving.
Q: Any optional tips? A: Try different candy garnishes. Fun fact: This type of cake was very popular in the 1950s! Which tip will you try first?
From My Kitchen to Yours
I hope you love making this frozen peppermint roll. It is a joyful, chilly treat. The best recipes are the ones we share. I would love to hear about your baking adventure. Tell me all about it in the comments.
Have you tried this recipe? Give your experience in the comments. Your stories are my favorite thing to read. Thank you for spending time in my kitchen today.
Happy cooking!
—Grace Ellington.


Frozen Peppermint Chocolate Roll
Description
A festive, no-bake frozen dessert featuring layers of chocolate wafers and peppermint cream, coated in a rich cocoa cream to resemble a yule log.
Ingredients
Instructions
- Make peppermint cream: Process candies in food processor until crushed but not ground. With electric mixer, beat 1 1/2 cups cream, 1/4 cup sugar, vanilla, and peppermint extract in large bowl until soft peaks form. Using rubber spatula, fold crushed candy into peppermint cream.
- Make cookie stacks: Spread 1 tablespoon peppermint cream on chocolate wafer. Top with another wafer and repeat 4 more times to produce stack of 6 wafers with cream in between each cookie. Make 6 stacks, each with 6 wafers. Spread 1 tablespoon peppermint cream on top of 5 stacks, leaving 1 stack plain.
- Make log: Lay cookie stacks on sides and press together end to end, making one 16-inch log (plain stack without cream on top wafer should be placed at end). Wrap log in plastic and freeze until firm, at least 5 hours or up to 1 week.
- Trim log: With electric mixer, beat remaining 1 1/4 cups cream, remaining 1/4 cup sugar, and cocoa in large bowl until stiff peaks form. Cut thin piece diagonally from one end of frozen log and discard. Cut 2-inch piece diagonally from other end of frozen log and set aside.
- Make bump: Transfer frozen cake to serving platter. Spread all but 1/2 cup cocoa cream evenly over top, sides, and ends of log. Press reserved 2-inch piece on top of log to make bump, placing it several inches from one end of log. Cover bump with remaining cocoa cream.
- Decorate log: Drag tines of fork down length of log to simulate bark. Freeze until firm, at least 3 hours or up to 2 days. Before serving, let stand at room temperature for 20 minutes. Garnish platter with candy spearmint leaves and red hot candies.
Notes
- For best results, ensure the log is completely frozen before applying the cocoa cream coating. Letting it stand at room temperature before serving softens it slightly for easier slicing.

