
The Cookie That Started With a Mess
My first batch of these cookies was a disaster. I was in a hurry. I forgot to let the dough sit. The dough was so sticky! My hands looked like I’d been digging in chocolate mud. I still laugh at that.
But you know what? Those messy cookies still tasted wonderful. That taught me a good lesson. Good food doesn’t need to be perfect. It just needs to be made with a happy heart. What’s your funniest kitchen mess story?
Why We Roll Them Twice
You roll these balls in two sugars. First regular sugar, then powdered sugar. This matters. The first sugar layer seals the dough. It helps the second layer stick. That’s the secret to the snowy white coat.
Without that first step, the powdered sugar just melts away. You’d get a sad, pale cookie. We want a proper snowball! *Fun fact: The deep cracks happen because the inside puffs up faster than the outside can stretch.* Isn’t that neat?
A Little Secret in the Dough
The recipe asks for espresso powder. It is optional. But I always add it. You won’t taste coffee. It just makes the chocolate flavor sing. It wakes it up. Doesn’t that smell amazing when it all mixes together?
This is my favorite trick for any chocolate dessert. A tiny bit of coffee makes chocolate taste more like itself. Try it once and see. Do you have a secret ingredient you always add?
The Waiting Game
Letting the dough sit for ten minutes is important. I know it’s hard to wait. But this matters. The flour drinks up the wet ingredients. The dough becomes firm. Then you can roll perfect, clean balls.
Use this time. Wash your bowls. Line your pans. Take a deep breath. Good baking has quiet moments. They are just as important as the mixing and baking.
Knowing When They’re Done
This is the scary part for new bakers. You bake them until they look underdone. The centers will seem soft between the cracks. That’s perfect. They keep cooking on the hot pan as they cool.
If you wait for them to look fully baked in the oven, they will be dry. Trust the recipe. The soft center becomes wonderfully fudgy. Which do you prefer, a chewy cookie or a crunchy one?
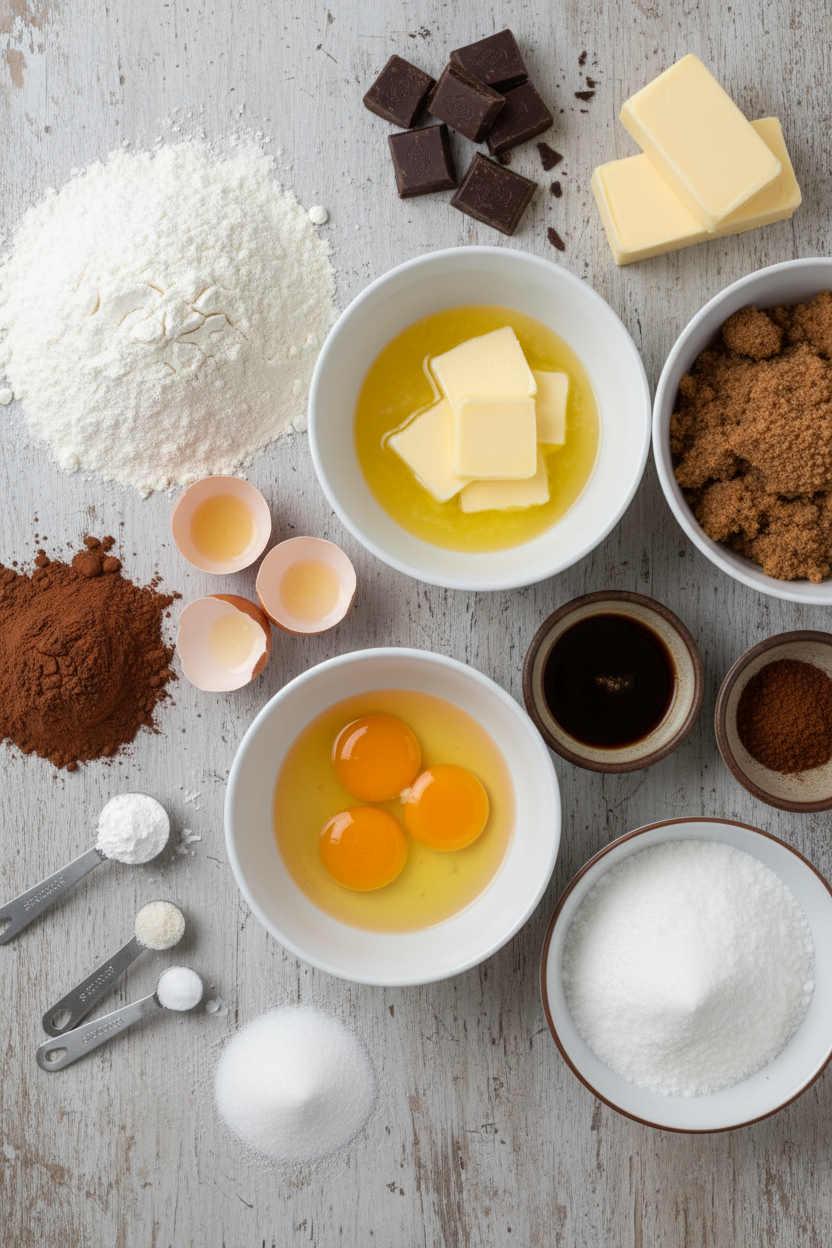
Ingredients:
| Ingredient | Amount | Notes |
|---|---|---|
| All-purpose flour | 1 cup (5 ounces/142 grams) | |
| Unsweetened cocoa powder | ½ cup (1 ½ ounces/43 grams) | |
| Baking powder | 1 teaspoon | |
| Baking soda | ¼ teaspoon | |
| Salt | ½ teaspoon | |
| Brown sugar | 1 ½ cups packed (10 ½ ounces/298 grams) | |
| Large eggs | 3 | |
| Instant espresso powder | 4 teaspoons | optional |
| Vanilla extract | 1 teaspoon | |
| Unsweetened chocolate, chopped | 4 ounces (113 grams) | |
| Unsalted butter | 4 tablespoons | |
| Granulated sugar | ½ cup (3 ½ ounces/99 grams) | for rolling |
| Confectioners’ sugar | ½ cup (2 ounces/57 grams) | for rolling |
Crackled Chocolate Snowball Cookies
Hello, my dear. Come sit. Let’s make my favorite winter cookie. They look like little snow-dusted chocolate hills. I call them my snowball cookies. The kitchen will smell like a sweet, cozy dream. Doesn’t that sound lovely?
We start by getting everything ready. This is called “mise en place.” It just means setting up. It makes baking so much calmer. Trust me on this. I learned the hard way, running for eggs with floury hands!
- Step 1: Heat your oven to 325 degrees. Line your baking sheets with parchment paper. Now, whisk the flour, cocoa, baking powder, baking soda, and salt together. Set this dry mix aside. It looks like dark, rich earth. I still love that color.
- Step 2: In a big bowl, whisk the brown sugar and eggs. Add the espresso powder if you have it. It makes the chocolate sing! A teaspoon of vanilla goes in too. This mix will look glossy and beautiful. See how it swirls?
- Step 3: Melt the unsweetened chocolate and butter together. Use half power in the microwave. Stir it often. (My hard-learned tip: rushing this will burn the chocolate. Be patient, like waiting for a seed to sprout.) Once melted, whisk it right into the egg mixture.
- Step 4: Now, gently fold the dry ingredients into the wet. Just until no white streaks remain. Let the dough rest for ten minutes. It firms up a bit. This is a good time to wash a bowl or two. I always do.
- Step 5: Put your two sugars in separate shallow dishes. One is regular sugar, one is powdered. Working with a tablespoon of dough, roll it into a ball. Roll it first in the granulated sugar. This helps the powdered sugar stick later. Then, roll it in the powdered sugar. Coat it well, like a little snowball! Do you know why we use two sugars? Share below!
- Step 6: Place the balls on your baking sheets. Bake them one sheet at a time. They need their space. Bake for 9 to 12 minutes. They will puff and crackle beautifully. The centers will still look soft. Let them cool completely on the sheet. This is the hardest part—waiting!
Cook Time: 9–12 minutes per batch
Total Time: About 1 hour
Yield: About 22 cookies
Category: Dessert, Cookies
Three Fun Twists to Try
Once you master the classic, you can play. Here are three of my favorite little twists. They make each batch a new adventure.
- Peppermint Snowballs: Add a ¼ teaspoon of peppermint extract with the vanilla. Crush a candy cane and mix it into the powdered sugar for rolling.
- Orange-Chocolate Sparkle: Add the zest of one orange to the dough. Roll the finished balls in sparkling sugar instead of powdered sugar for a frosty glitter.
- Nutty Crackle: Gently fold ½ cup of very finely chopped toasted hazelnuts into the dough at the end. They add a wonderful, cozy crunch.
Which one would you try first? Comment below!
Serving Them Up with Style
These cookies are stars on their own. But I love making a moment of it. For a pretty plate, dust them with a little extra powdered sugar right before serving. Stack them on a vintage cake stand. It always makes people smile.
Pair them with a cold glass of milk, of course. That’s perfection. For the grown-ups, a small glass of cherry port or a rich cream sherry is lovely. It sips like a warm hug. For a fun non-alcoholic treat, try a cup of hot raspberry tea. The berry notes dance with the dark chocolate.
Which would you choose tonight?
Keeping Your Snowball Cookies Perfect
These cookies stay soft for days. Just pop them in a sealed container. You can layer them with parchment paper.
They also freeze beautifully for a sweet surprise later. I wrap them tightly and tuck them in the freezer. My grandkids love finding them on a rainy day.
I once left a batch out overnight. They got a bit hard. A quick warm-up in a low oven made them soft again.
Making a double batch is a smart idea. You get more treats with the same effort. This matters because a ready-made cookie brings instant joy.
Have you ever tried storing cookies this way? Share below!
Cookie Troubles? Let’s Fix Them
First, your cookies might not crackle. The dough needs to be sticky. Roll the balls firmly in both sugars.
Second, they can spread too much. Your dough might be too warm. Let it rest for ten minutes before rolling.
I remember when my first batch came out flat. I had rushed the resting step. Now I always set a timer.
Third, the centers may seem underdone. That is perfect! They set as they cool on the sheet. This matters for a fudgy center.
Fixing small issues builds your kitchen confidence. You learn how ingredients work together. Which of these problems have you run into before?
Your Quick Questions, Answered
Q: Can I make these gluten-free? A: Yes! Use a good gluten-free flour blend. It works just fine.
Q: Can I make the dough ahead? A: Absolutely. Chill it for up to three days. Roll and bake when ready.
Q: What if I don’t have espresso powder? A: Just leave it out. It deepens the chocolate flavor, but is optional.
Q: Can I double the recipe? A: You sure can. Just use a bigger bowl for mixing.
Q: Any other tips? A: A cookie scoop gives you even sizes. *Fun fact: The crackle happens because the outside sets first while the inside puffs!* Which tip will you try first?
From My Kitchen to Yours
I hope you love baking these chocolate snowballs. They always make my kitchen feel cozy. Sharing them is the best part.
I would love to hear about your baking adventure. Tell me how your family liked them. Your stories make my day brighter.
Have you tried this recipe? Give your experience in the comments. Thank you for spending time with me today.
Happy cooking!
—Grace Ellington
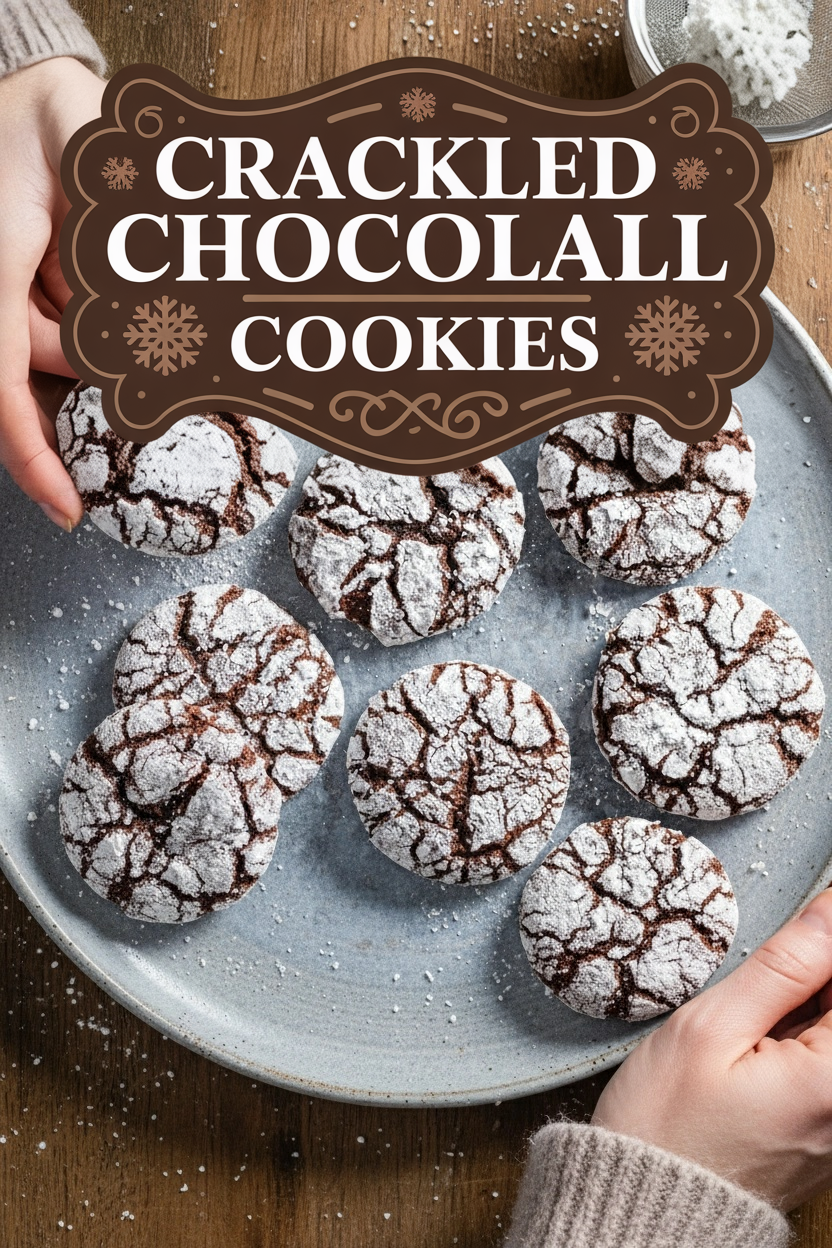
Crackled Chocolate Snowball Cookies
Description
Rich, fudgy chocolate cookies with a signature crackled top and a snowy coating of powdered sugar.
Ingredients
Instructions
- Adjust oven rack to middle position and heat oven to 325 degrees. Line 2 baking sheets with parchment paper. Whisk flour, cocoa powder, baking powder, baking soda, and salt together in a bowl. Set aside.
- Whisk brown sugar, eggs, espresso powder (if using), and vanilla together in a large bowl. Set aside.
- Combine chopped unsweetened chocolate and butter in a bowl and microwave at 50 percent power, stirring occasionally, until melted, 2 to 3 minutes.
- Whisk chocolate mixture into egg mixture until combined. Fold in flour mixture until no dry streaks remain. Let dough sit at room temperature for 10 minutes.
- Place granulated sugar and confectioners’ sugar in separate shallow dishes.
- Working with 2 tablespoons dough (or use #30 scoop) at a time, roll into balls. Drop balls into granulated sugar and roll to coat. Transfer to confectioners’ sugar and roll to coat evenly. Evenly space dough balls on prepared sheets, 11 per sheet.
- Bake cookies, 1 sheet at a time, until puffed and cracked and edges have begun to set but centers are still soft (cookies will look raw between cracks and seem underdone), 9 to 12 minutes, rotating sheet halfway through baking. Let cool completely on sheet before serving.
Notes
- For best results, ensure the dough rests for the full 10 minutes to make rolling easier. The cookies will look underbaked when you take them out; they set as they cool on the sheet.

