
The Heart of the Kitchen
My kitchen table has seen many stories. This babka is one of my favorites. It is a sweet, chocolate bread. It looks fancy but is made with simple things. Flour, butter, eggs, and love. That is the best ingredient.
I learned to make it from my friend Anna. She brought a loaf over one rainy afternoon. The smell filled my whole house. We ate it warm with big glasses of milk. I knew I had to learn the recipe. Doesn’t that smell amazing?
Why This Bread is Special
This is not a quick bread. You must be patient. The dough needs time to rise. It needs a long rest in the fridge. This waiting matters. It lets the flavors get to know each other. It makes the texture soft and rich.
Then, you get to braid it. That is the fun part. You cut the dough and twist it. It feels like playing with edible clay. The chocolate peeks through. It becomes a beautiful spiral. This makes every slice unique. What is your favorite thing to bake when you have a free afternoon?
A Little Secret from the Oven
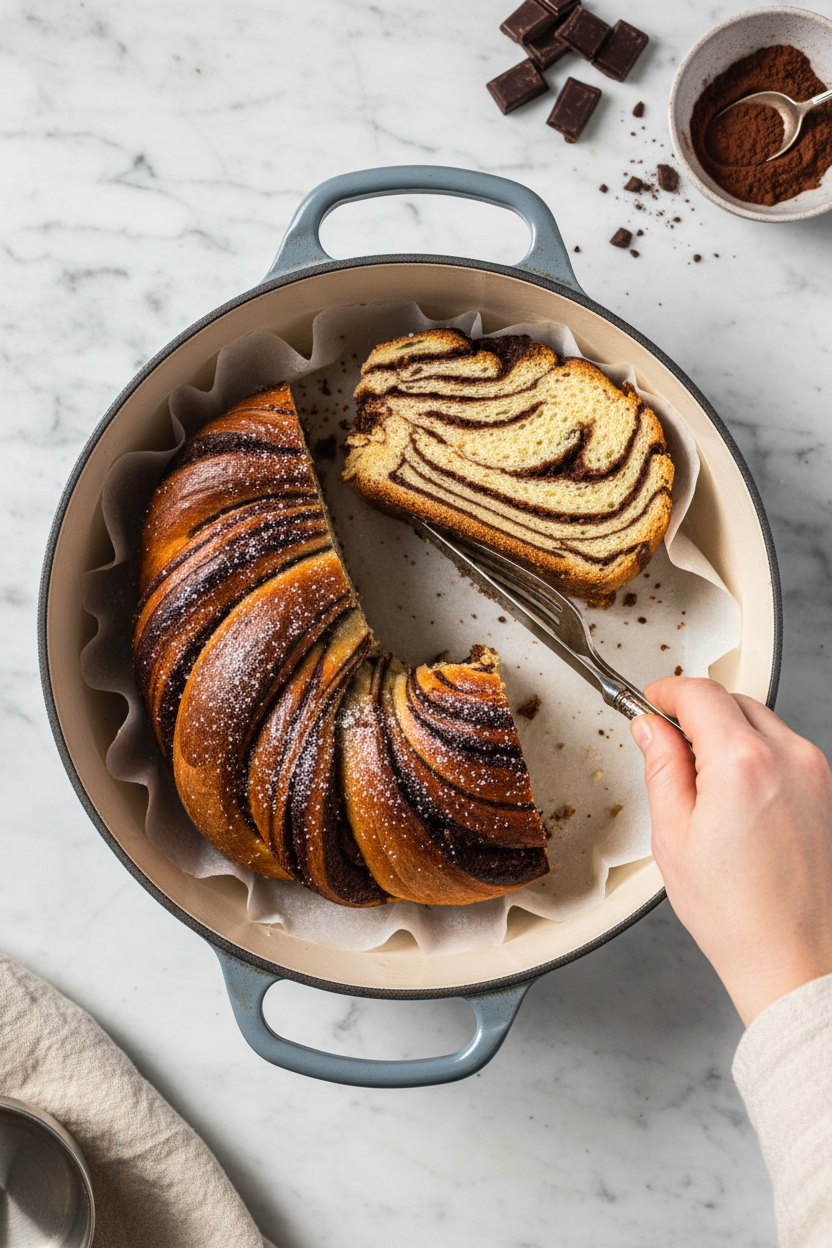
We bake this bread in a Dutch oven. That is a heavy pot with a lid. It is a magic trick for bread. The lid traps the steam. This gives the loaf a wonderful crust. The inside stays tender. It is like a tiny bakery in your own oven.
Fun fact: Bakers have used pots like this for hundreds of years. It is an old, simple way to make great bread. I still laugh at that. The oldest tools are often the best. Do you have a favorite kitchen tool that seems like magic?
The Chocolate That Binds Us
The filling is pure joy. You melt chocolate and butter together. Then you whisk in egg whites. This makes it shiny and spreadable. It will look so good you might want to eat it with a spoon. Please wait. It gets better in the bread.
Spreading it on the dough is my quiet moment. I make sure to get it in every corner. This step matters because it is the sweet surprise in every bite. The chocolate swirls are the heart of the babka. They make it a treat to share.
Your Turn to Bake a Memory
When your babka is done, let it cool. This is the hardest part. The smell will be incredible. But a warm loaf can be gummy inside. Waiting makes the texture perfect. Slice it after a few hours. You will see all your beautiful work.
Share it with someone you care about. That is the real point of baking. It turns food into a memory. I think of Anna every time I make it. What is a food that always reminds you of a special person?
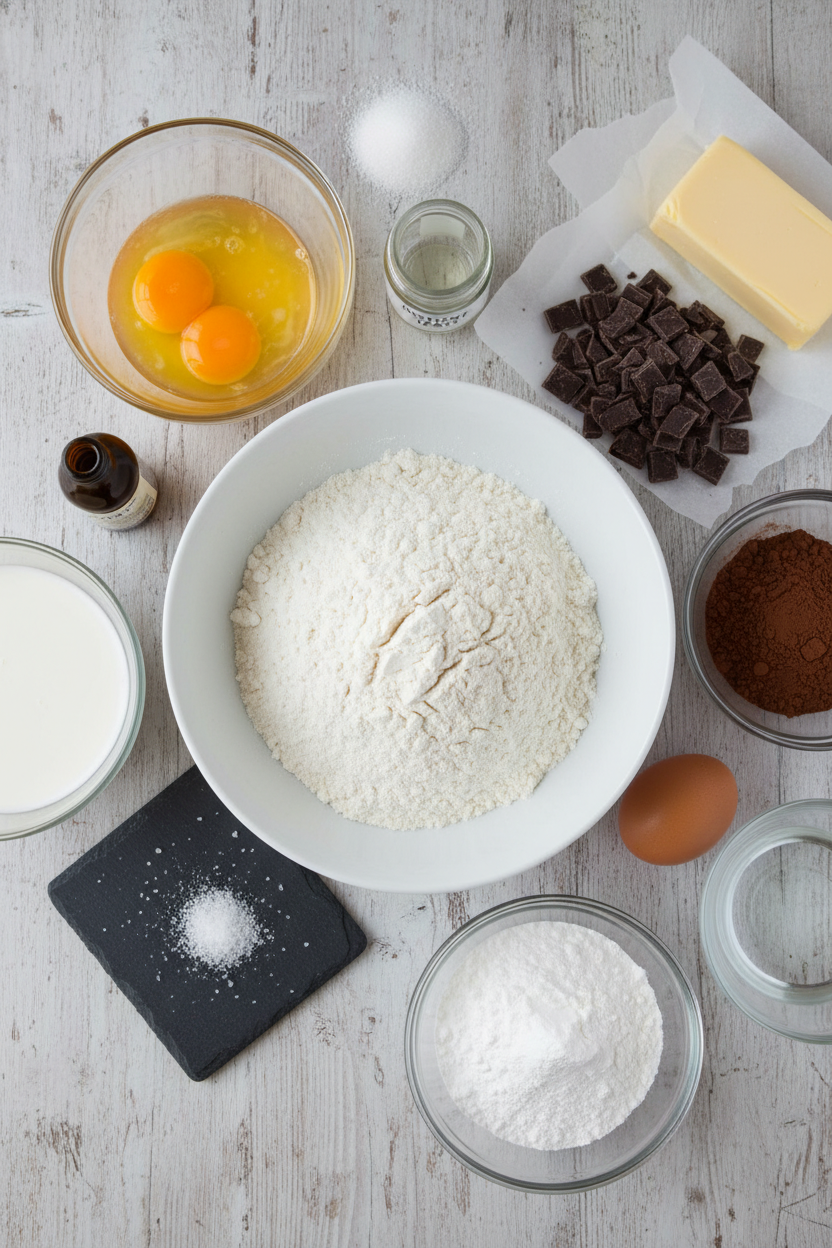
Ingredients:
| Ingredient | Amount | Notes |
|---|---|---|
| Dough: | ||
| All-purpose flour | 4 cups (20 ounces/567 grams) | |
| Instant or rapid-rise yeast | 1 tablespoon | |
| Salt | 1 teaspoon | |
| Whole milk | 1 cup (8 ounces) | room temperature |
| Granulated sugar | ½ cup (3½ ounces/99 grams) | |
| Large egg yolks | 4 | room temperature |
| Vanilla extract | 2 teaspoons | |
| Unsalted butter | 16 tablespoons | softened |
| Filling: | ||
| Bittersweet chocolate | 4 ounces (113 grams) | chopped |
| Unsalted butter | 8 tablespoons | |
| Unsweetened cocoa powder | 6 tablespoons (1⅛ ounces/32 grams) | |
| Confectioners’ sugar | ½ cup (2 ounces/57 grams) | |
| Large egg whites | 2 | |
| For brushing: | ||
| Large egg | 1 | lightly beaten with 1 tbsp water and pinch salt |
My Chocolate Braid Babka: A Sweet Kitchen Hug
Hello, my dear. Come sit. Let’s make something special today. This babka is like a warm, chocolatey hug from your oven. It looks fancy, but I promise it’s friendly. We’ll take our time, just like my grandma did with me. Doesn’t that smell amazing?
This dough is rich and soft. It feels wonderful in your hands. The secret is adding the butter slowly. It makes the bread so tender. I still laugh at the first time I made it. I was so proud of my braid! Yours will be beautiful, too.
Step 1: First, we wake up the yeast. Whisk the flour, yeast, and salt in your mixer bowl. In another jug, mix the milk, sugar, yolks, and vanilla. It will look like sunshine. Pour the wet into the dry on low speed. Mix until it becomes a shaggy dough. (Hard-learned tip: Room-temperature ingredients are key for a happy dough!)
Step 2: Now, add the soft butter. Do this one tablespoon at a time. Let each piece disappear into the dough. Then let the mixer knead it for you. It will become smooth and silky. It should pull away from the bowl’s sides. This takes patience, but it’s worth it.
Step 3: Shape the dough into a soft ball. Place it in a greased bowl. Cover it with plastic wrap. Let it take a little nap. It needs to rise for about two hours. Then, tuck it into the fridge to firm up. This makes it easier to roll later. Why do we chill the dough? Share below!
Step 4: Time for the chocolate filling! Melt the chocolate, butter, and cocoa together. Stir in the powdered sugar. Let it cool completely. This is very important. Then whisk in the egg whites. It will turn shiny and lovely.
Step 5: Roll your dough into a big rectangle. Spread the chocolate filling all over. Leave a tiny border at the edges. Roll it up tightly, like a sleeping bag. Pinch the seam to seal it. Then chill the log for thirty minutes. This helps our braid hold its shape.
Step 6: Make a foil sling for your Dutch oven. This is our magic trick. It lets us lift the bread out easily. Just lay two foil strips in a cross. Press them into the pot and spray them. Now, for the fun part—the braid!
Step 7: Cut the chilled log in half lengthwise. You’ll see pretty swirls. Lay the halves side by side, cut sides up. Pinch the top ends together. Now, gently cross one piece over the other. Keep going to make a simple braid. Pinch the ends to seal. Twist it into a spiral and tuck it in.
Step 8: Place your braid in the prepared pot. Cover it and let it rise again. It will get nice and puffy. Heat your oven. Gently brush the loaf with the egg wash. This gives it that gorgeous golden color. Bake it covered, then uncovered until done.
Step 9: Use the foil to lift your masterpiece out. Let it cool completely on a rack. I know, waiting is the hardest part. But slicing into warm bread makes it gummy. Trust me on this. The wait makes the first bite perfect.
Cook Time: About 1 hour
Total Time: 6–8 hours (includes rising & cooling)
Yield: Makes 1 Loaf
Category: Baking, Bread, Dessert
Three Sweet Twists to Try
Once you master the classic, try a little twist. It’s how recipes become your own. Here are three ideas I love.
Cinnamon-Sugar Swirl. Swap the chocolate filling for soft butter, brown sugar, and lots of cinnamon.
Orange & Dark Chocolate. Add the zest of one orange to the dough. Use dark chocolate in the filling.
Nutty Chocolate Crunch. Sprinkle chopped toasted hazelnuts over the filling before you roll it up.
Which one would you try first? Comment below!
Serving Your Babka with Style
This babka is a star all by itself. But a little pairing makes it an event. For breakfast, just a pat of soft butter is divine. For dessert, try a scoop of vanilla ice cream. The warm and cold together is heavenly.
What to drink? A glass of cold milk is always the right choice. For the grown-ups, a small glass of ruby port is lovely. It’s sweet and pairs so well with chocolate. Which would you choose tonight?
Keeping Your Babka Beautiful
Let’s talk about keeping your babka happy. Once cool, wrap it tightly in foil. It stays fresh on the counter for two days. For longer storage, freeze it. Wrap the whole loaf or slices in plastic, then foil. It freezes beautifully for a month.
To reheat, thaw if frozen. Warm slices in a 300-degree oven for 10 minutes. This brings back that soft, fresh texture. I once froze a loaf for a surprise visit from my grandson. His smile was worth the wait!
Batch cooking matters because it saves future-you time. You can make two loaves at once. Bake one now, freeze one for later. It makes a busy day feel special. Have you ever tried storing it this way? Share below!
Babka Troubleshooting: Easy Fixes
First, a sticky dough is common. Just add a little extra flour, one spoon at a time. I remember when my dough stuck to everything. A light dusting on my hands saved the day.
Second, the filling might leak. Make sure your dough log is pinched shut tightly. A good seal keeps the chocolate inside where it belongs. This matters for a pretty, swirled slice.
Third, the bottom might brown too fast. Use the foil sling as directed. It protects the loaf from the hot pot. This simple step builds your baking confidence. Which of these problems have you run into before?
Your Babka Questions, Answered
Q: Can I make this gluten-free? A: I haven’t tried it. A 1-to-1 gluten-free flour blend might work. Let me know if you experiment!
Q: Can I make it ahead? A: Yes! Chill the dough overnight. This slows the rise and develops flavor.
Q: What if I don’t have bittersweet chocolate? A: Semi-sweet chocolate chips are a fine swap. The flavor will be a little sweeter.
Q: Can I double the recipe? A: Absolutely. Make two separate loaves. Bake them one at a time for best results.
Q: Any optional tips? A: A sprinkle of coarse sugar on top before baking adds a sweet crunch. *Fun fact: The word “babka” means “grandma” in Polish!* Which tip will you try first?
From My Kitchen to Yours
I hope you enjoy making this chocolate braid. Baking is about sharing love and stories. The braiding might seem tricky at first. Just take your time and have fun with it.
I would love to hear about your baking adventure. Tell me about the smiles it created at your table. Your stories are my favorite thing to read. Have you tried this recipe? Share your experience in the comments.
Happy cooking! —Grace Ellington.
Dutch Oven Chocolate Braid Babka
Description
A stunning, rich, and buttery braided chocolate babka, baked to perfection in a Dutch oven for a beautiful crust and tender crumb.
Ingredients
Filling:
For brushing:
Instructions
- For the dough: Whisk flour, yeast, and salt together in bowl of stand mixer. Whisk milk, sugar, egg yolks, and vanilla in a 4-cup liquid measuring cup until sugar has dissolved. Using dough hook on low speed, slowly add milk mixture to flour mixture and mix until cohesive dough starts to form and no dry flour remains, about 2 minutes, scraping down bowl as needed.
- Increase speed to medium-low, add butter, 1 tablespoon at a time, and knead until butter is fully incorporated, about 4 minutes, scraping down bowl as needed. Continue to knead until dough is smooth and elastic and clears sides of bowl, 10 to 12 minutes.
- Transfer dough to lightly floured counter and knead by hand to form smooth, round ball, about 30 seconds. Place dough, seam side down, in lightly greased large bowl or container, cover tightly with plastic wrap, and let rise until increased in size by about half, 1½ to 2 hours. Place in refrigerator until dough is firm, at least 1 hour or up to 24 hours. (If dough is chilled longer than 1 hour, let rest at room temperature for 15 minutes before rolling out in step 5.)
- For the filling: Microwave chocolate, butter, and cocoa together in medium bowl at 50 percent power, stirring occasionally, until melted, about 3 minutes. Stir in sugar until combined and let cool completely, about 30 minutes. Whisk in egg whites until fully combined and mixture turns glossy.
- Press down on dough to deflate, then transfer to lightly floured counter. Press and roll dough into 18 by 24-inch rectangle, with short side parallel to counter edge. Spread filling over dough, leaving ½-inch border around edges.
- Roll dough away from you into firm, taut cylinder. Pinch seam closed, then reshape cylinder as needed to be 18 inches in length with uniform thickness. Wrap in plastic, transfer to rimmed baking sheet, and refrigerate until firm but still supple, about 30 minutes.
- Make foil sling for Dutch oven by folding 2 long sheets of aluminum foil so each is 7 inches wide. Lay sheets of foil in pot perpendicular to each other, with extra foil hanging over edges of pot. Push foil into bottom and up sides of pot, smoothing foil flush to bottom of pot, then spray with vegetable oil spray.
- Transfer dough log to lightly floured counter, with short side facing you. Using bench scraper or sharp knife, cut log in half lengthwise. Turn dough halves cut sides up and arrange side by side. Pinch top ends together. Lift and place 1 dough half on opposite side of second half. Repeat, keeping cut sides up, until dough halves are tightly braided. Pinch remaining ends together. Twist braided dough into spiral and tuck end underneath. Transfer loaf to prepared pot, cover with lid, and let rise until increased in size by about half, 1½ to 2 hours.
- Adjust oven rack to middle position and heat oven to 350 degrees. Gently brush loaf with egg mixture. Cover pot, transfer to oven, and bake loaf for 20 minutes. Uncover, rotate pot, and continue to bake until loaf is deep golden brown and registers 190 to 195 degrees, 40 to 50 minutes.
- Using foil overhang, lift loaf out of pot and let cool completely on wire rack, about 3 hours.
Notes
- For best results, ensure all ingredients are at room temperature before starting. The long, slow rise in the refrigerator develops flavor and makes the dough easier to handle. Let the babka cool completely before slicing to allow the filling to set.

