My First Maple Cheesecake
I made my first maple cheesecake for my grandson’s birthday. He loves pancakes. I thought, why not put that flavor in a cake? It was a hit. He ate two slices. I still laugh at that.
This recipe feels like a hug from a maple tree. It is rich, sweet, and so smooth. The granola on top gives a nice little crunch. Doesn’t that sound lovely? What is your favorite birthday dessert? Tell me about it.
Why a Slow Bake Matters
The oven temperature seems very low, I know. But trust me here. Baking it slow and low is the secret. It keeps the top from cracking. It makes the texture like silk.
This matters because a gentle bake means a calm cake. No rushing. No stress. Just a perfect, creamy middle. Letting it cool slowly is important too. It keeps everything smooth and happy.
The Crunchy Secret
We use graham crackers and pecans for the crust. You grind them up together. This is my favorite part. The kitchen smells like toasted nuts and butter. It smells like home.
Pressing the crust into the pan is fun. Use a cup to pack it down firm. A solid crust matters. It holds up our creamy dreamy filling. It is the strong foundation for our sweet tower.
A Sweet Story in Every Bite
The maple syrup is the star. It goes right in the filling. No sugar needed. You taste the maple in every single bite. *Fun fact: It takes about 40 gallons of maple sap to make just 1 gallon of syrup!* That is a lot of work from the trees.
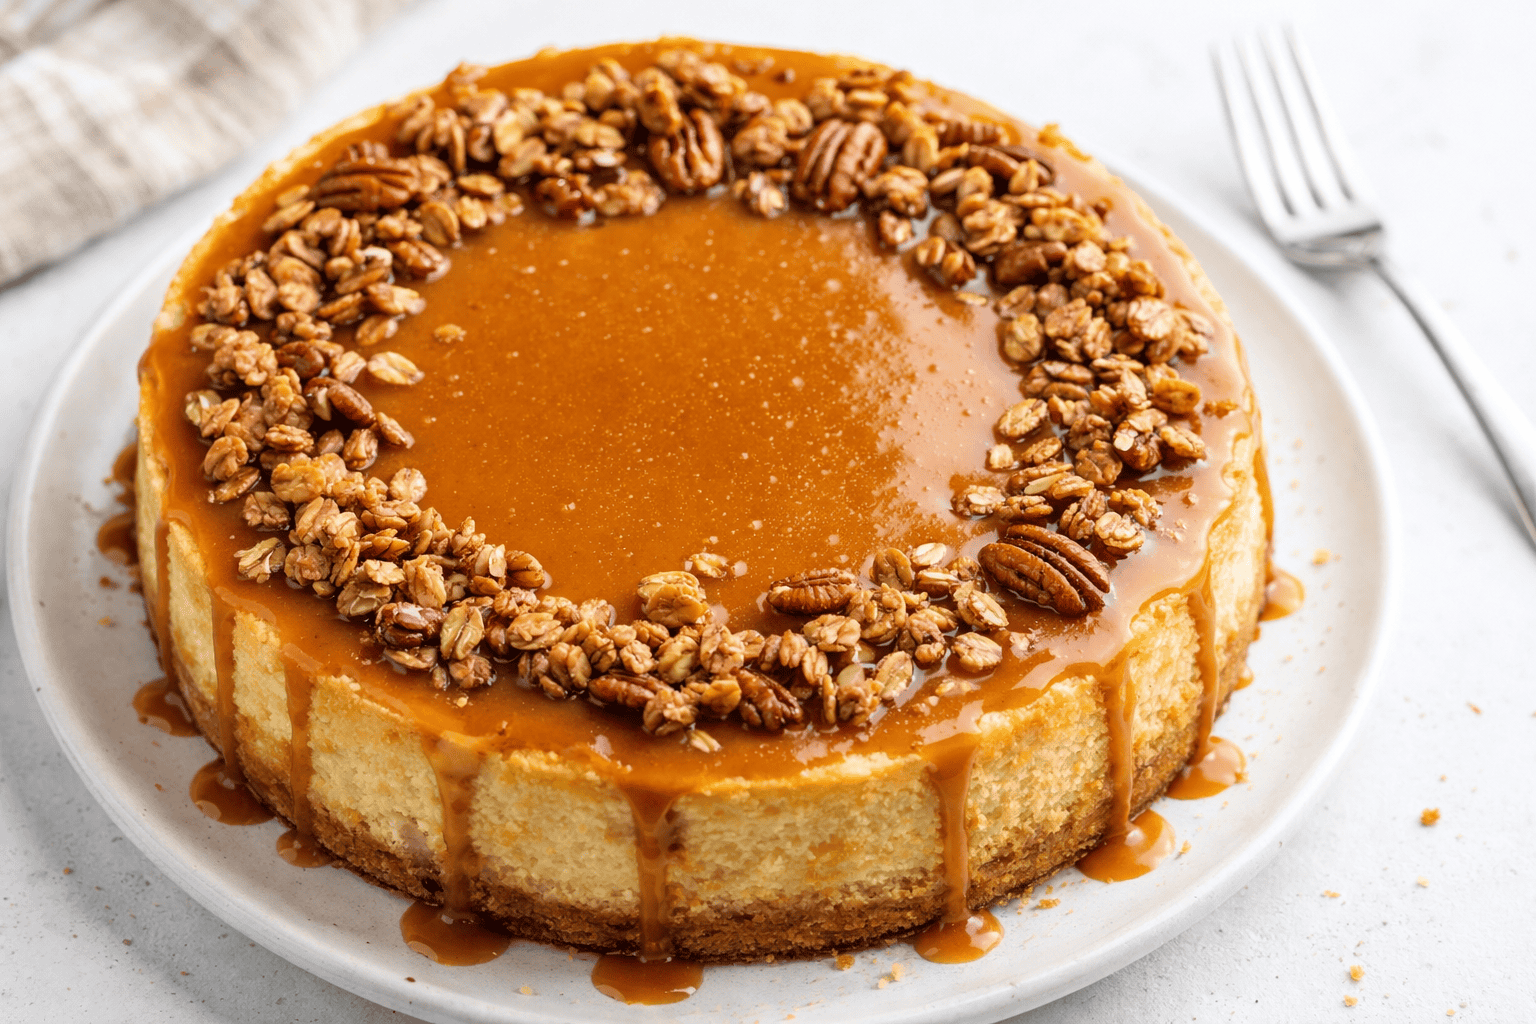
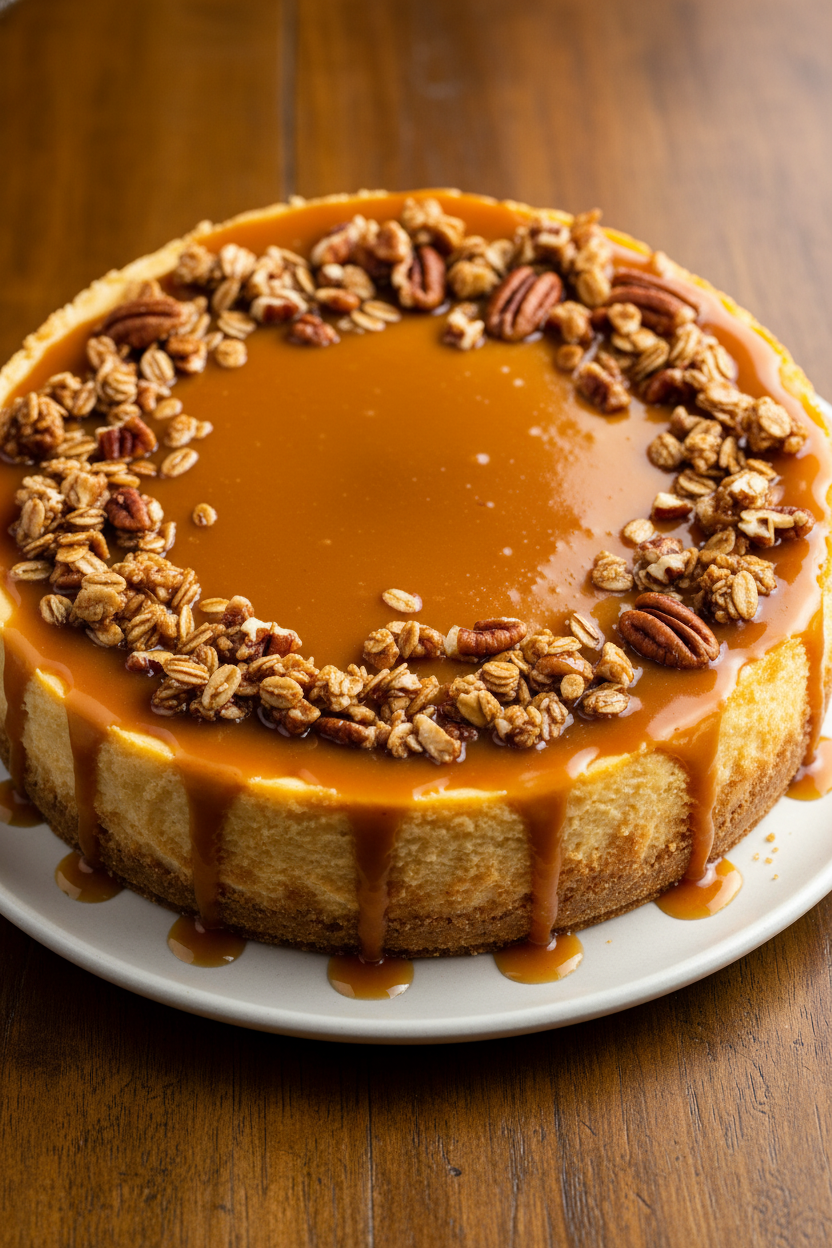
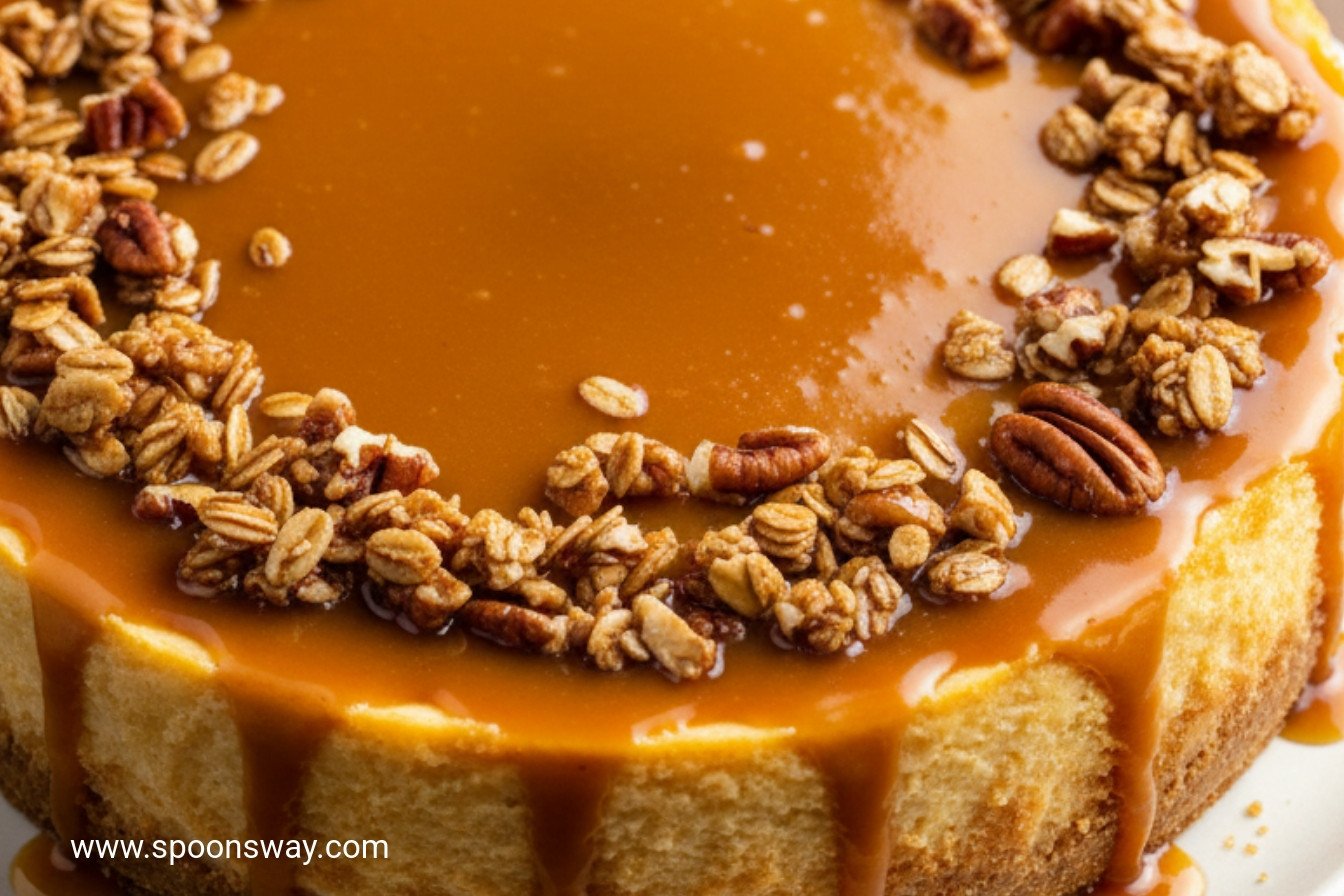
Then we drizzle more syrup on top. We add a ring of granola for fun. It looks so pretty. Do you prefer your desserts super sweet or just a little sweet? I am always curious.
Your Turn in the Kitchen
Do not worry about air bubbles. Tapping the pan helps. Then just drag a fork across the top. It pops those little bubbles right up. It is like playing connect-the-dots with your cake.
The hardest part is waiting. It needs to chill for hours. But good things take time. Slice it with a warm knife for clean pieces. What kitchen task makes you the most patient? For me, it is waiting for bread to rise.
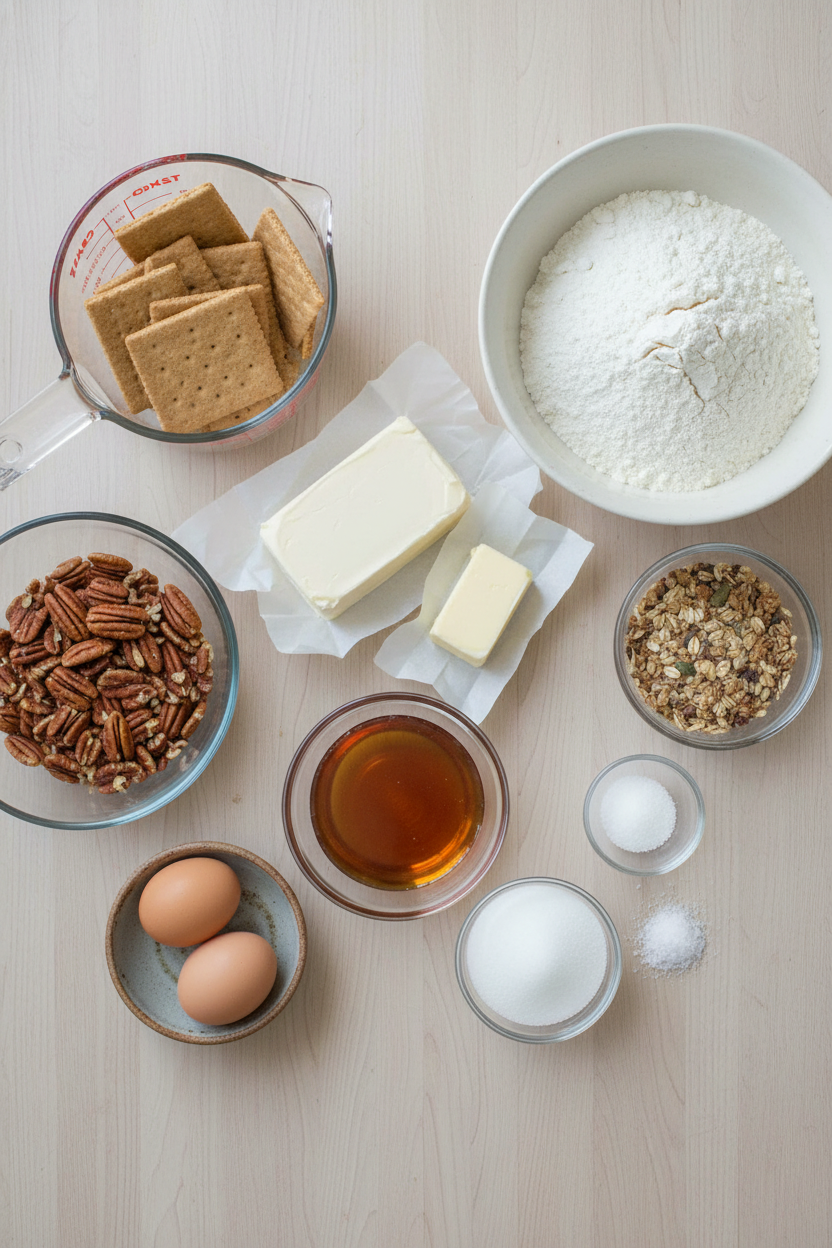
Ingredients:
| Ingredient | Amount | Notes |
|---|---|---|
| Crust: | ||
| Graham crackers | 4 whole, broken | |
| Pecans | ¼ cup | |
| All-purpose flour | ½ cup (2½ oz / 71g) | |
| Sugar | ⅓ cup (2⅓ oz / 66g) | |
| Table salt | ¼ teaspoon | |
| Unsalted butter, melted | 4 tablespoons | |
| Cheesecake: | ||
| Cream cheese, softened | 2 pounds (907g) | |
| Maple syrup | 1 ¼ cups | For the batter |
| Large eggs | 4 | |
| Topping: | ||
| Granola | ⅓ cup | |
| Maple syrup | ½ cup | For drizzling |
My Maple Kissed Cheesecake
Hello, my dear. Come sit at the counter. I want to tell you about my favorite cheesecake. It tastes like a cozy autumn morning. The maple syrup makes it sweet, but not too sweet. The little bit of granola on top gives a nice crunch. I first made this for my grandson’s birthday. He still asks for it every year. Doesn’t that smell amazing? Let’s bake it together.
Step 1: First, we make the crust. Crumble the graham crackers and pecans in the food processor. It will look like sandy dirt. Add the flour, sugar, and salt. Give it a few quick pulses. Now, pour in the melted butter. Pulse it until it looks like wet sand. Press this mixture firmly into your pan. Bake it until it smells toasty. I still laugh at that. It will make your whole kitchen smell like heaven.
Step 2: Let that crust cool completely. Now, for the fun part. Wipe out your processor bowl. Add the soft cream cheese and maple syrup. Process it until it’s perfectly smooth. You must scrape down the sides. Then, with the machine running, add the eggs one by one. Go slowly. This makes the filling silky. (My hard-learned tip: Make sure your cream cheese is very soft. Cold cheese makes lumpy batter!). Pour this creamy dream onto your cool crust.
Step 3: Tap the pan firmly on the counter. This gets rid of big air bubbles. Let it sit for ten minutes. Little bubbles will rise to the top. Gently drag a fork across the surface to pop them. This keeps the top pretty. Now, bake it low and slow. This is the secret to no cracks! It takes about three hours at a very low temperature. The center should still have a little jiggle. What’s the secret to a crack-free top? Share below!
Step 4: Patience is key here. Let the cake cool on a rack for two hours. Then, it needs a long nap in the fridge. At least six hours, dear. I know it’s hard to wait. Once it’s cold, run a thin knife around the edge. Then, carefully remove the pan’s side. To serve, sprinkle granola around the edge. Drizzle more maple syrup in the middle. Use the back of a spoon to spread it. It looks so beautiful.
Cook Time: About 3 hours 20 minutes (plus cooling)
Total Time: About 12 hours (mostly unattended)
Yield: 10-12 servings
Category: Dessert, Cheesecake
Three Sweet Twists to Try
This recipe is like a good friend. It’s happy to change its outfit. Here are a few fun ideas for next time. I love playing with flavors. It keeps things exciting in my kitchen.
Apple Pie Swirl: Swirl spiced apple butter into the batter before baking.
Salty Pretzel Crust: Swap graham crackers for crushed pretzels. Sweet and salty!
Orange Blossom: Add a teaspoon of orange zest to the filling. So bright and sunny.
Which one would you try first? Comment below!
Serving It With Style
A slice of this cheesecake is a celebration all by itself. But I love making it feel extra special. A little garnish goes a long way. It makes everyone feel loved. Here’s how I like to serve it.
Place each slice on a pretty plate. Add a few fresh berries on the side. A tiny dollop of whipped cream never hurts. For drinks, a cup of strong coffee is perfect. The bitterness balances the sweet maple. For a festive touch, a glass of amber rum or bourbon pairs wonderfully. Which would you choose tonight?
Keeping Your Cheesecake Happy
This cheesecake loves a cold fridge. Wrap it tight for up to four days. For longer, freeze it whole or in slices. Wrap slices in plastic, then foil. They keep for a month. Thaw in the fridge overnight. I once froze a slice for my grandson’s visit. He said it tasted just-made! This matters because good food shouldn’t be rushed. Storing it right means sweet treats anytime. Have you ever tried storing it this way? Share below!
Smooth Sailing for Your Cheesecake
First, a cracked top. This happens if you bake it too hot. The slow, low heat in our recipe prevents this. I remember my first cracked cheesecake. I was so disappointed! Second, a soggy crust. Always let your crust cool completely before adding filling. A warm crust turns soft. Third, lumps in the batter. Your cream cheese must be very soft. Beat it until perfectly smooth. Getting it right builds your kitchen confidence. It also makes every bite creamy and dreamy. Which of these problems have you run into before?
Your Cheesecake Questions, Answered
Q: Can I make this gluten-free? A: Yes! Use gluten-free graham crackers for the crust.
Q: Can I make it ahead? A: Absolutely. Make it up to two days before serving.
Q: No pecans? A: Use more crackers or try rolled oats instead.
Q: Can I make a smaller one? A: Halve the recipe. Use a 7-inch pan. Bake time may be less.
Q: Any extra tip? A: Let slices sit out for 30 minutes before eating. *Fun fact: This lets the maple flavor really sing!* Which tip will you try first?
From My Kitchen to Yours
I hope this recipe brings you joy. Baking is about sharing love. It is about creating sweet memories. I would love to hear about your kitchen adventure. Tell me about your family’s smiles. Have you tried this recipe? Share your experience in the comments. Your story might help another cook. Thank you for spending time with me today. Happy cooking!
—Grace Ellington.
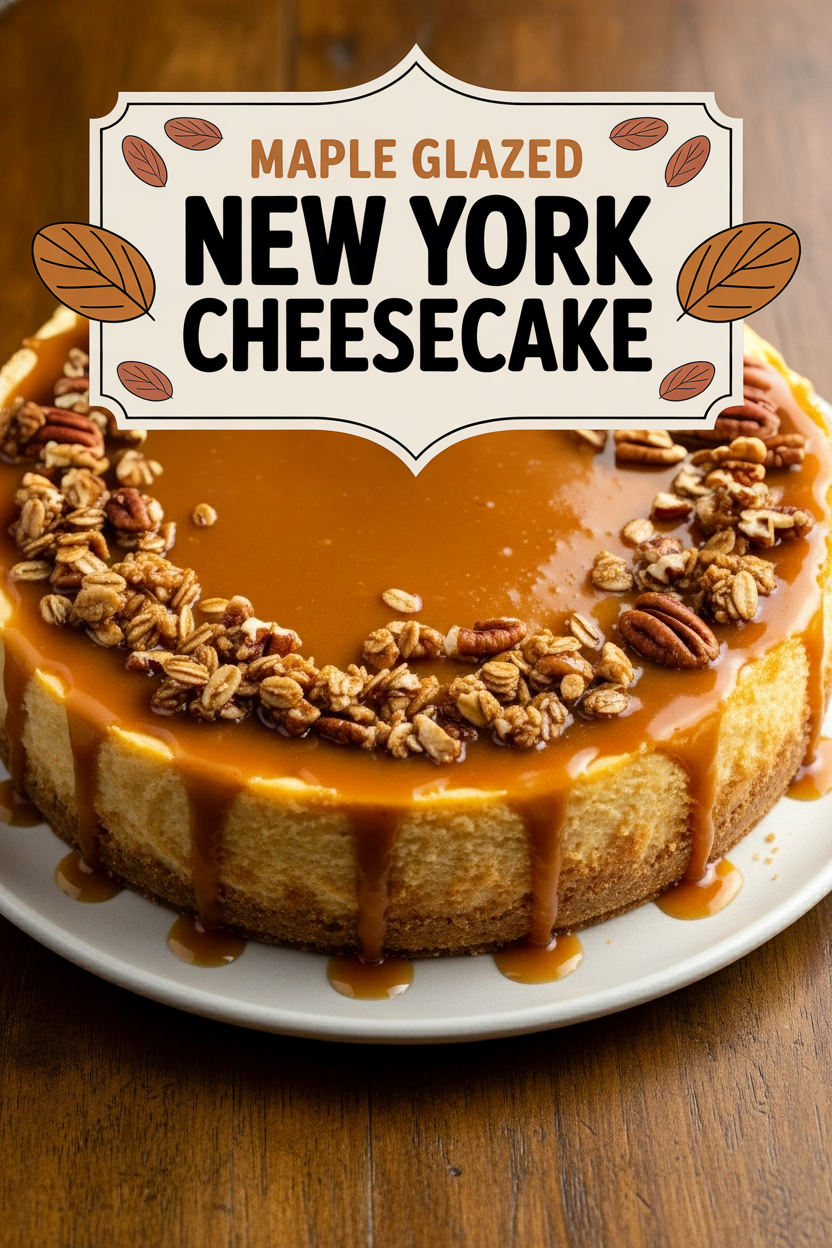
Maple Glazed New York Cheesecake
Description
Maple Cheesecake
Ingredients
Crust:
Cheesecake:
Topping:
Instructions
- Adjust oven rack to middle position and heat oven to 325 degrees. Grease bottom and side of 9-inch springform pan. Process cracker pieces and pecans in food processor until finely ground, about 30 seconds. Add flour, sugar, and salt and pulse to combine, about 2 pulses. Add melted butter and pulse until crumbs are evenly moistened, about 5 pulses.
- Using your hands, press crumbs into even layer on prepared pan bottom. Using bottom of dry measuring cup, firmly pack crumbs into pan. Bake until crust smells toasty and is browned around edges, about 18 minutes. Reduce oven temperature to 225 degrees. Let crust cool completely.
- In clean, dry processor bowl, process cream cheese and maple syrup until smooth, about 2 minutes, scraping down sides of bowl as needed. With processor running, add eggs, one at a time, until just incorporated, about 30 seconds total. Pour batter onto cooled crust.
- Firmly tap pan on counter and set aside for 10 minutes to allow air bubbles to rise to top. Gently draw tines of fork across surface of batter to pop air bubbles that have risen to surface.
- Once oven has reached 225 degrees, bake cheesecake on aluminum foil–lined rimmed baking sheet until edges are set and center jiggles slightly when shaken and registers 165 degrees ½ inch below surface, about 3 hours.
- Transfer pan to wire rack and let cool completely, about 2 hours. Refrigerate cheesecake, uncovered, until cold, about 6 hours. (Once fully chilled, cheesecake can be covered with plastic wrap and refrigerated for up to 4 days.)
- To unmold cheesecake, run tip of paring knife between cake and side of pan; remove side of pan. Slide thin metal spatula between crust and pan bottom to loosen, then slide cheesecake onto serving platter. Let cheesecake stand at room temperature for 30 minutes.
- Sprinkle granola around top edge of cheesecake. Drizzle maple syrup inside ring of granola. Spread with back of spoon, as needed, to fill area inside granola ring.
- Warm knife under hot water, then wipe dry. Cut cheesecake into wedges and serve.
Notes
- Nutritional information is an estimate based on 12 servings, calculated using standard ingredient databases. Actual values may vary.

