The Heart of the Cookie
Every great cookie has a heart. For these, it’s a sweet, creamy surprise. You make it first and freeze it solid. This little step is so important. It keeps the filling from melting too fast.
I think of it like tucking a cold, sweet secret into a warm, red hug. My grandson calls them “cookie presents.” I still laugh at that. What do you call a cookie with a hidden center?
A Splash of Red & A Pinch of Wheat
The dough is a beautiful red. The food coloring makes it fun. But the real magic is in the flours. We use a bit of whole-wheat with the regular flour.
This gives the cookie a stronger body. It needs to hold that creamy heart! *Fun fact: Adding whole-wheat flour also gives a tiny, nice nutty taste. You might not even notice it, but it helps.*
Getting Your Hands in There
The dough gets stiff. That’s okay. The recipe says you can use your hands. I always do. Feeling the dough come together is the best part.
It’s soft and a little sticky. It turns your fingers a cheerful pink. Doesn’t that smell amazing? The cocoa and lemon zest are a wonderful pair. Do you like mixing with a spoon or with your hands?
The Big Wrap
Now, you wrap the frozen heart. Flatten the dough into a small circle. Place the cream cheese disk right in the middle. Gently pull the edges up and seal it tight.
You must work quickly. You want the filling to stay cold. The first time I made these, I was too slow. My filling got soft and messy. It was a pink kitchen! But even messy cookies taste good.
Why the Hot, Fast Bake?
The oven is very hot for these cookies. They bake for only 7 or 8 minutes. This high heat makes the edges set fast. It gives you a perfect cookie.
The outside gets slight cracks. The inside stays soft. And the creamy heart? It melts just enough. It becomes a perfect, velvety bite. This matters because patience is key. You must let them cool for two full hours. It’s hard to wait, but it’s worth it.
Sharing the Sweetness
Food is for sharing. These cookies are a special treat. Making them shows you care. That is the most important ingredient of all.
It’s a little project, but a joyful one. What is your favorite cookie to make for someone you love? Tell me about it. I’d love to know.
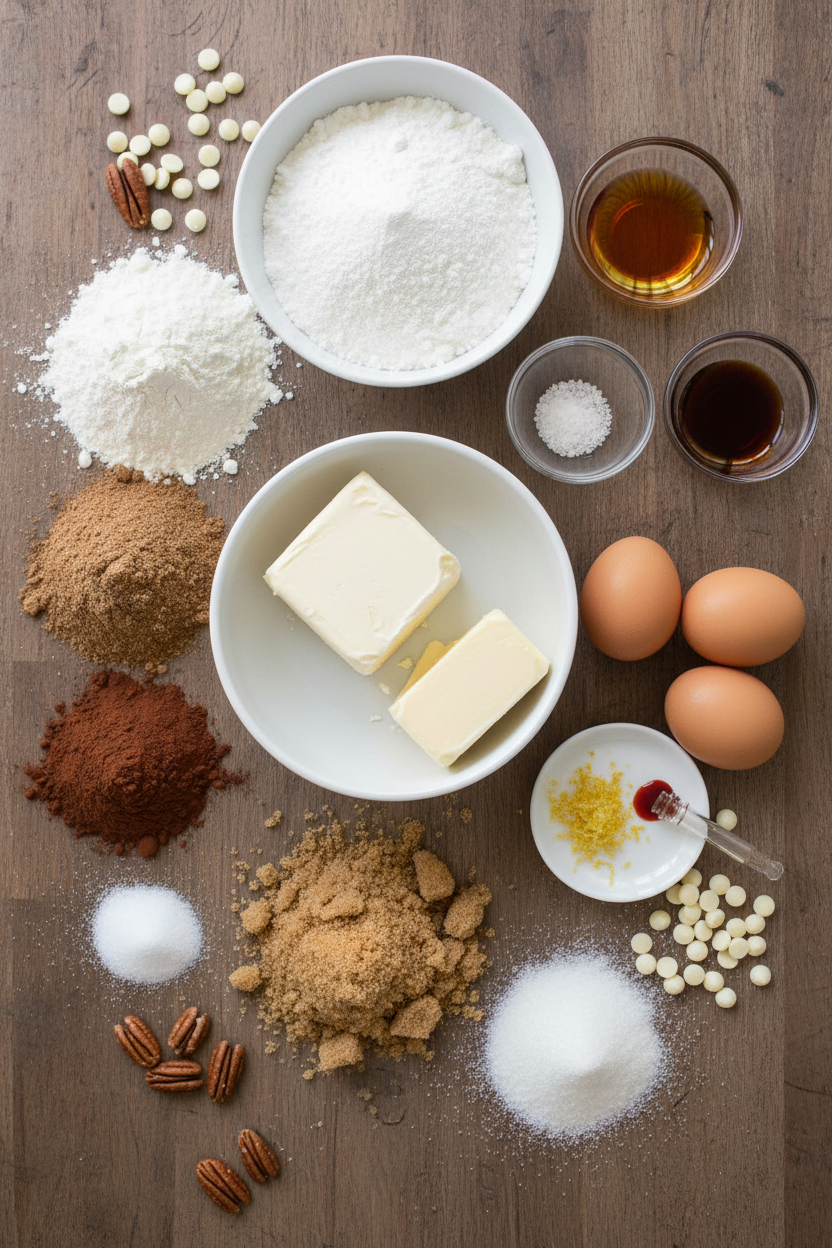
Ingredients:
| Ingredient | Amount | Notes |
|---|---|---|
| Confectioners’ sugar | ½ cup (2 oz / 57 g) | For the filling |
| Cream cheese | 4 oz (113 g), softened | For the filling |
| Unsalted butter | 2 tbsp, softened | For the filling |
| Table salt | 1 pinch | For the filling |
| Vanilla extract | ⅛ tsp | For the filling |
| All-purpose flour | 2⅔ cups (13⅓ oz / 378 g) | For the cookies |
| Whole-wheat flour | ⅔ cup (3⅔ oz / 104 g) | For the cookies |
| Unsweetened cocoa powder | 1 tbsp | For the cookies |
| Table salt | 1¼ tsp | For the cookies |
| Baking soda | 1 tsp | For the cookies |
| Unsalted butter | 16 tbsp, melted | For the cookies |
| Light brown sugar | 1 cup packed (7 oz / 198 g) | For the cookies |
| Granulated sugar | ½ cup (3½ oz / 99 g) | For the cookies |
| Eggs | 2 large | For the cookies |
| Lemon zest | 1½ tsp, grated | For the cookies |
| Vanilla extract | 2 tsp | For the cookies |
| Red food coloring | 1 tbsp | For the cookies |
| White chocolate chips | 1 cup (6 oz / 170 g) | For the cookies |
| Pecans | ½ cup, finely chopped | For the cookies |
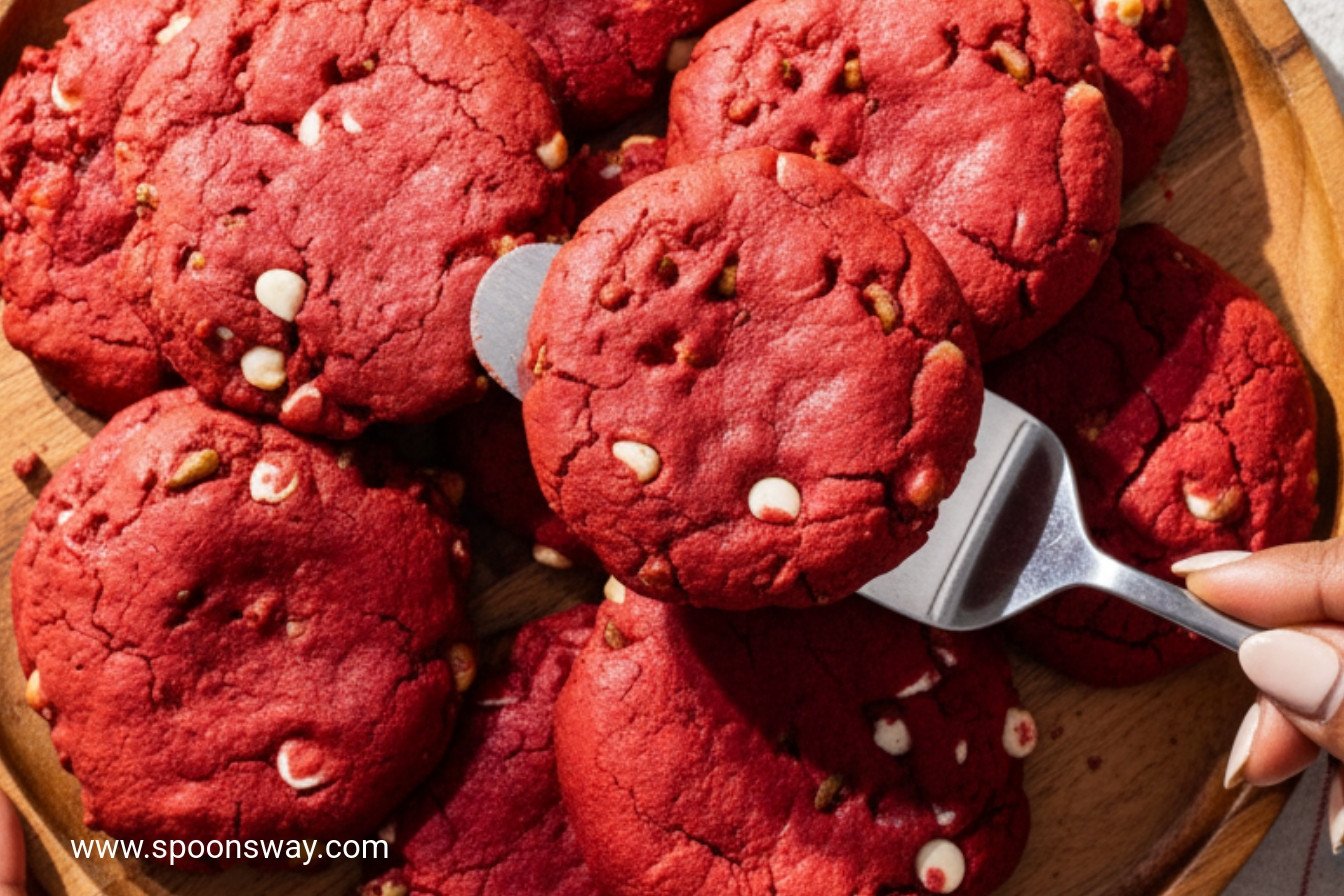
My Secret Stuffed Red Velvet Cookies
Hello, my dear. Come sit at the counter. I want to share my special cookie recipe. These are not just any cookies. They are soft red velvet cookies with a creamy surprise inside. I first made them for my grandson’s birthday. His eyes got so wide when he bit into one! I still laugh at that. Making them is like a little kitchen magic trick. Let’s begin.
Step 1: First, we make the secret filling. Put the soft cream cheese, butter, sugar, salt, and vanilla in a bowl. Mix it until it’s fluffy and smooth. Doesn’t that smell amazing? Scoop it into twelve little piles on a plate. Flatten each pile into a tiny disk. Now, pop the whole plate into the freezer. It needs to get very firm. (My hard-learned tip: Freeze them solid! A soft filling will leak right out in the oven.)
Step 2: Time for the cookie dough. Whisk your flours, cocoa, salt, and baking soda together. In another bowl, mix the melted butter and sugars. Then whisk in the eggs, lemon zest, vanilla, and that bright red color. It will look like glossy paint! Stir in the flour mixture. Finally, fold in the white chocolate chips and pecans. The dough will be thick. I always finish mixing it with my hands. It feels wonderful.
Step 3: Divide the dough into twelve balls. Flatten each one into a small pancake. Now for the magic! Take one frozen filling disk. Place it right in the center of a dough circle. Gently wrap the dough up and around it. Pinch it closed and shape it into a smooth, thick disk. Be sure the filling is sealed inside. Place six cookies on each baking sheet. Quick quiz: Why do we freeze the filling first? Share below!
Step 4: Bake one sheet at a time. A hot 425-degree oven is the secret. Bake for just 7 to 8 minutes. You’ll see the edges puff and get little cracks. They might look a bit soft in the middle. That’s perfect! Let them cool completely on the sheet. This is the hardest part—waiting! But it makes the centers set up just right. Then, take a bite. The creamy middle is the best reward.
Cook Time: 8 minutes per batch
Total Time: About 4 hours (includes chilling & cooling)
Yield: 12 big, beautiful cookies
Category: Dessert, Cookies
Let’s Get Creative With Your Cookies!
Once you master the basic recipe, try a fun twist. It makes baking feel like play. Here are three ideas I love.
- Valentine’s Swirl: Use pink food coloring instead of red. Mix a few drops into the filling too!
- Chocolate Lover’s Dream: Swap the white chocolate chips for dark chocolate. Use a chocolate cream cheese filling.
- Orange Zest Sparkle: Use orange zest instead of lemon. Add a sprinkle of orange zest on top after baking.
Which one would you try first? Comment below!
Serving Up Sweet Memories
These cookies are a celebration all by themselves. For a real treat, serve one slightly warm. The filling gets wonderfully soft. Place it on a pretty little plate. A dusting of powdered sugar looks like snow. For a party, put them on a cake stand. They look so fancy! A glass of cold milk is the classic pairing. For the grown-ups, a small glass of creamy sherry is lovely. It tastes like my grandmother’s house. Which would you choose tonight? I think I’ll have mine with a big glass of milk. Just like my grandson does.

Keeping Your Cookies Happy
Let’s talk about keeping these cookies fresh. They are best the day you bake them. But they will keep for two days in an airtight container. Just keep them at room temperature.
You can freeze the baked cookies for up to a month. Wrap each one tightly in plastic wrap. I remember my first batch disappeared too fast. So I started freezing half the dough balls.
This is a great batch-cook trick. Make the filling and dough ahead. Freeze them separately on a tray. Then pop the frozen pieces into a bag. You can bake just a few anytime.
This matters because fresh cookies bring instant joy. Having them ready means you’re always prepared for surprise guests. Or a sudden sweet tooth! Have you ever tried storing cookie dough this way? Share below!
Cookie Troubles? Easy Fixes!
Sometimes cookies spread too much. Your dough might be too warm. Just chill it for 30 minutes before baking. This helps them keep their pretty shape.
The filling can leak out while baking. I remember this happening to me once. The key is to make sure the frozen filling disk is completely sealed inside. Pinch the dough well.
Your cookies might not be very red. Do not be shy with the food coloring! A full tablespoon gives that classic, cheerful look. Fun fact: red velvet originally got its color from beet juice!
Fixing small problems builds your cooking confidence. It also makes sure every bite is delicious. Which of these problems have you run into before?
Your Quick Questions, Answered
Q: Can I make these gluten-free? A: Yes! Use your favorite gluten-free flour blend. Replace both the all-purpose and whole-wheat flour with it.
Q: How far ahead can I make the dough? A: You can make it two days ahead. Keep it covered in the fridge. Let it soften a bit before shaping.
Q: I don’t have pecans or white chocolate. A: That’s fine! Use any nut you like. Or use milk chocolate chips instead. Make it your own.
Q: Can I make a smaller batch? A: Absolutely. Just cut all the ingredients in half. You will get six wonderful cookies.
Q: Any optional tips? A: A little sprinkle of sea salt on top before baking is lovely. Which tip will you try first?
From My Kitchen to Yours
I hope you love making these special cookies. Baking is about sharing warmth and creating smiles. It is one of my greatest joys.
I would love to hear about your baking adventure. Tell me about the people you shared them with. Or about your own little twist on the recipe.
Have you tried this recipe? Share your experience in the comments below. Thank you for spending this time with me in my kitchen.
Happy cooking!
—Grace Ellington

Cream Cheese Stuffed Red Velvet Cookies
Description
Stuffed Red Velvet Cookies
Ingredients
Filling:
Cookies:
Instructions
- For the filling: Using stand mixer fitted with paddle, beat all ingredients on low speed until sugar is mostly moistened, about 1 minute. Increase speed to medium-high and beat until fluffy and smooth, 2 to 3 minutes, scraping down bowl as needed.
- Line rimmed baking sheet or large, flat plate with parchment paper. Using tablespoon measure and small spoon (or #60 scoop), divide filling into 12 equal portions on prepared plate. Use back of spoon to lightly flatten each portion into rough disk shape (no greater than 1½ inches in diameter). Freeze until solid, at least 2 hours. (Filling can be frozen for up to 1 week.)
- For the cookies: Adjust oven rack to middle position and heat oven to 425 degrees. Line 2 rimmed baking sheets with parchment paper. Whisk all-purpose flour, whole-wheat flour, cocoa, salt, and baking soda together in large bowl.
- Whisk melted butter, brown sugar, and granulated sugar in second large bowl until smooth. Whisk in eggs, lemon zest, vanilla, and food coloring until smooth and creamy, about 30 seconds. Stir in half of flour mixture with rubber spatula or wooden spoon. Stir in chocolate chips, pecans, and remaining flour mixture. (Mixture will be stiff; once dough begins to stiffen, you can mix with your hands until dough is evenly combined.)
- Divide dough into 12 equal portions (about 3½ ounces; 99 grams; or ⅓ cup each). Flatten each dough portion into disk shape, about 3 inches in diameter. Working quickly, place 1 disk of frozen filling in center of each dough disk. Wrap edges of dough up and around filling, seal dough, and shape into smooth disk shape (about 3½ inches in diameter and ½ inch thick), taking care to ensure filling remains in center of each cookie. Space cookies evenly on prepared sheets, 6 cookies per sheet.
- Bake cookies, 1 sheet at a time, until edges of cookies are beginning to puff and crack, 7 to 8 minutes. Let cookies cool completely on sheets, about 2 hours. Serve.
Notes
- Ensure the cream cheese filling is frozen solid for easier handling. The cookies will be very soft when they first come out of the oven; they firm up as they cool completely on the baking sheets.

