The Secret is in the Waiting
Let me tell you about these short ribs. They teach you patience. You cook them low and slow one day. Then you must walk away. You put the whole pot in the fridge overnight. I know, waiting is hard! But it makes all the difference.
The next day, you lift off a layer of solid fat. It comes off like a lid. This leaves you with pure, rich flavor underneath. Why does this matter? That waiting time lets the flavors get to know each other. They become best friends in that cold, dark fridge. Do you have a hard time waiting for a treat to be ready? I sure do.
A Sweet and Tangy Hug
The glaze is like a sweet, tangy hug for the meat. You cook down the braising liquid. Then you add balsamic vinegar and molasses. Doesn’t that smell amazing? It gets thick and shiny.
*Fun fact: Molasses is what’s left after sugar is made from cane juice. It gives a deep, warm sweetness. The miso and soy sauce are the quiet heroes. They add a salty, savory depth you can’t quite name. Why does this matter? Balancing sweet, salty, and tangy makes every bite interesting. Your tongue gets a little party.
My First Time
I remember the first time I made these. I was so nervous. I thought I had ruined it. The meat looked so dark after braising! But after the night in the fridge, and that hot oven finish, magic happened. The outside got sticky and crisp. The inside was like butter. I still laugh at how worried I was.
That final blast of heat is crucial. You brush and turn the ribs every five minutes. This builds a gorgeous, glossy coat. It’s a little work, but so worth it. What’s a recipe that made you nervous to try? Tell me about it.
Making it Your Own
This recipe is wonderfully forgiving. Don’t have fresh thyme? A teaspoon of dried works. No red wine? Use all beef broth. The goal is to create a cozy, flavorful liquid for the meat to swim in. Your kitchen, your rules.
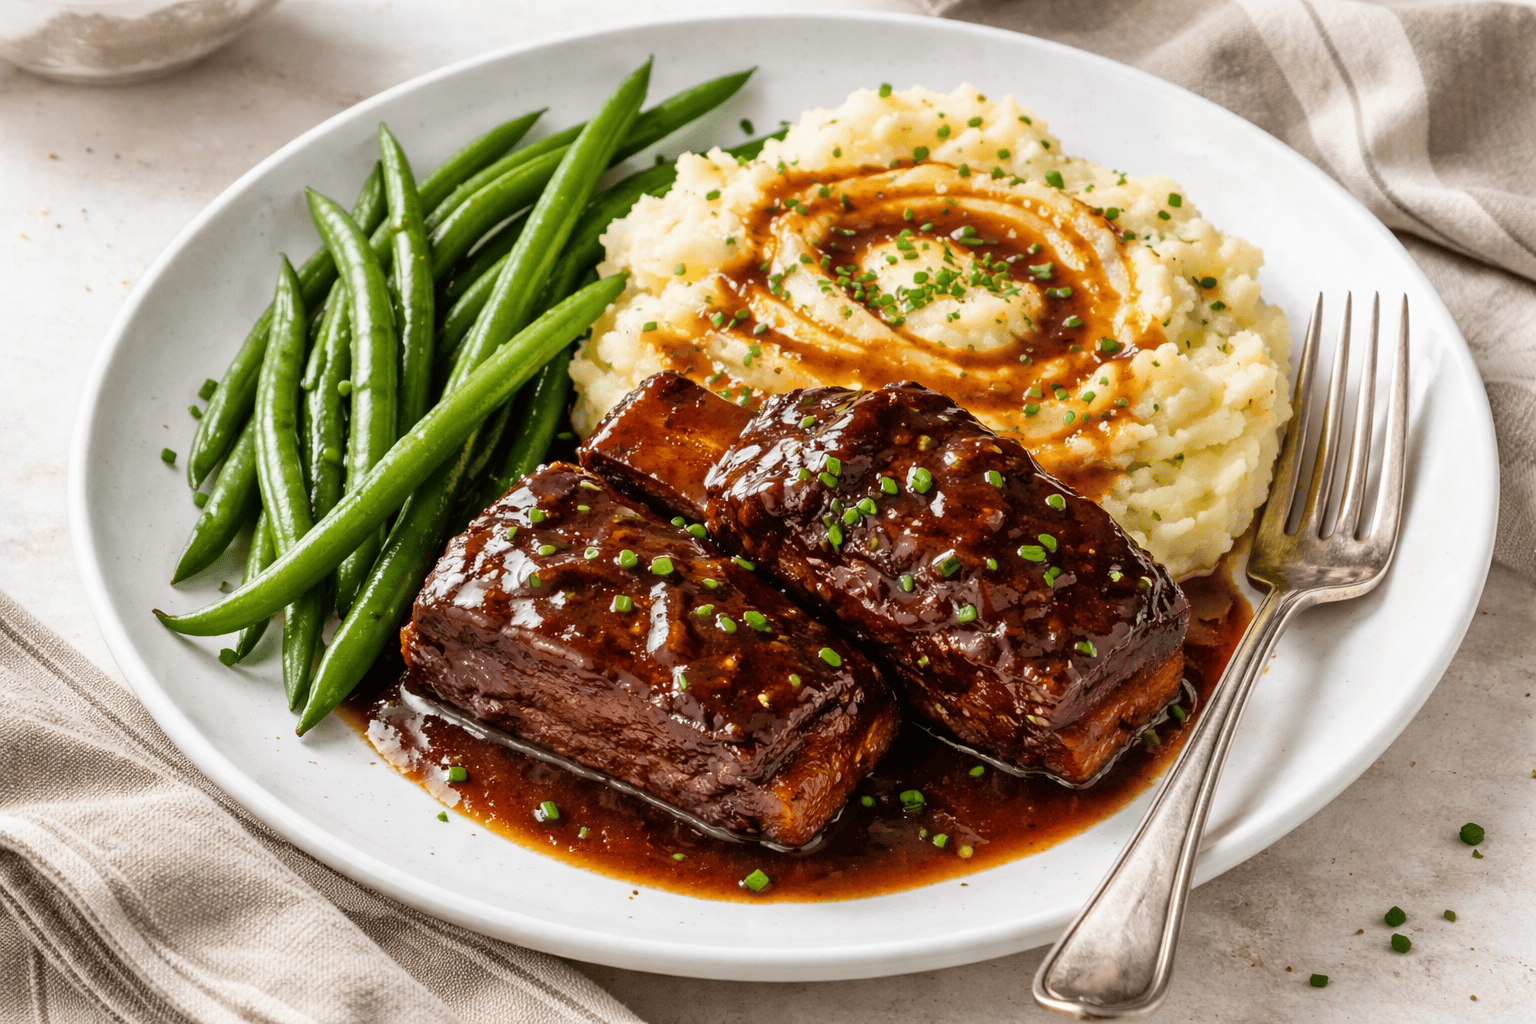
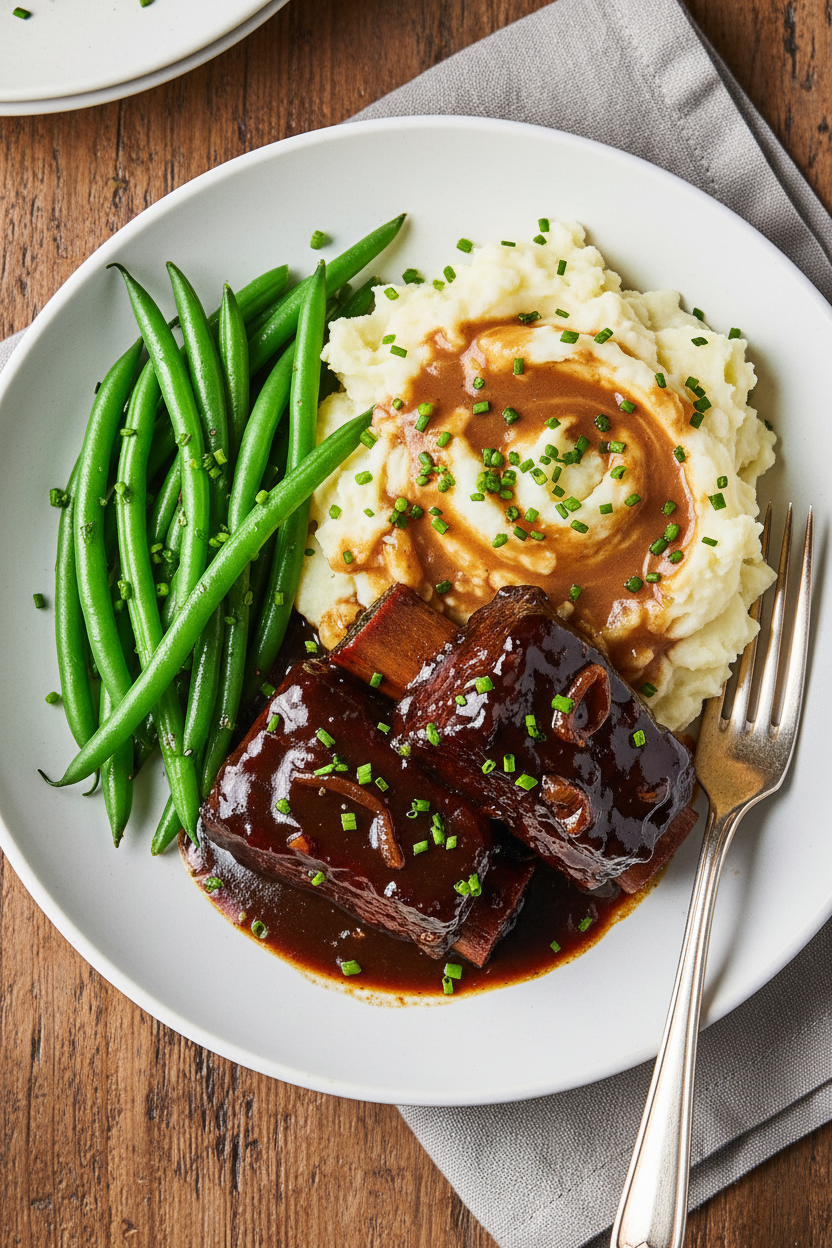
I love to serve these over creamy mashed potatoes. The glaze runs into the potatoes. It’s the best part. What would you serve them with? Buttered noodles? A pile of rice? I’d love to hear your ideas.
A Lesson for the Table
Some foods are meant to be shared. This is one of them. It’s not a quick Tuesday night meal. It’s a Sunday supper. A birthday dinner. It says, “I have time for you.”
That’s the real magic of cooking. It’s not just about food. It’s about the care you put in. It’s about the people gathered around. Who would you love to make this meal for? Picture their happy face when they take that first bite. That’s the best reward.
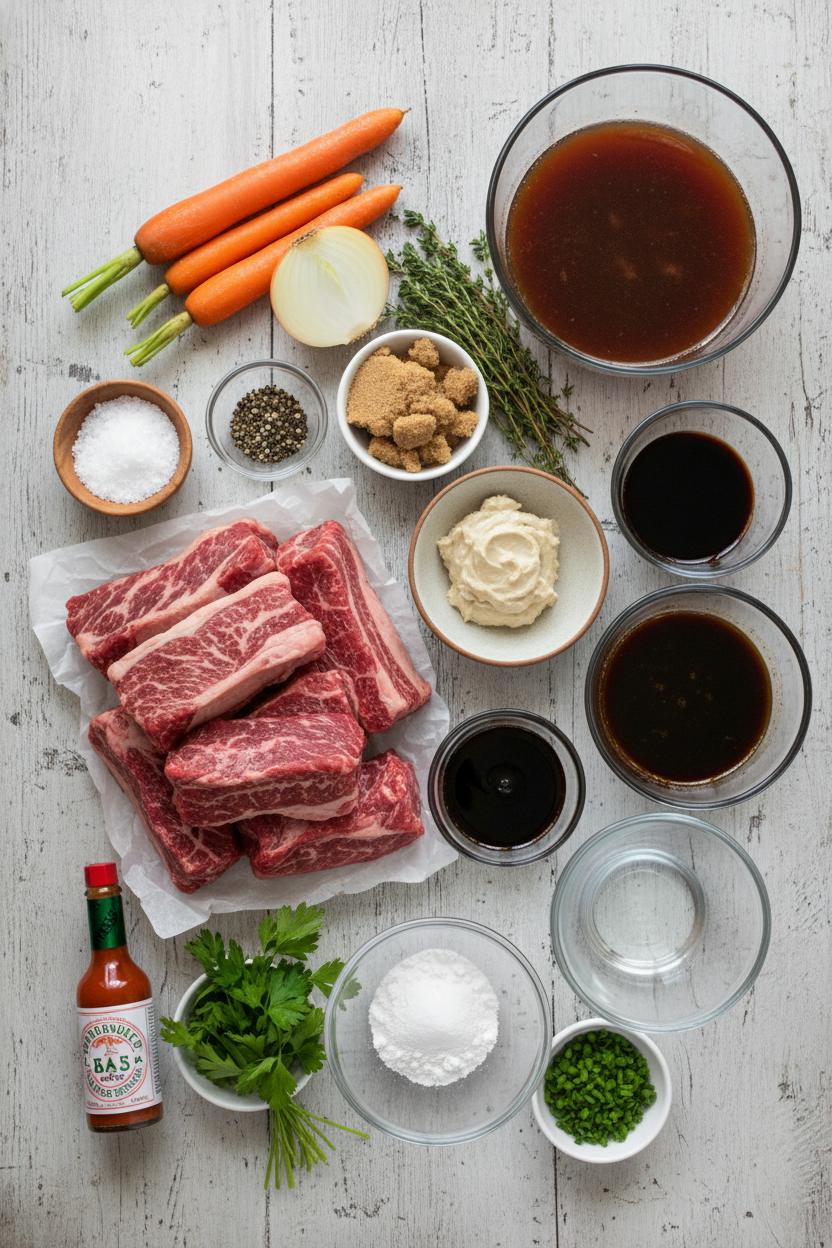
Ingredients:
| Ingredient | Amount | Notes |
|---|---|---|
| Boneless beef short ribs, trimmed | 4 pounds | |
| Kosher salt | 4 teaspoons | |
| Pepper | 2 teaspoons | |
| Beef broth | 2 cups | |
| Dry red wine | 2 cups | |
| Packed brown sugar | 3 tablespoons | |
| White miso | 2 tablespoons | |
| Soy sauce | 2 tablespoons | |
| Large onion | 1 | Halved and sliced thin |
| Carrots | 2 | Peeled and sliced ¼ inch thick |
| Fresh thyme | 6 sprigs | |
| Balsamic vinegar | ⅓ cup | |
| Molasses | 3 tablespoons | |
| Cornstarch | 2½ teaspoons | |
| Water | 2 teaspoons | |
| Hot sauce | 1½ teaspoons | |
| Fresh parsley or chives, minced | 2 tablespoons | For garnish |
My Cozy Kitchen Ribs: A Two-Day Love Story
Hello, my dear. Come sit. Let’s talk about these amazing short ribs. They are a two-day project, but don’t let that scare you. Good things take a little patience. The first day fills your whole house with the most wonderful smell. Doesn’t that smell amazing? The second day is for the magic glaze. I promise, it’s worth the wait.
We start by getting cozy. Your oven needs to be very low and gentle. We are not rushing the meat. We are letting it relax in a warm bath of broth and wine. This slow cooking makes the ribs so tender. You will not believe it. A fork will slide right in, like butter.
Step 1: Heat your oven to 275 degrees. Dry your ribs with a paper towel. Sprinkle them all over with salt and pepper. This is our first little flavor hug for the meat.
Step 2: In your big Dutch oven, whisk the broth, wine, brown sugar, miso, and soy sauce. Add the sliced onion, carrots, and thyme sprigs. Now, nestle the ribs down into that liquid. They should be almost covered. Bring it to a simmer on the stove, put the lid on, and slide it into the oven. Let it cook for about 2 ½ hours. Turn the ribs halfway through. (My hard-learned tip: Don’t peek too often! You let the heat escape.)
Step 3: When the meat is fork-tender, let the whole pot cool on the counter. Then, cover it and put it in the fridge overnight. This rest makes the flavor deep and rich. It also lets the fat rise to the top and harden. What’s the best part of making a recipe over two days? Share below!
Step 4: The next day, scrape off the solid fat from the top. Take the ribs out and put them on a plate. Strain the braising liquid into a bowl, pressing on the veggies. You only need 3 cups of this liquid for the glaze. Simmer it in a saucepan until it’s just 1 cup. It will look shiny and beautiful. Then, stir in the balsamic vinegar and molasses.
Step 5: Mix the cornstarch with a little water. Stir this into your glaze and simmer for two more minutes. It will get a little thicker, perfect for brushing. Stir in the hot sauce last. This adds just a tiny kick. I still laugh at the first time I forgot the hot sauce. My grandson said it was “too polite.”
Step 6: Heat your oven to 450 degrees now. Line a baking sheet. Pat your cold ribs very dry. This helps the glaze stick! Brush them all over with your warm glaze. Be generous.
Step 7: Roast the ribs for 20-25 minutes. Every five minutes, brush on more glaze and turn them. Give them one last brush when they come out. Sprinkle with fresh parsley or chives. Serve with the extra glaze on the side for dipping.
Cook Time: 3 hours (active) + overnight rest
Total Time: About 24 hours
Yield: 6 servings
Category: Dinner, Special Occasion
Let’s Get Creative With Your Ribs
Once you know the basic recipe, you can play. I love to change things up depending on the season or who’s coming for dinner. Here are three of my favorite twists. They are all simple and fun.
Sweet & Smoky Swap: Use maple syrup instead of molasses. Add a pinch of smoked paprika to the glaze.
Herb Garden Version: Use fresh rosemary instead of thyme. Stir a spoonful of orange marmalade into the glaze at the end.
Cozy Mushroom Twist: Skip the carrots. Add a handful of sliced mushrooms to the pot with the onions. They soak up all that wonderful juice.
Which one would you try first? Comment below! I always love to hear your ideas.
The Perfect Plate & Pour
These ribs are the star. So, let’s build a plate around them that feels just right. You want something creamy and something green to balance the rich, sticky meat. It makes for a happy dinner plate.
For sides, I always go for creamy mashed potatoes. They are perfect for catching that extra glaze. Or, a simple pile of buttery egg noodles. Then, add something crisp like roasted broccoli or a simple green salad. The fresh crunch is so nice.
What to drink? For the grown-ups, a glass of the same red wine you cooked with is lovely. It just fits. For everyone, a sparkling apple cider is my go-to. Its little bubbles cut right through the richness. Which would you choose tonight? I think I’d have a little of both.
Making It Last: Storing and Reheating Your Ribs
This recipe is a two-day friend. That makes it perfect for planning. After braising, let everything cool in the pot. Then, pop it in the fridge overnight. The fat will rise and harden on top. You can easily scoop it off the next day. This step matters. It makes your final glaze rich, not greasy.
You can keep the cooked ribs in their strained liquid for three days. I once made them on a Wednesday for a Saturday supper. They were even better! The flavors had time to get cozy together. You can also freeze the glazed, cooked ribs for a month. Thaw them in the fridge before gently reheating.
To reheat, use a low oven or a covered pan with a splash of broth. This keeps the meat tender. Batch cooking this dish is a smart move. It turns a fancy meal into a simple, ready-to-finish dinner. Have you ever tried storing a dish this way? Share below!
Simple Fixes for Common Hiccups
Even grandmas have kitchen troubles sometimes. Here are three common ones and their easy fixes. First, the meat isn’t falling-apart tender. This means it needed more braising time. Just put it back in the oven for another 20 minutes. Good cooking takes patience. It builds your confidence.
Second, your glaze is too thin. I remember when my first glaze was like soup! The fix is simple. Mix a little more cornstarch with water. Stir it into the simmering glaze. It will thicken right up. A good glaze should coat the back of a spoon nicely.
Third, the outside burns before the inside is hot. Your oven might be too fierce. Try lowering the temperature by 25 degrees. Also, keep brushing on that glaze. It creates a protective, sweet layer. This matters for flavor and texture. Which of these problems have you run into before?
Your Questions, My Answers
Q: Can I make this gluten-free? A: Yes! Use tamari instead of regular soy sauce. Check that your miso is gluten-free too.
Q: Can I make it ahead? A: Absolutely. Follow the recipe through step three. Finish it the next day. It saves time.
Q: What if I don’t have red wine? A: Use more beef broth. Add an extra tablespoon of vinegar for tang.
Q: Can I double the recipe? A: You can. Use a very large pot. The braising time will stay about the same.
Q: Any optional tips? A: Try a *fun fact*: a little orange zest in the glaze is lovely. It adds a bright note. Which tip will you try first?
From My Kitchen to Yours
I hope you love making these short ribs. I love sharing these kitchen stories with you. Cooking is about creating warmth and good memories. Every meal tells a little story. I would love to hear yours.
Tell me about your time in the kitchen. Did your family gather around to smell the glaze? Have you tried this recipe? Share your experience in the comments. Your stories are my favorite thing to read. Thank you for cooking with me today.
Happy cooking!
—Grace Ellington.


Glazed Boneless Beef Short Ribs
Description
Tender, slow-braised beef short ribs finished with a sweet, savory, and tangy glaze for an impressive and flavorful main course.
Ingredients
Instructions
- Adjust oven rack to middle position and heat oven to 275 degrees. Pat beef dry with paper towels and sprinkle with salt and pepper.
- Whisk broth, wine, sugar, miso, and soy sauce together in Dutch oven. Add onion, carrots, and thyme. Nestle short ribs into pot so that they are nearly submerged. Bring to simmer over high heat, cover, and transfer to oven. Cook until fork can be easily slipped in and out of ribs, 2¼ to 2¾ hours, using tongs to turn meat halfway through cooking. Cool ribs completely in braising liquid and refrigerate overnight or up to 3 days.
- Remove solidified fat from top of braising liquid and discard. Transfer ribs to large plate and refrigerate until ready to use. Strain braising liquid through fine-mesh strainer set over large bowl, pressing on solids to extract as much liquid as possible. Discard solids.
- Transfer 3 cups braising liquid to medium saucepan (discard remaining liquid) and bring to simmer over medium-high heat. Cook, stirring occasionally, until reduced to 1 cup, 20 to 25 minutes. Off heat, stir in vinegar and molasses.
- Combine cornstarch and water in bowl. Stir cornstarch mixture into glaze and bring to simmer over medium heat. Cook until slightly thickened, about 2 minutes. Stir in hot sauce and set aside to cool slightly.
- While glaze cools, adjust oven rack to middle position and heat oven to 450 degrees. Line rimmed baking sheet with parchment paper. Transfer beef to cutting board and use paring knife to trim any large pieces of fat from surface of ribs. Blot ribs dry with paper towels and evenly space on prepared sheet. Brush all surfaces of each rib with glaze.
- Transfer sheet to oven and cook until beef registers 140 degrees, 20 to 25 minutes. Every 5 minutes, brush all sides of ribs with glaze and turn ribs so different side is touching pan. Apply 1 more coat of glaze to top of each rib and sprinkle with parsley. Serve, passing remaining glaze separately.
Notes
- For best results, do not skip the overnight chilling step as it allows the flavors to develop and makes removing the fat much easier. The ribs can be braised up to 3 days ahead.

