
The Secret is in the Start
Let me tell you about gravy. It’s not just a sauce. It’s a hug for your turkey. It all starts with those funny-looking bits, the neck and giblets. We brown them up nice. This builds the deep flavor base. My grandkids used to call them “mystery parts.” I still laugh at that.
Then we let the onion soften and get sweet. This takes a little patience. Good things need time. Why does this matter? Because this first step is where the magic happens. It turns simple things into liquid gold. What’s your favorite Thanksgiving smell? Mine is onions and thyme in the pot.
A Pot of Quiet Goodness
Next, we add the broth and water. We let it all simmer quietly on the stove. The herbs dance in the bubbles. Doesn’t that smell amazing? This is your turkey broth. You can make it two days ahead. What a relief on the big day!
Straining it is important. We want the smooth, clear broth, not the lumpy bits. We save that golden liquid. The hard work is done. Now the broth rests in the fridge. *Fun fact: this slow simmer pulls all the good gelatin from the bones. That’s what makes gravy silky later!
The Magical Roux
Here is the gravy’s heart. Butter and flour, cooked together. We call this a “roux.” You whisk and whisk until it smells like toasted nuts. It turns a beautiful honey color. This is the thickener for our gravy.
You must whisk constantly. No stopping! Why does this matter? If you stop, the flour can burn. Then your gravy tastes bitter. We don’t want that. Take your time here. It’s only four minutes. Do you like to whisk? I find it very peaceful.
Bringing It All Together
Now for the fun part. You slowly add your special broth to the roux. Whisk, whisk, whisk! Watch it turn thick and creamy. It’s like a miracle in the pan. Let it bubble for a minute. Then you can cover it and walk away.
See? The gravy is made before the turkey is even done. You just reheat it later. This saves your sanity. On Thanksgiving, the stove is very busy. Having gravy ready is a smart trick. What dish do you like to make ahead?
The Final Shine
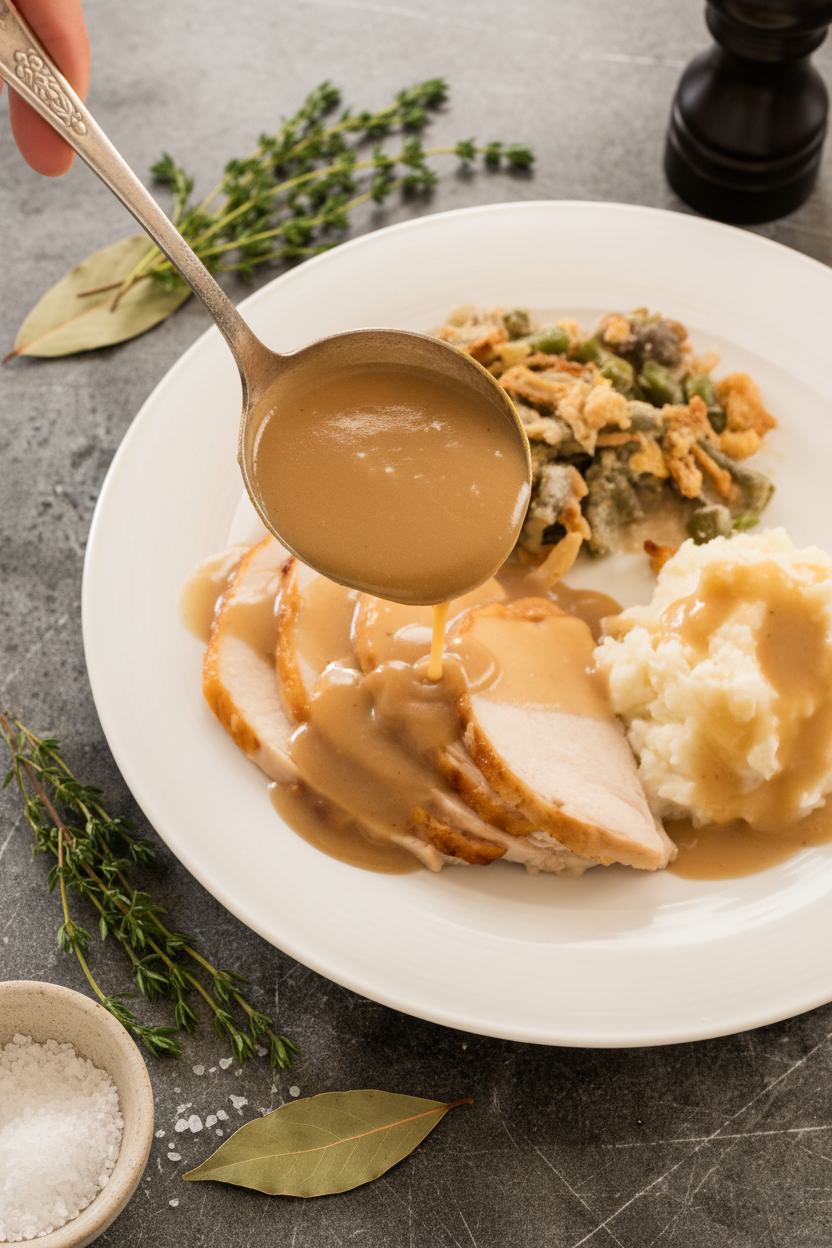
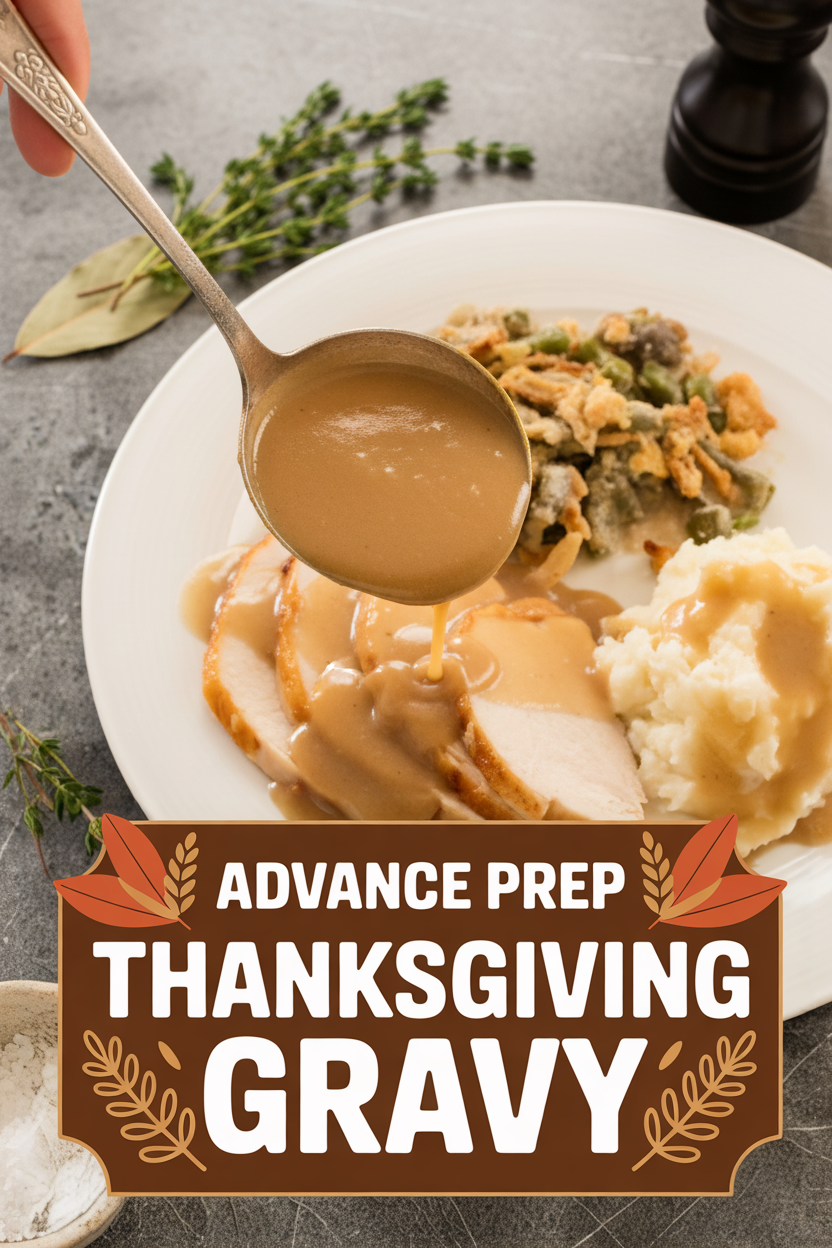
When the turkey comes out, don’t waste those pan drippings. They are flavor treasure. Pour them into a fat separator. The fat rises to the top. You pour the good juice underneath into your gravy.
Give it one last simmer. Taste it. Add a little salt and pepper. Now it’s perfect. This final step makes the gravy taste like today’s turkey, not yesterday’s broth. It ties the whole meal together. Pour it into your prettiest pitcher. You did it!
Ingredients:
| Ingredient | Amount | Notes |
|---|---|---|
| Vegetable oil | 1 tablespoon | |
| Reserved turkey neck and giblets | from turkey | minus the liver |
| Onion | 1 | chopped |
| Low-sodium chicken broth | 4 cups | |
| Water | 2 cups | |
| Fresh thyme | 4 sprigs | |
| Bay leaf | 1 | |
| Unsalted butter | 4 tablespoons | |
| All-purpose flour | 6 tablespoons |

My Make-Ahead Thanksgiving Gravy Secret
Hello, my dear. Come sit at the counter. Let’s talk gravy. I used to get so flustered on Thanksgiving day. Everything needed the stove at once. My gravy was always the last frantic thing. Then I learned this trick. You make the broth two days early. Doesn’t that sound like a relief? The big day feels so much calmer. I still laugh at that old panic. Now, we have time for a cup of tea before the guests arrive.
This recipe builds flavor slowly, like a good story. We start with the turkey neck and giblets. They are full of savory taste. (Just leave out the liver, it makes things bitter. A hard-learned tip from my mother!). We cook them low and slow with an onion. Your kitchen will smell like a cozy hug. This is the heart of your gravy. It whispers “holiday” all through the house.
Step 1: Grab your big saucepan. Heat the oil. Brown the neck and giblets for five minutes. They should look golden. Add your chopped onion. Cook until it gets soft and sweet. Now, turn the heat way down. Put the lid on. Let them whisper together for twenty minutes. This step is patience. It makes all the difference. Step 2: Turn the heat back to high. Pour in your broth and water. Use your spoon to scrape up the tasty bits from the pan bottom. Those bits are flavor gold! Bring it all to a boil. Then add the thyme and bay leaf. Let it simmer gently for half an hour. You might see foam on top. You can skim it off with a spoon. It keeps your broth clear and pretty. Step 3: Time to strain it. Place a fine-mesh strainer over a big bowl. Carefully pour your broth through. All the solids get left behind. You can toss them now. Their job is done. Let the beautiful broth cool on the counter. Then pop it in the fridge for up to two days. See? The hard part is already finished. What’s the secret to a clear broth? Share below! Step 4: On the big day, we make a roux. Melt the butter in a clean pan. Whisk in the flour. Keep whisking for about four minutes. It will turn a lovely golden color. It will smell like toasted nuts. This is your gravy’s thickening magic. Don’t walk away from it! (A hard-learned tip: a burnt roux means starting over). Step 5: Get your broth from the fridge. Warm it up a little in another pot. Now, slowly add the warm broth to your roux. Add just a little at first, whisking the whole time. This prevents lumps. Once it’s all in, let it simmer for five minutes. It will thicken up nicely. You can cover it and set it aside until the turkey is done. Step 6: Your turkey is out of the oven! Pour the pan drippings into a fat separator. The good juice goes on the bottom. Reheat your gravy. Stir in those defatted drippings. Let it bubble for two final minutes. Taste it. Add salt and pepper until it sings. Now, pour it into your prettiest gravy boat. You did it. And you’re not even sweaty. Cook Time: About 1 hour 15 minutesTotal Time: 1 hour 30 minutes (plus broth chilling)
Yield: About 6 cups
Category: Holiday, Sauce
Three Fun Twists on Classic Gravy
Once you know the basics, you can play. I love adding a little surprise. It makes the meal feel special. Here are three ideas I’ve tried over the years. My grandson loves the mushroom one. It’s so earthy and rich. Which one would you try first? Comment below!
Mushroom Magic: Swap the turkey parts for a pound of sliced mushrooms. Brown them well. They make a deep, savory gravy everyone loves. Herb Garden Fresh: Add a big handful of fresh parsley and a teaspoon of chopped rosemary with the thyme. It tastes like a spring garden. Sweet & Smoky: Stir in two tablespoons of apple cider and a tiny pinch of smoked paprika at the end. It’s a cozy, autumn hug in a cup.Serving Your Gravy Masterpiece
This gravy is the star. Let it shine. Pour it over your sliced turkey, of course. But don’t stop there. I always put extra on the table. My family drowns their mashed potatoes in it. A little pool on the stuffing is divine. For a pretty touch, garnish the gravy boat with a fresh thyme sprig.
What to drink? A crisp apple cider is perfect. It cuts through the rich meal. For the grown-ups, a glass of Pinot Noir wine pairs beautifully. It’s fruity and light. Which would you choose tonight? Now, gather everyone. The feast is ready. Pass the gravy, please.
Make-Ahead Magic for Your Gravy
This gravy is a gift to your future self. You can make the broth two days early. Just cool it and pop it in the fridge. You can even make the full gravy a day ahead.
Store it in a sealed container. Reheat it gently on the stove. Add a splash of broth if it gets too thick. I once reheated it too fast and it splattered. A slow warm-up is always best.
Doing this work early matters. It makes Thanksgiving day calm. You get to enjoy your family instead of fussing. Have you ever tried storing gravy this way? Share below!
Gravy Troubles? Let’s Fix Them Together
Is your gravy too thin? Just simmer it a bit longer. The heat will help it thicken up nicely. A lumpy gravy is no fun at all.
Whisk your broth in slowly. I remember when I poured it all in at once. What a lumpy mess! Taking your time here builds cooking confidence.
Does the gravy taste bland? Wait to season it at the very end. The turkey drippings add lots of salt. Final seasoning makes the flavor perfect. Which of these problems have you run into before?
Your Gravy Questions, Answered
Q: Can I make this gluten-free?
A: Yes! Use a gluten-free flour blend for the roux. It works just the same.
Q: How far ahead can I make it?
A: The broth keeps for two days. The finished gravy keeps for one day.
Q: I don’t have fresh thyme.
A: Use one teaspoon of dried thyme instead. It will still taste wonderful.
Q: Can I double the recipe?
A: Absolutely. Just use a bigger pot. Fun fact: Gravy freezes well for a month!
Q: Any secret tips?
A: A pinch of black pepper at the end wakes up all the flavors. Which tip will you try first?
From My Kitchen to Yours
I hope this recipe brings joy to your table. Good food is about sharing and comfort. Making gravy ahead is a little act of love.
I would love to hear about your Thanksgiving. Tell me about your family traditions. Have you tried this recipe? Share your experience in the comments. Thank you for letting me into your kitchen today.
Happy cooking!
—Grace Ellington
Advance Prep Thanksgiving Gravy
Description
Make your Thanksgiving dinner stress-free with this make-ahead gravy. Rich, flavorful, and ready when the turkey comes out of the oven.
Ingredients
Instructions
- SAUTÉ AND SOFTEN Heat oil in large saucepan over medium-high heat and brown giblets (minus the liver) and neck for 5 minutes. Add onion and cook until softened, about 3 minutes, then reduce heat to low, cover, and cook for 20 minutes.
- SIMMER AND SKIM Turn heat to high, add chicken broth and water, scrape pan bottom, and bring to boil. Reduce heat to low, add herbs, and simmer for about 30 minutes, skimming if needed.
- STRAIN AND COOL Pour broth through fine-mesh strainer. Discard solids. Broth can be made in advance and stored in the refrigerator for 2 days.
- MAKE ROUX Melt butter in large saucepan over medium heat. Whisk in flour. Cook, whisking constantly, until honey-colored and fragrant, about 4 minutes.
- ADD BROTH Bring reserved turkey broth to simmer and add to pan, a little at a time, whisking constantly. Simmer gravy, whisking occasionally, until thickened, about 5 minutes. Set aside, covered, until turkey is done. (Gravy can be refrigerated, covered, for 1 day.)
- DEFAT AND FINISH Scrape up bits in roasting pan and pour drippings into fat separator. Reheat gravy over medium heat until bubbling. Add defatted drippings. Simmer for 2 minutes until the gravy thickens. Season with salt and pepper. Serve with turkey.
Notes
- For a smoother gravy, you can use an immersion blender after adding the broth to the roux. If the gravy is too thick after reheating, thin it with a little extra warm broth.

