
The Secret is in the Back
We start with a little turkey surgery. Don’t worry, it’s easy. You cut the back away from the breast. Save that back piece. It is the key to amazing gravy. I know it seems strange to keep it. But trust your grandma on this one.
That bony back is full of flavor. We will brown it with vegetables later. It makes a broth that tastes like Thanksgiving. This matters because gravy from a box can’t compare. Homemade gravy hugs the turkey on your plate. It makes everything taste like home.
A Long, Salty Nap
Next, we give the turkey breast a salt rub. You tuck the salt right under the skin. Then the turkey rests in the fridge for a whole day. This seems like a long time. I used to think so too.
But that salt works its magic. It makes the meat juicy and tender. Every single bite will be perfect. This matters because nobody likes dry turkey. The salt brings out the turkey’s own wonderful flavor. Do you let your meat rest before cooking?
Low and Slow, Then Hot and Fast
We roast the turkey low and slow first. This cooks the meat gently. Then we crank the heat up high at the end. This makes the skin crispy and golden brown. It’s the best part, in my opinion.
My grandson Sam loves the crispy skin. He always asks for the “turkey chips.” I still laugh at that. The two temperatures give us the best of both worlds. Tender meat and crackling skin. Doesn’t that sound amazing?
Making the Magic Gravy
Remember that turkey back? Now it’s star time. We brown it until it smells wonderful. Then we simmer it with onion, carrot, and celery. Your kitchen will smell like a dream. That smell is the heart of Thanksgiving.
We use that rich broth for the gravy. You whisk it right in the pan. You get all the tasty brown bits from the turkey. Fun fact: those brown bits are called “fond.” They are little flavor treasures. What’s your favorite part of Thanksgiving dinner? Is it the gravy?
The Patient Rest
When the turkey is done, we let it rest. This is the hardest part. You must wait a full 30 minutes. The turkey needs this time. The juices settle back into the meat.
If you carve it too soon, all the juice runs out. I learned this the hard way years ago. My first turkey was a bit dry. Now I am always patient. Use this time to finish your gravy. Then carve, pour the gravy, and enjoy. What side dish are you planning to make with yours?
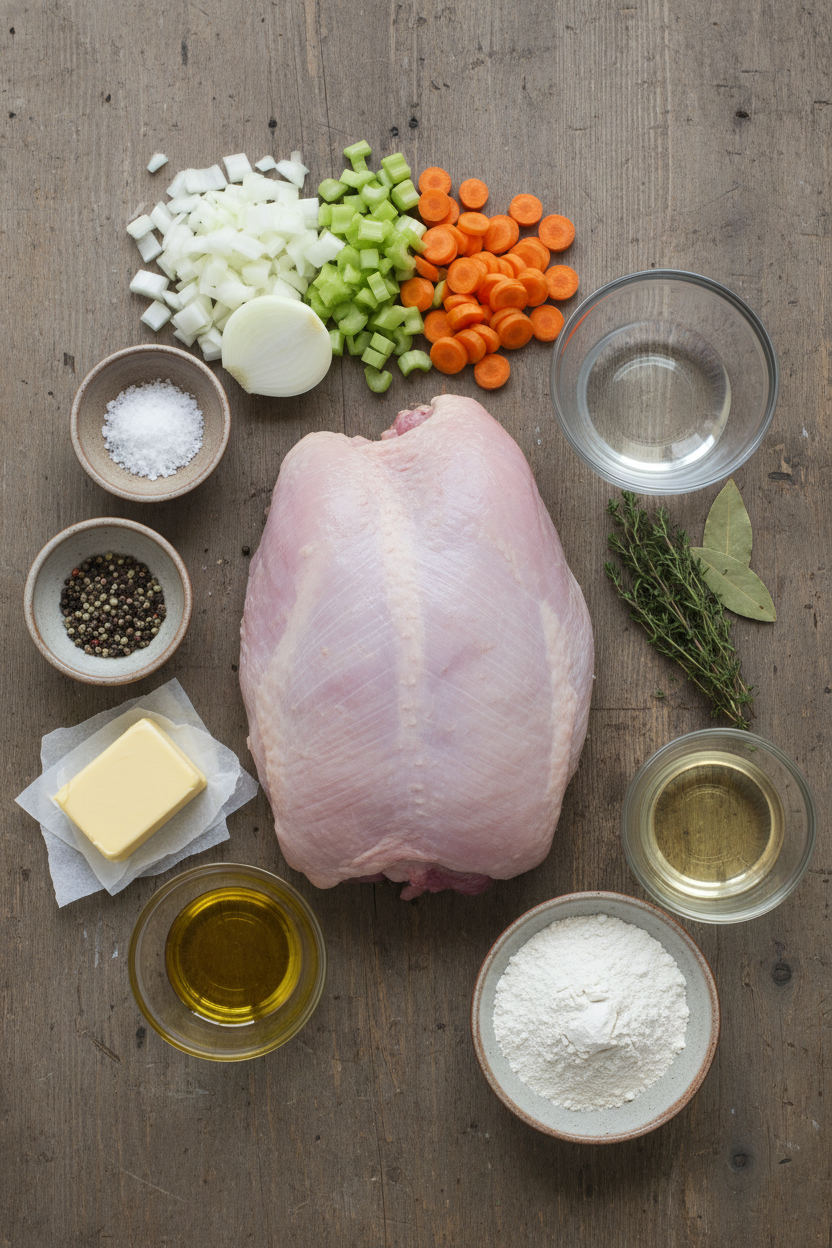
Ingredients:
| Ingredient | Amount | Notes |
|---|---|---|
| Bone-in turkey breast | 1 (5- to 7-pound) | |
| Kosher salt and pepper | To taste | |
| Unsalted butter, melted | 2 tablespoons | |
| Extra-virgin olive oil | 2 teaspoons, plus extra as needed | |
| Small onion, chopped | 1 | |
| Small carrot, chopped | 1 | |
| Small celery rib, chopped | 1 | |
| Water | 5 cups | |
| Fresh thyme sprigs | 2 | |
| Bay leaf | 1 | |
| All-purpose flour | 1/4 cup | |
| Dry white wine | 1/4 cup |
My Cozy Kitchen Turkey & The Best Gravy
Hello, my dear. Come sit. Let’s talk about Sunday dinner. Nothing beats a juicy turkey breast. It feels like a hug on a plate. I’ve made this for years. My grandkids always ask for seconds. The secret is in the skin and that rich gravy. Doesn’t that smell amazing? We take our time. Good food cannot be rushed. I still laugh at the year I forgot the salt. What a bland bird that was! Let me walk you through it.
Step 1: First, we get our turkey breast ready. Lay it skin-side down on your counter. See that line of fat? Use your kitchen shears to cut along it. This separates the back from the breast. You will hear a little pop. That’s just the joint. Save that back piece. It is gold for your gravy later. (Hard-learned tip: Sharp shears make this so much easier. Dull ones will just frustrate you.)
Step 2: Now, be gentle with the skin. Loosen it from the meat with your fingers. It’s like tucking in a blanket. Rub salt directly on the meat under the skin. Then rub some inside the cavity. This makes every bite flavorful. Place it on a plate in the fridge. Leave it uncovered for a whole day. This helps the skin get crispy later. Why do we salt it a day early? Share below!
Step 3: The next day, heat your oven. Pat the turkey very dry. A wet bird will not brown. Place it in your big skillet. Brush it all over with melted butter. This gives it a beautiful color. Roast it low and slow at first. We want it to cook through gently. Your kitchen will start to smell wonderful.
Step 4: While that roasts, make your broth. Brown that saved back piece in a pot. Add some chopped onion, carrot, and celery. Let them get a little soft. Then add water, thyme, and a bay leaf. Let it bubble softly for an hour. This makes a rich, homemade broth. Your gravy will thank you. Strain it and set it aside.
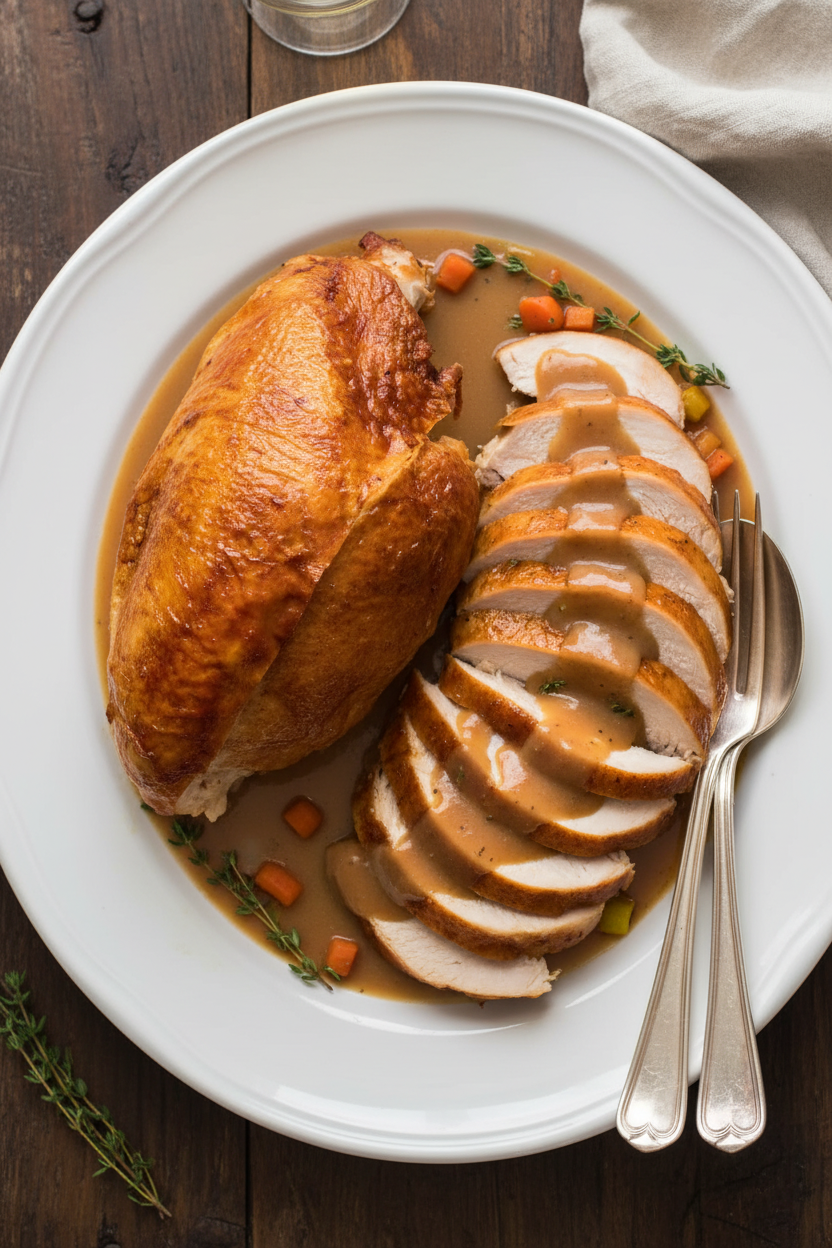
Step 5: Time for the magic finish! Take the turkey out. Crank your oven up very high. Put the turkey back in. Watch it through the window. The skin will puff up and get golden brown. Let the turkey rest on a board. It needs a long nap, about 30 minutes. This keeps all the juices inside.
Step 6: Finally, the gravy. Use the good fat from the skillet. Whisk in flour until it looks like wet sand. Pour in a little white wine. It sizzles and lifts all the tasty bits. Slowly whisk in your homemade broth. Let it bubble and thicken. Season it with a little salt and pepper. Pour it into my old gravy boat. Now, carve your turkey and gather everyone.
Cook Time: About 2 hours
Total Time: About 26 hours (includes salting time)
Yield: 6-8 servings
Category: Dinner, Holiday
Three Tasty Twists to Try
This recipe is like a favorite sweater. It is cozy as is. But sometimes, you want to add a new brooch. Here are three fun ideas. They are simple changes with big flavor.
Herb Garden Glow: Under the skin, add fresh rosemary and sage with the salt. It smells like a summer garden.
Maple & Mustard Sweet Heat: Brush the turkey with maple syrup and a spoon of mustard before the final roast. Sweet and savory.
Citrus Sunshine: Place thin lemon and orange slices under the skin. The fruit keeps the meat so moist and bright.
Which one would you try first? Comment below!
Setting Your Beautiful Table
Now, what to serve with your masterpiece? I love creamy mashed potatoes. They are the perfect gravy boat. Buttered green beans with almonds are lovely too. For color, roasted carrots or cranberry sauce. Pile the sliced turkey high on a platter. Pour the gravy into a warm pitcher.
To drink, a crisp apple cider is perfect for all. It is sweet and tart. For the grown-ups, a glass of the same white wine used in the gravy. It just feels right. The flavors dance together. Which would you choose tonight?
Keeping Your Turkey Tasty for Later
Let’s talk about leftovers. They are a gift. First, let the turkey cool completely. Then slice it off the bone. Store the meat in a sealed container. Pour a little gravy over it to keep it moist. It will last three days in the fridge.
You can freeze it, too. I pack slices in a freezer bag with gravy. It keeps for two months. To reheat, thaw it in the fridge overnight. Warm it gently in a pan with more gravy. This keeps it juicy.
I once reheated turkey in a dry oven. It was like eating sawdust! Now I always use gravy. Storing food well means no waste. It also gives you a ready-made feast. Have you ever tried storing it this way? Share below!
Simple Fixes for Common Turkey Troubles
Is your turkey skin pale? The final high-heat roast fixes that. Crank that oven to 500 degrees. It makes the skin crispy and golden brown. I remember skipping this step once. The turkey tasted great but looked sad.
Is your gravy too thin? Let it simmer a bit longer. It will thicken as it reduces. Is it lumpy? Just pour it through a strainer. Good gravy makes the whole meal sing. Getting these details right builds your kitchen confidence.
It turns a good cook into a great one. Which of these problems have you run into before?
Your Turkey Questions, Answered
Q: Can I make this gluten-free? A: Yes! Use cornstarch instead of flour for the gravy. Mix two tablespoons with cold water first.
Q: Can I make parts ahead? A: Absolutely. Make the broth a day early. It saves you time on the big day.
Q: What if I don’t have wine? A: Use more broth. Add a tiny splash of vinegar for a similar tang.
Q: Can I roast vegetables too? A: Of course. Add carrots and potatoes to the skillet. They cook in the tasty drippings.
Q: Why rest the meat for so long? A: It lets the juices settle back in. This keeps every slice wonderfully moist. Fun fact: Letting meat rest is like letting a cake cool. It just works better! Which tip will you try first?
From My Kitchen to Yours
I hope you love this recipe. It feels like a hug on a plate. The smell fills your home with love. Cooking is about sharing stories and good food.
I would love to hear about your kitchen adventures. Tell me how it went for you. Have you tried this recipe? Give your experience in the comments. Your stories are my favorite thing to read.
Happy cooking!
—Grace Ellington.
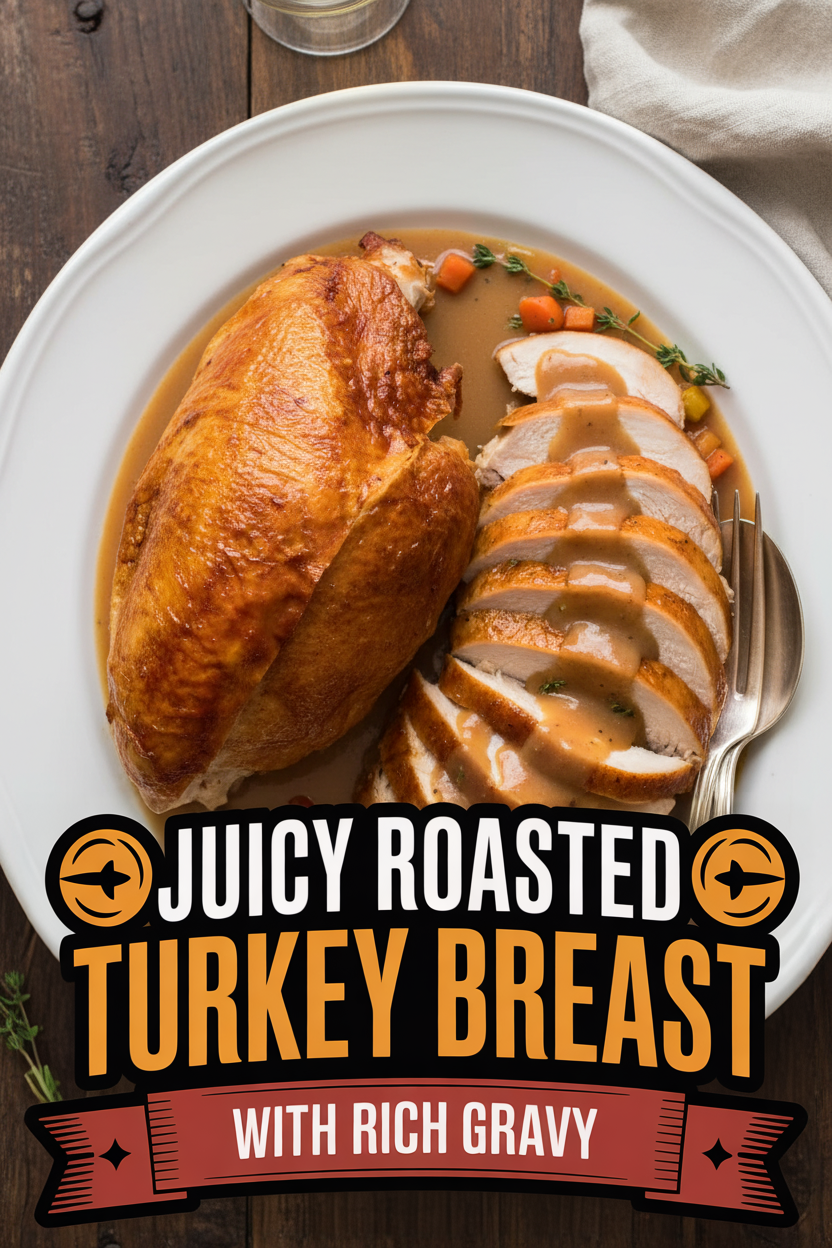
Juicy Roasted Turkey Breast with Rich Gravy
Description
Roast a perfectly juicy and flavorful bone-in turkey breast with a rich, homemade gravy made from the reserved back.
Ingredients
Instructions
- Place turkey breast on counter skin side down. Using kitchen shears, cut through ribs, following vertical line of fat where breast meets back, from tapered end of breast to wing joint. Using your hands, bend back away from breast to pop shoulder joints out of sockets. Using paring knife, cut through joints between bones to separate back from breast. Reserve back for gravy. Trim excess fat from breast.
- Place turkey breast, skin side up, on counter. Using your fingers, carefully loosen and separate turkey skin from each side of breast. Peel back skin, leaving it attached at top and center of breast. Rub 1 teaspoon salt onto each side of breast, then place skin back over meat. Rub 1 teaspoon salt onto underside of breast cavity. Place turkey on large plate and refrigerate, uncovered, for 24 hours.
- Adjust oven rack to middle position and heat oven to 325 degrees. Pat turkey dry with paper towels. Place turkey, skin side up, in 12-inch ovensafe skillet, arranging so narrow end of breast is not touching skillet. Brush melted butter evenly over turkey and sprinkle with 1 teaspoon salt. Roast until thickest part of breast registers 130 degrees, 1 to 1 1/4 hours.
- Meanwhile, heat oil in large saucepan over medium-high heat. Add reserved back, skin side down, and cook until well browned, 6 to 8 minutes. Add onion, carrot, and celery and cook, stirring occasionally, until vegetables are softened and lightly browned, about 5 minutes. Add water, thyme sprigs, and bay leaf and bring to boil. Reduce heat to medium-low and simmer for 1 hour. Strain broth through fine-mesh strainer into container. Discard solids; set aside broth (you should have about 4 cups). (Broth can be refrigerated for up to 24 hours.)
- Remove turkey from oven and increase oven temperature to 500 degrees. When oven reaches 500 degrees, return turkey to oven and roast until skin is deeply browned and thickest part of breast registers 160 degrees, 15 to 30 minutes. Using spatula, loosen turkey from skillet; transfer to carving board and let rest, uncovered, for 30 minutes.
- While turkey rests, pour off fat from skillet. (You should have about 1/4 cup; if not, add extra oil as needed to equal 1/4 cup.) Return fat to skillet and heat over medium heat until shimmering. Sprinkle flour evenly over fat and cook, whisking constantly, until flour is coated with fat and browned, about 1 minute. Add wine, whisking to scrape up any browned bits, and cook until wine has evaporated, 1 to 2 minutes. Slowly whisk in reserved broth. Increase heat to medium-high and cook, whisking occasionally, until gravy is thickened and reduced to 2 cups, about 20 minutes. Season with salt and pepper to taste. Carve turkey and serve, passing gravy separately.
Notes
- For best results, do not skip the 24-hour dry brine in the refrigerator. It seasons the meat deeply and helps the skin crisp up beautifully.

