My First Turkey Fiasco
I once forgot to take the giblets out. Can you believe it? I roasted that bird with the little paper bag still inside. I still laugh at that. The turkey was fine, but my face was so red. Everyone makes mistakes in the kitchen.
That’s why I love this oven bag method. It keeps things simple. The bag holds all the good juices close to the bird. This makes the meat so tender and juicy. It also makes the best gravy later. What’s your biggest kitchen mistake? I bet I’ve done worse!
Why We Use an Oven Bag
That little flour shake in the bag is a magic trick. It stops the bag from bursting. More importantly, it helps make the skin crispy. The steam inside keeps the meat from drying out. You get the best of both worlds.
This matters because a dry turkey is a sad turkey. No one wants that. The bag does the worrying for you. Fun fact: The first oven bags were made for camping, not for turkeys!
The Secret is in the Pan
Do not skip the vegetables in the pan. Onion, carrot, and celery. They sit under the rack with the broth. As the turkey cooks, its drippings fall onto them. Doesn’t that smell amazing? It fills the whole house.
Those veggies are not for eating. They are for flavor. You strain them out later. But they give their all to the liquid. That liquid becomes your gravy. This step matters. It turns simple juice into something special.
Making the Golden Gravy
Let’s talk about the gravy. You skim the fat off those juices. Then you cook it with flour. You cook it until it looks like peanut butter. This is the key. It takes away the raw flour taste.
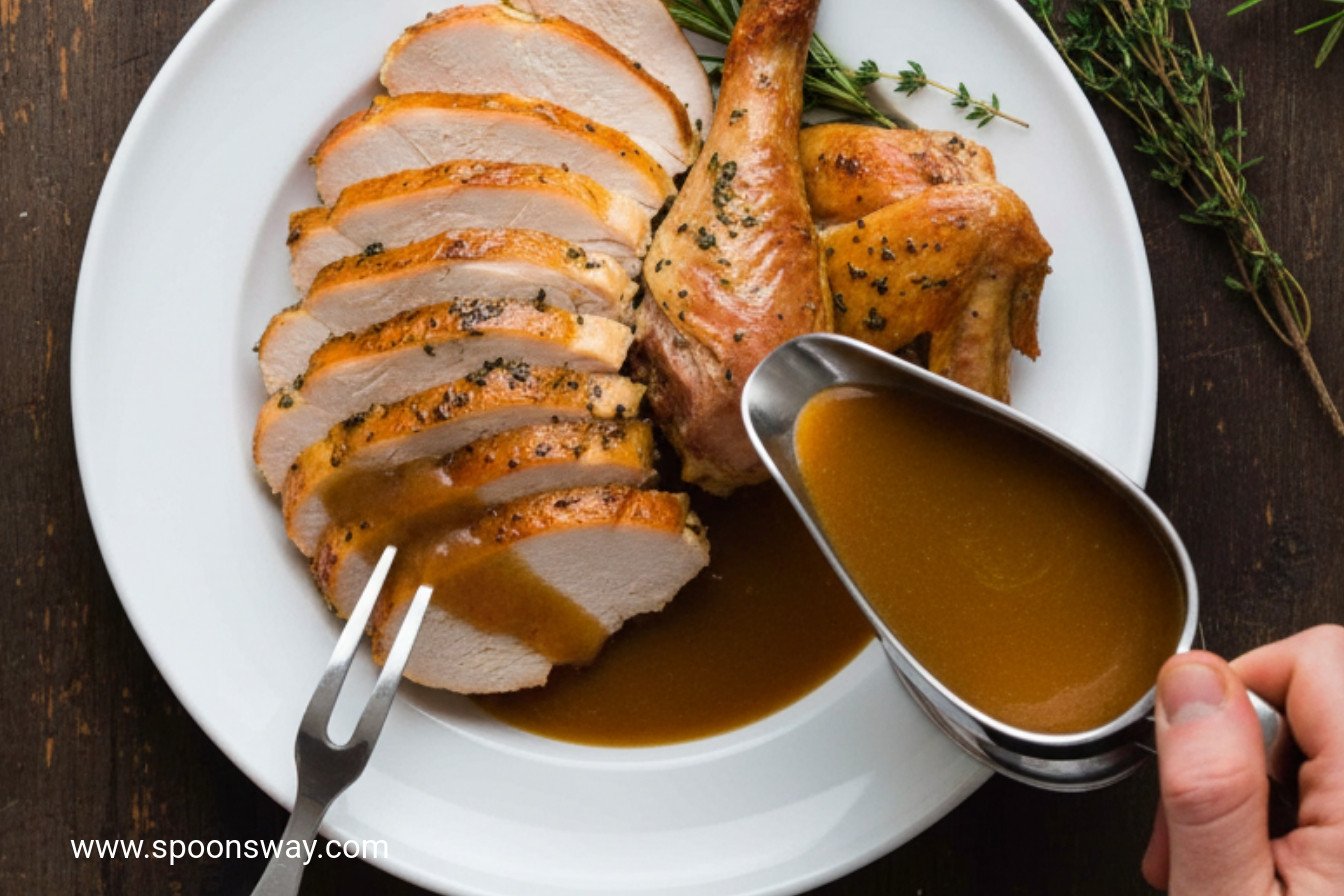
Then you slowly whisk in your defatted juices. Watch it thicken. It turns a beautiful golden brown. This gravy tastes like the whole holiday in a spoon. Do you like your gravy thick or a bit thinner? I’m a thick gravy fan myself.
The Final, Buttery Touch
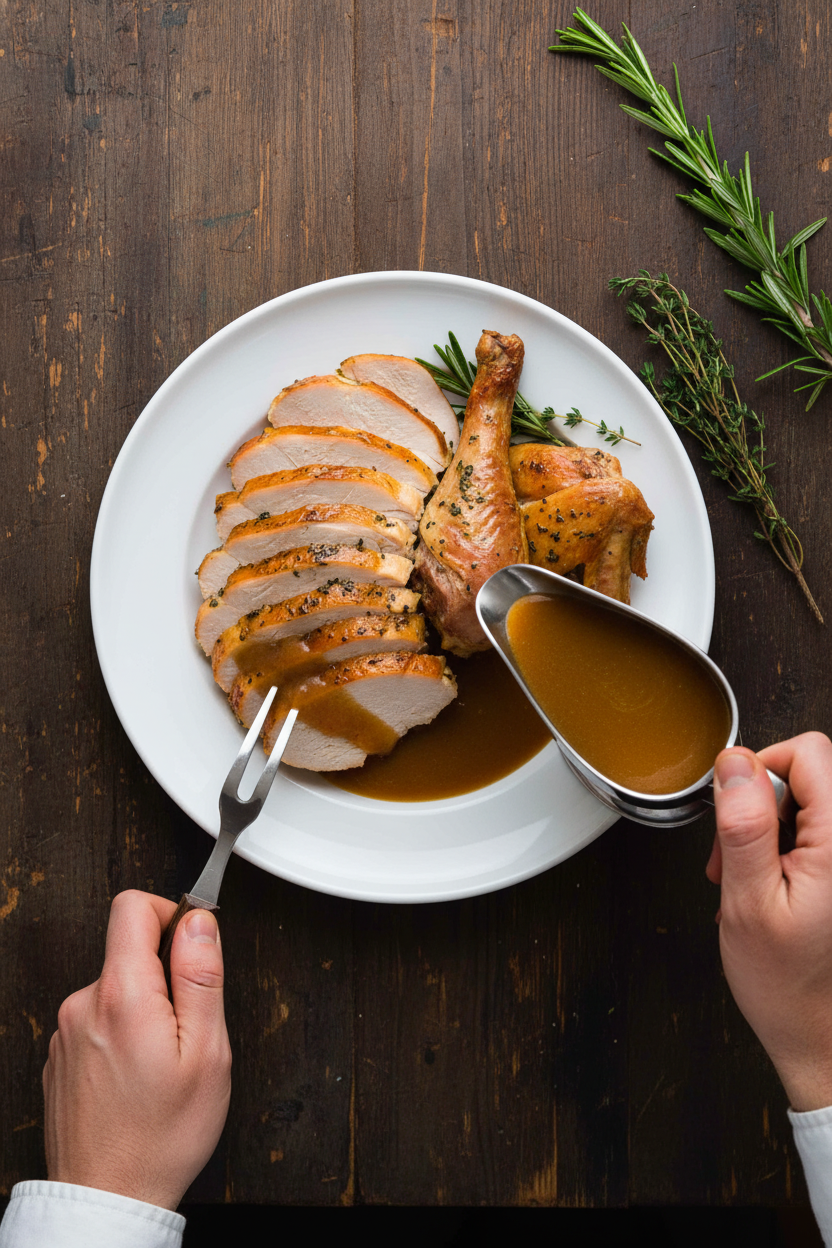
After the turkey rests, you carve it. Then comes my favorite part. You melt butter with fresh thyme and rosemary. You pour that herby butter all over the carved meat. It makes it glisten.
This last step wakes up all the flavors. It adds a fresh, fragrant finish. It makes the turkey look and taste feast-worthy. What’s your favorite herb to cook with? Mine will always be rosemary. It smells like a happy kitchen to me.
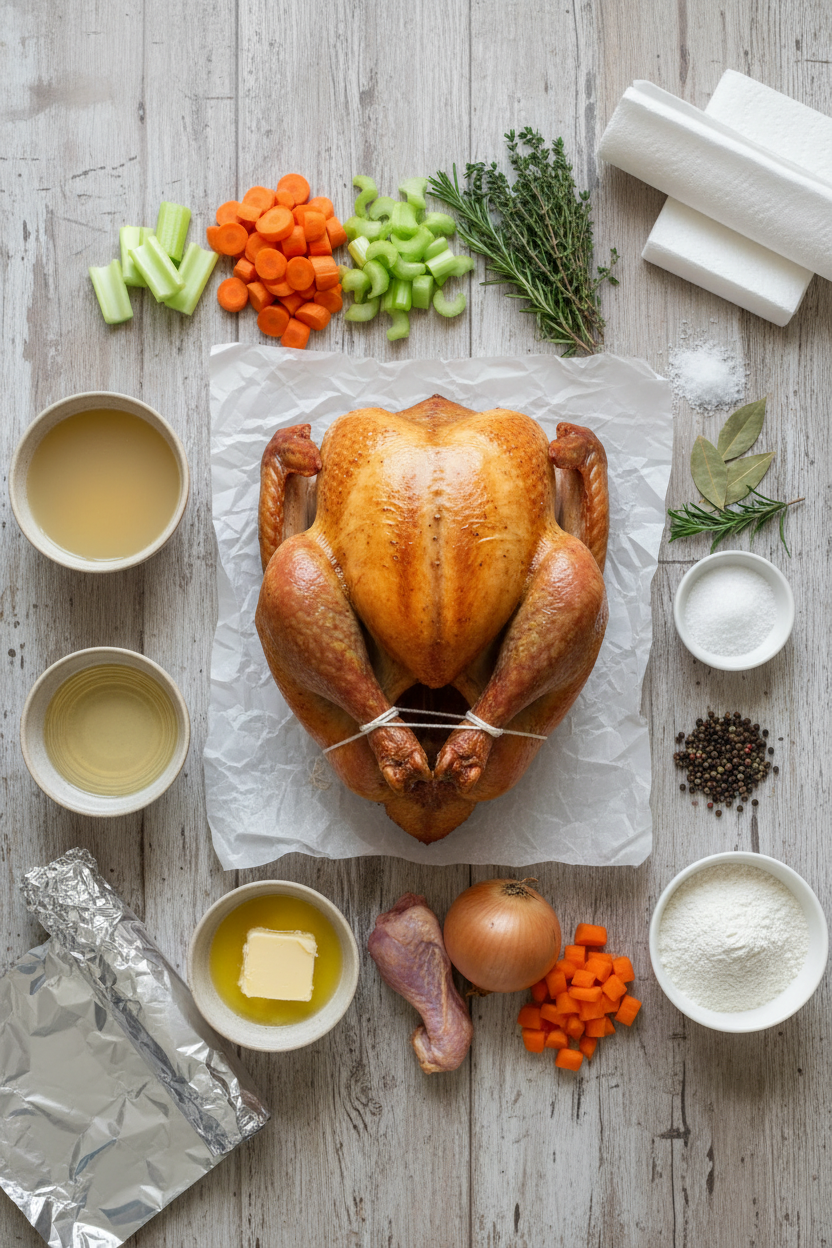
Ingredients:
| Ingredient | Amount | Notes |
|---|---|---|
| Prebrined turkey (with neck) | 18- to 20-pound | Giblets discarded |
| Onion | 1 large | Chopped |
| Carrots | 6 | Peeled and chopped |
| Celery ribs | 3 | Chopped |
| Chicken broth | 2 cups + extra as needed | |
| Dry white wine | 1 cup | |
| Fresh thyme | 3 sprigs + 1 tbsp minced | |
| Fresh rosemary | 1 sprig + 1 tbsp minced | |
| Bay leaves | 2 | |
| Unsalted butter | 10 tablespoons | |
| Kosher salt and pepper | To taste | |
| All-purpose flour | 1 tablespoon + ⅔ cup | |
| Turkey-size oven bag | 1 |
Feast Worthy Turkey with Gravy
Hello, my dear. Come sit at the counter. I want to tell you about our family turkey. It’s not just a recipe. It’s a whole day of wonderful smells and happy chatter. I’ve made this for decades. The secret is in the bag and the waiting. Doesn’t that smell amazing?
We use an oven bag. It keeps the bird so juicy and tender. My grandson calls it the turkey sleeping bag. I still laugh at that. The gravy comes from all the good bits in the pan. It’s pure gold. Let me walk you through it, step by sweet step.
Step 1: First, heat your oven to 350 degrees. Put the turkey neck and chopped veggies in your big pan. Add broth, wine, and herb sprigs. This makes a flavor bath for your bird. Set the V-rack right on top. The turkey will roast above it all. Step 2: Now, pat your turkey very dry with paper towels. This helps the skin get crispy. Tuck its wings behind its back. Tie the legs together with string. Melt a little butter and brush it all over. Give it a good sprinkle of salt and pepper. Step 3: Here’s the magic. Shake a spoon of flour in the oven bag. This stops it from bursting. Gently place the turkey inside. Tie the bag closed and put it on the rack. Cut a few small slits in the top for steam. Roast until a thermometer says it’s done. (Hard-learned tip: Trust your thermometer, not just the clock!) Step 4: Oven out! Be very careful of the hot steam. Poke holes in the bottom of the bag. Let all the wonderful juices run into the pan. Then, cut the bag away and lift the turkey out. Let it rest on a tray. Cover it with foil for a whole hour. This keeps it juicy when you carve it. Step 5: Time for gravy magic. Strain all the juices from the pan into a bowl. Press on the veggies to get every last drop. Let the fat rise to the top. Skim off the fat, but save half a cup. You’ll cook flour in this fat. It makes the gravy rich and smooth. Step 6: Whisk your defatted juices into the flour mixture. Bring it to a gentle simmer. Stir until it thickens nicely. It should coat the back of your spoon. Taste it and add salt and pepper. Now, keep it warm until you’re ready. What’s your favorite thing to pour gravy over? Share below! Step 7: Finally, carve your beautiful turkey. Melt the rest of the butter with fresh minced herbs. Pour this fragrant butter all over the carved meat. It adds one last layer of love. Serve it on your prettiest platter. Pass the gravy separately so everyone can pour their own river. Cook Time: 3–3 1/2 hoursTotal Time: About 4 1/2 hours
Yield: Serves a crowd (12-14)
Category: Dinner, Holiday
Three Tasty Twists to Try
This recipe is a wonderful classic. But sometimes, a little change is fun. Here are three ideas I love. They make the meal feel new again.
Maple & Apple: Add apple slices to the pan. Use apple cider instead of wine. Brush the turkey with maple syrup. Herb Garden: Stuff the cavity with a whole lemon and a big bunch of sage. It fills your kitchen with a fresh, sunny scent. Cozy & Smoky: Add a few teaspoons of smoked paprika to your salt and pepper rub. It gives a warm, campfire feeling.Each one tells a different story. Which one would you try first? Comment below!
Setting Your Holiday Table
Now, what to serve with your masterpiece? I always make fluffy mashed potatoes. They are the best gravy boat. Buttered green beans with almonds are lovely too. For color, add roasted sweet potatoes or cranberry sauce.
For drinks, a crisp apple cider is perfect for everyone. Grown-ups might enjoy a glass of the same white wine you cooked with. It ties the whole meal together beautifully.
The table is set. The candles are lit. Everything is ready. Which would you choose tonight?
Keeping Your Feast Fresh
Let’s talk about leftovers. They are a gift! First, carve all the meat off the bone. Store it in a shallow container in the fridge. It will keep for about four days. You can also freeze the meat for up to three months. Use freezer bags and press out the air.
For the gravy, let it cool completely first. Then pour it into a jar. It will keep in the fridge for a few days. You can freeze it, too. I once froze gravy in an ice cube tray. It was perfect for a quick single serving!
Reheat turkey in a pan with a bit of broth. This keeps it moist. Warm gravy slowly in a pot, stirring often. Batch cooking this meal saves you future stress. A ready-made meal on a busy night is a treasure. Have you ever tried storing it this way? Share below!
Turkey Troubles and Easy Fixes
Is your turkey skin not crispy? The oven bag steams it. For crisp skin, remove the bag early. Let the turkey roast uncovered for the last 30 minutes. I remember when my first turkey was pale. This trick fixed it perfectly.
Is your gravy too thin? Let it simmer a bit longer. The flour needs time to thicken the liquid. Is it too thick? Just whisk in a little more broth. Getting the gravy right matters for your confidence. A good gravy brings all the flavors together beautifully.
Worried about dry breast meat? The herb butter poured on at the end is key. It adds moisture and fantastic flavor. This step makes the turkey truly special. Which of these problems have you run into before?
Your Turkey Questions, Answered
Q: Can I make this gluten-free? A: Yes! Use a gluten-free flour blend for the gravy.
Q: What can I do ahead? A: Chop your vegetables the day before. This saves you time.
Q: No fresh herbs? A: Use one teaspoon of dried herbs for each tablespoon of fresh.
Q: Cooking a smaller bird? A: Reduce the roasting time. Check the temperature early.
Q: Any optional tips? A: Let the turkey rest a full hour. This keeps the juices inside. Fun fact: letting meat rest is called “carryover cooking.” Which tip will you try first?
From My Kitchen to Yours
I hope this recipe brings joy to your table. Cooking for people is an act of love. The mess and the work are all worth it. Seeing everyone enjoy the meal is the best part.
I would love to hear about your cooking adventure. Tell me about your family’s favorite part. Have you tried this recipe? Share your experience in the comments. Your stories make my day. Thank you for letting me share my kitchen with you.
Happy cooking!
—Grace Ellington.

Feast Worthy Turkey with Gravy
Description
Day-Of Turkey and Gravy for a Crowd. A perfectly roasted, juicy turkey with a rich, flavorful homemade gravy.
Ingredients
Instructions
- Adjust oven rack to lowest position and heat oven to 350 degrees. Place turkey neck, onion, carrots, celery, 2 cups broth, wine, thyme sprigs, rosemary sprig, and bay leaves in large roasting pan. Set V-rack in pan.
- Pat turkey dry with paper towels. Tuck wings behind back and tie legs together with kitchen twine. Microwave 2 tablespoons butter in bowl until melted, about 30 seconds. Brush turkey with melted butter and season with salt and pepper.
- Add 1 tablespoon flour to oven bag, then hold bag closed and shake to distribute flour. Place turkey in bag. Tie bag closed with kitchen twine or included bag tie. Place turkey in V-rack and cut four 1-inch slits in top of bag to allow steam to escape. Roast until breasts register 160 degrees and thighs register 175 degrees, 2 3/4 to 3 1/4 hours.
- Remove pan from oven. Using paring knife, poke holes in underside of bag to release liquid into pan. (Be careful of escaping steam.) Using kitchen shears, cut bag around perimeter of turkey and remove top of bag. Holding tied end, pull bottom portion of bag from underneath turkey, using tongs to tilt turkey as needed. Discard bag. Transfer V-rack with turkey to rimmed baking sheet, tent with aluminum foil, and let rest for 1 hour.
- Using wooden spoon, scrape up any browned bits from bottom of pan. Discard turkey neck. Strain contents of pan through fine-mesh strainer set over large bowl. Using spoon, press on vegetables to extract as much liquid as possible; discard vegetables. Let juices sit to allow fat to rise to top, about 5 minutes. Using ladle, skim fat from top of juices and reserve 1/2 cup; discard remaining fat.
- If necessary, add enough extra broth to defatted juices to measure 6 cups. Combine reserved fat and remaining 2/3 cup flour in medium saucepan and cook over medium heat until mixture is color of peanut butter, about 10 minutes, stirring occasionally. Slowly whisk in defatted juices and bring to simmer. Cook until gravy is slightly thickened and coats back of spoon, about 5 minutes. Season with salt and pepper to taste. Cover and keep warm.
- Carve turkey and transfer to serving platter. Microwave remaining 8 tablespoons butter with minced thyme, minced rosemary, 3/4 teaspoon salt, and 1/4 teaspoon pepper until melted, about 1 minute. Pour herb butter over turkey. Serve, passing gravy separately.
Notes
- Ensure your turkey is fully thawed before cooking. Letting the turkey rest for a full hour is crucial for juicy meat. The gravy can be made ahead and reheated gently.

