
The Secret is in the Mayo
I know, I know. Mayo on a turkey? It sounds strange. But trust your grandma Grace. This is my favorite trick. The mayo makes a magic coat. It keeps every single bit of moisture locked inside.
My grandson made a face the first time he saw me do this. He laughed and said, “Grandma, that’s for sandwiches!” But he didn’t laugh when he took a bite. His eyes got wide. He said it was the juiciest turkey ever. I still smile at that memory.
Why the Rest is So Important
After the turkey comes out of the oven, you must let it rest. This matters so much. If you carve it right away, all the good juices will run out onto the cutting board. Your turkey will be dry.
Letting it sit for 30 minutes is hard. It smells so amazing! But be patient. The turkey is still working inside. The juices settle back into the meat. This waiting time is what makes it super-moist. What’s the hardest part of dinner for you to wait for?
A Little Story About Gravy
Gravy used to scare me. My first one was lumpy. It was a sad, pale brown. Then my friend Martha taught me this way. You cook the vegetables until they are very brown. That color makes your gravy beautiful.
You stir in the flour and let it cook for a minute. This gets rid of the raw flour taste. Fun fact: This step is called making a “roux.” It is the heart of your gravy. It makes it rich and smooth. Do you have a food that used to scare you to make?
The Flavor in Every Bite
We use fresh herbs if we can. Rosemary and thyme smell like a sunny garden. Rubbing the spices on first lets the flavor sink in. This matters because it seasons the meat, not just the skin.
The paprika isn’t for heat. It gives the skin a lovely, warm color. When you pull it from the oven, the skin will be golden and crisp. The meat underneath will be tender and full of herby goodness. Doesn’t that sound perfect?
Your Turn in the Kitchen
This recipe has a few steps. But none of them are hard. Read it through once before you start. That always helps me. The biggest job is just being patient with the roasting time.
I love that final brush of mayo mixture. It makes the skin extra crispy. What part of cooking a big meal do you enjoy the most? Is it the planning, the cooking, or the eating with everyone? For me, it’s seeing everyone happy at the table. That is the best part of all.
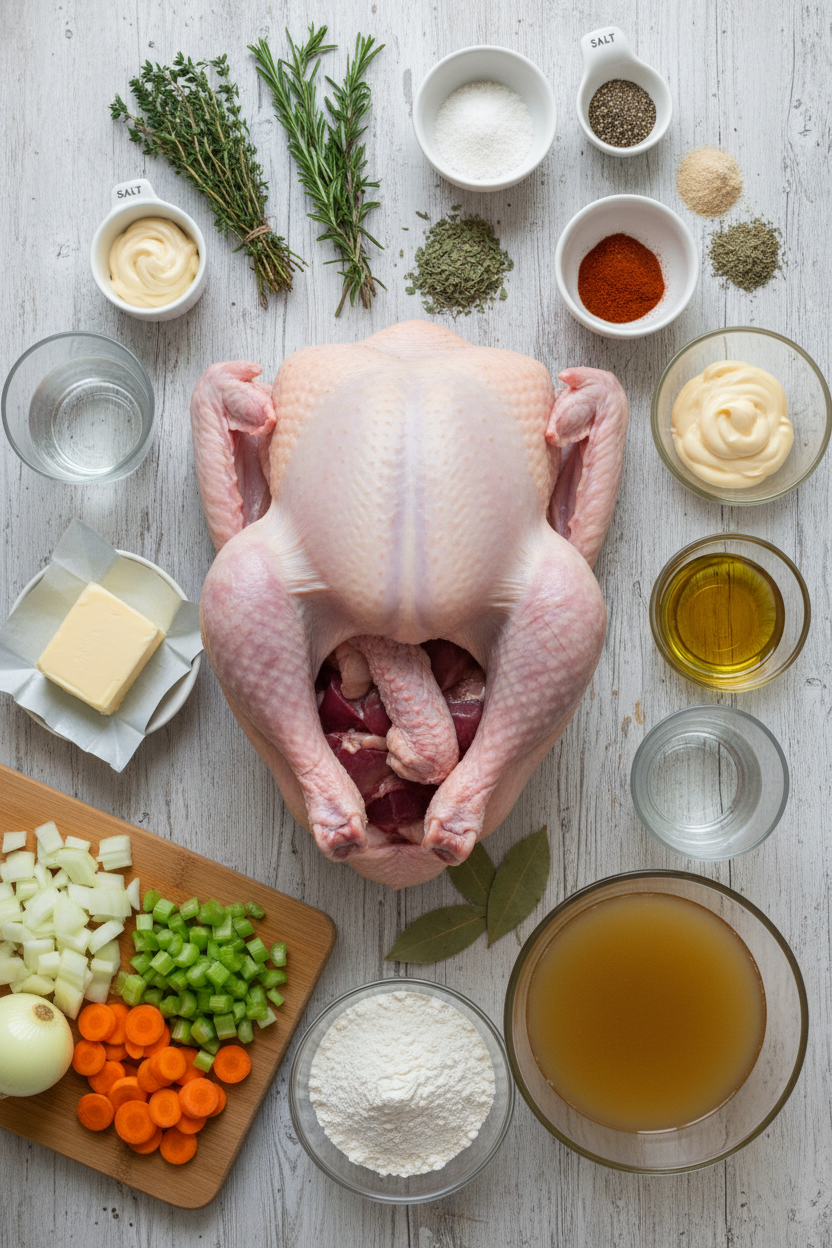
Ingredients:
| Ingredient | Amount | Notes |
|---|---|---|
| turkey, neck and giblets removed | 1 (12- to 14-pound) | reserved for another use |
| minced fresh thyme | 1 tablespoon | for turkey rub |
| minced fresh rosemary | 1 tablespoon | for turkey rub |
| dried sage | 2 teaspoons | for turkey rub |
| salt | 1 ½ teaspoons | for turkey rub |
| pepper | 1 teaspoon | for turkey rub |
| garlic powder | 1 teaspoon | for turkey rub |
| paprika | 1 teaspoon | for turkey rub |
| mayonnaise | ½ cup | for basting mixture |
| olive oil | 3 tablespoons | for basting mixture |
| cider vinegar | 2 tablespoons | for basting mixture |
| water | 2 cups | for roasting pan |
| unsalted butter | 4 tablespoons | for gravy |
| onion, chopped | 1 | for gravy |
| carrot, peeled and chopped | 1 | for gravy |
| celery rib, chopped | 1 | for gravy |
| all-purpose flour | 6 tablespoons | for gravy |
| water | 3 ½ cups | for gravy (divided) |
| low-sodium chicken broth | 3 cups | for gravy |
| bay leaf | 1 | for gravy |
| minced fresh thyme | ½ teaspoon | for gravy |
| Salt and pepper | to taste, for gravy |
The Ultimate Juicy Roast Turkey
Hello, my dear. Come sit at the table. Let’s talk turkey. A good roast turkey is all about memories. I remember my first one. It was drier than a desert! I still laugh at that. But I learned the secret. It’s all in the mayo and the slow roast. Doesn’t that smell amazing already? Let me walk you through it, step-by-step. You’ll have the juiciest bird on the block.
Step 1: Prep the Bird
Get your turkey ready. Dry it inside and out with paper towels. This helps the skin get crispy later. Tuck its wings under like it’s relaxing. Use a skewer to hold the legs together. It keeps the breast nice and covered. (My hard-learned tip: Pat it dry really well. A wet turkey steams instead of roasts!)
Step 2: The Magic Paste
Mix your herbs and spices in a bowl. Rub some all over the turkey. Let it sit for an hour. This is like a flavor nap. Then, mix the rest with mayo, oil, and vinegar. This paste is magic. It makes the skin golden and keeps the meat so moist.
Step 3: Slow & Steady Roast
Heat your oven to 325 degrees. Brush half that mayo mix on the turkey. Cover the breast with foil. This protects it. Pour water in the pan below. It creates steam. Roast it low and slow for a few hours. Why do we add water to the pan? Share below!
Step 4: Gravy Base
Start your gravy now. Melt butter in a pot. Cook chopped onion, carrot, and celery until brown. Stir in flour, then slowly add water and broth. Let it simmer with a bay leaf. It will get very thick. That’s perfect. Just set it aside. The flavors will marry beautifully.
Step 5: Crispy Finish & Rest
Crank the oven up to 450 degrees. Remove the foil shield. Brush on the rest of the mayo mix. Roast until the skin is gorgeous and crispy. Let the turkey rest for a full 30 minutes. This lets the juices settle back in. Trust me, don’t skip the rest!
Step 6: Final Gravy & Serve
Finish your gravy. Use all those tasty brown bits from the pan. Pour everything into a fat separator. Add the good juices to your waiting gravy. Simmer it until it’s just right. Strain it for a silky-smooth finish. Season with a little love. Now, carve and serve!
| Cook Time | 3–4 hours |
| Total Time | 4 hours 45 minutes (plus resting) |
| Yield | 10–12 servings |
| Category | Dinner, Holiday |
Three Tasty Twists on Tradition
Once you master the basic bird, try a little twist. It’s fun to play with flavors. Here are three ideas I love. They make the meal feel new again. My grandson adores the lemon-herb version. It’s so bright and fresh.
- Lemon-Herb Zing: Add the zest of two lemons to your spice rub. Slide thin lemon slices under the skin before roasting.
- Maple-Spice Glaze: Swap the mayo glaze for a mix of maple syrup, Dijon mustard, and a pinch of cinnamon for the last roast.
- Garlic Butter Dream: Mix softened butter with five minced garlic cloves. Rub it under the skin and over the turkey instead of the mayo paste.
Which one would you try first? Comment below!
Serving Your Masterpiece
Presentation is part of the joy. I love a big platter. Place your carved turkey right in the center. Scatter some fresh rosemary and thyme around it. It looks so festive. Pour the gravy into a nice warm pitcher. Let everyone help themselves.
For sides, you can’t go wrong. Creamy mashed potatoes are a must. Buttery green beans with almonds are lovely. A tart cranberry sauce cuts through the richness. It’s all about balance on the plate.
What to drink? For the grown-ups, a glass of chilled Chardonnay pairs beautifully. For everyone, sparkling apple cider with a cinnamon stick feels special. It clinks so nicely. Which would you choose tonight?

Keeping Your Turkey Tasty Later
Let’s talk about leftovers. They are the best part. First, let the turkey cool completely. Then carve the meat off the bones. Store the meat in a sealed container in the fridge. It will stay good for about four days.
You can freeze it for longer. I pack slices in a freezer bag. I squeeze out all the air. This keeps it from getting freezer burn. It will be good for two months. Thaw it in the fridge overnight.
To reheat, be gentle. Place slices in a baking dish. Add a little broth or gravy on top. Cover it with foil. Warm it in a 325-degree oven until hot. This keeps it moist. I once reheated it in the microwave. It got rubbery. I learned my lesson.
Batch cooking matters. It gives you easy meals for busy days. A big turkey can make sandwiches, soups, and casseroles. It is a gift to your future self. Have you ever tried storing it this way? Share below!
Turkey Troubles and Easy Fixes
Is your turkey dry? The breast cooks faster than the legs. My fix is the foil tent. Cover the breast for most of the cook time. This slows it down. I remember when my first turkey was dry. I was so sad. Now I always use foil.
Is the skin pale and soft? Crank up the heat at the end. Take the foil off. Let it roast at high heat. This makes the skin crispy and golden. It also adds beautiful color.
Is your gravy too thin or lumpy? For thin gravy, let it simmer longer. It will thicken as water evaporates. For lumps, just strain it. A fine mesh strainer catches all the lumps. This gives you smooth, perfect gravy.
Fixing these issues builds your confidence. You learn how food behaves. It also makes your meal taste so much better. Good flavor comes from good technique. Which of these problems have you run into before?
Your Turkey Questions, Answered
Q: Can I make this gluten-free? A: Yes. For the gravy, use a gluten-free flour blend. Cornstarch works too.
Q: Can I make anything ahead? A: Absolutely. Make the gravy base a day early. Chop your vegetables for it. Store them in the fridge.
Q: I don’t have fresh herbs. A: That’s fine. Use dried. Use one-third the amount. So, one teaspoon dried instead of one tablespoon fresh.
Q: What if my turkey is bigger? A: Just add more cook time. Plan for about 13 minutes per pound. Always check with a thermometer.
Q: Any optional tips? A: Let the turkey rest after cooking. This lets the juices settle back in. Fun fact: Resting is what makes it juicy when you carve it. Which tip will you try first?
From My Kitchen to Yours
I hope you love this recipe. It has served my family for years. The table is where we share stories and laughs. Good food brings everyone together.
I would love to see your creation. Did you get a crispy, golden skin? Was your family happy? Share your success with me.
Have you tried this recipe? Tag us on Pinterest! You can find me at @GraceCooks. I always look at your photos. They make my day.
Happy cooking!
—Grace Ellington.

The Ultimate Juicy Roast Turkey
Description
Super-Moist Roast Turkey. This ultimate recipe ensures a juicy, flavorful turkey with a rich, homemade gravy.
Ingredients
TURKEY:
GRAVY:
Instructions
- Set wire rack inside rimmed baking sheet. Dry turkey thoroughly inside and out with paper towels. Tuck wings under turkey and transfer to prepared wire rack. Pull legs upward and slide 12-inch skewer under bone of fattest part of drumstick across to other drumstick so skewer connects both and legs cover small point of breast.
- Combine thyme, rosemary, sage, salt, pepper, garlic powder, and paprika in bowl. Rub 2 tablespoons spice mixture evenly over surface of turkey and let sit at room temperature for 1 hour. Add mayonnaise, oil, and vinegar to remaining spice mixture and whisk to combine. Divide mayonnaise mixture in half.
- Adjust oven rack to lowest position and heat oven to 325 degrees. Brush half of mayonnaise mixture evenly over surface of turkey. Place 18 by 18-inch sheet of heavy-duty aluminum foil diagonally over breast, tucking point of foil inside cavity and over tops of legs. Transfer turkey to oven and pour water into bottom of baking sheet. Roast until thighs/drumsticks register 165 degrees, 2 1/2 to 3 hours. Remove turkey from oven and increase oven temperature to 450 degrees.
- While turkey cooks, melt butter in large saucepan over medium heat. Add onion, carrot, and celery and cook until well browned, 7 to 9 minutes. Stir in flour and cook for 1 minute. Slowly whisk in 2 cups water, broth, bay leaf, and thyme. Bring to simmer, reduce heat to low, and cook, covered, stirring occasionally, until mixture has thickened, about 20 minutes (gravy will be very thick). Remove from heat and set aside.
- Once oven has come to temperature, remove foil and brush remaining half of mayonnaise mixture evenly over turkey. Return turkey to oven and roast until breasts register 160 degrees and thighs/drumsticks register 175 degrees, 25 to 35 minutes. Tip juices from turkey cavity into baking sheet and transfer turkey to carving board. Let rest, uncovered, for 30 minutes.
- Remove wire rack from baking sheet. Pour remaining 1 1/2 cups water into baking sheet and scrape up any browned bits. Carefully pour pan juices into fat separator and let sit for 5 minutes. Pour defatted pan juices into gravy and bring to simmer over medium heat. Simmer until gravy is thickened and reduced to 3 cups, 15 to 20 minutes. Strain gravy through fine-mesh strainer into clean saucepan; discard solids. Rewarm gravy gently over medium-low heat. Season with salt and pepper to taste. Carve turkey and serve with gravy.
Notes
- Letting the turkey rest after roasting is crucial for juicy meat. For food safety, ensure the turkey reaches the correct internal temperatures as stated.

